


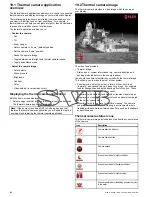


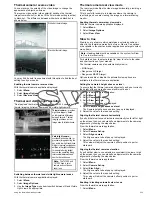


Thermal camera reverse video
You can reverse the polarity of the video image to change the
appearance of objects on-screen.
The reverse video option (video polarity) switches the thermal
image from white-hot (or red-hot if the color mode setting is active)
to black-hot. The difference between white-hot and black-hot is
shown below:
White-hot thermal image.
Black-hot thermal image.
You may find it useful to experiment with this option to find the best
setting to suit your needs.
Enabling thermal camera reverse video
With the thermal camera application displayed:
1. Select
Menu
.
2. Select
Image Options
.
3. Select
Reverse Video
.
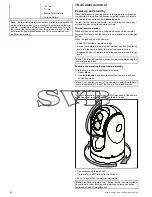
Thermal and visible-light operation
“Dual payload” thermal cameras are equipped with 2 cameras — a
thermal imaging (infrared) camera and a visible-light camera.
Thermal camera
— provides
night-time imagery, based
on temperature differences
between objects. Thermal
imaging produces a clear
image even in total darkness.
Visible-light camera
—
provides black and white (or
greyscale) imagery during the
day and in low-light conditions.
Helps to improve navigational
abilities in low-light conditions;
for example during twilight
hours when operating along
intercoastal waterways and
near harbor entrances.
Note:
The T470SC and
T473SC have a color
camera and continuous
zoom lens.
Switching between thermal and visible-light camera lenses
With the thermal camera application displayed:
1. Select
Menu
.
2. Select
Image Options
.
3. Use the
Image Type
menu item to switch between IR and Visible
Light views, as appropriate.
Thermal camera rear view mode
The rear view mode flips the video image horizontally, providing a
“mirror image”.
This is useful for example in instances where the camera is
rear-facing and you are viewing the image on a forward-facing
monitor.
Enabling thermal camera rear view mode
With the thermal camera application displayed:
1. Select
Menu
.
2. Select
Image Options
.
3. Select
Rear View
.
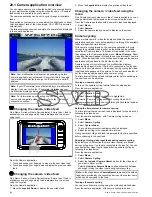
Slew to Cue
Slew to cue is a feature which maintains a selected position or
object in the thermal cameras field of view. Slew to Cue options
are available in the chart and radar applications as target context
menu items.
Note:
Heading data must be available on the system for Slew
to Cue to work correctly.
For details on how to select a target to ‘slew to’ refer to the radar
and chart sections of your manual.
The thermal camera can also automatically slew to:
• MOB target
• Dangerous AIS target
• Dangerous MARPA target
Options to enable or disable the automatic slew options are
available in the thermal camera application
Setting the camera's height above sea level
To ensure that the thermal camera’s alignment can be set correctly
the height of the camera above sea level must be set.
From the thermal camera application:
1. Select
Menu
.
2. Select
Camera Set-up
.
3. Select
Slew Settings
.
The Slew settings page is displayed.
4. Select
Camera height above sea level
.
The Camera height above sea level pop up is displayed.
5. Adjust the value to the required setting.
Aligning the thermal camera horizontally
If you find that slew to cue objects are consistently too far left or right
on the screen then you can make fine adjustments to the cameras
alignment by following the steps below.
From the thermal camera application:
1. Select
Menu
.
2. Select
Camera Set-up
.
3. Select
Align camera
.
The Align camera to boat pop up is displayed.
4. Adjust the value to the required setting.
This value will adjust the camera’s offset position to port or
starboard.
Aligning the thermal cameras elevation
If you find that slew to cue objects are consistently too low or high
on the screen then you can make fine adjustments to the cameras
alignment by following the steps below.
From the thermal camera application:
1. Select
Menu
.
2. Select
Camera Set-up
.
3. Select
Elev Align:
.
The Align camera to boat pop up is displayed.
4. Adjust the value to the required setting.
This value will adjust the camera’s offset position to port or
starboard.
Enabling / disabling automatic slew to cue
From the thermal camera application:
1. Select
Menu
.
Using the thermal camera application
225
Summary of Contents for A65
Page 2: ......
Page 4: ......
Page 8: ...8 New a Series New c Series New e Series...
Page 12: ...12 New a Series New c Series New e Series...
Page 20: ...20 New a Series New c Series New e Series...
Page 36: ...36 New a Series New c Series New e Series...
Page 64: ...64 New a Series New c Series New e Series...
Page 86: ...86 New a Series New c Series New e Series...
Page 96: ...96 New a Series New c Series New e Series...
Page 106: ...106 New a Series New c Series New e Series...
Page 138: ...138 New a Series New c Series New e Series...
Page 192: ...192 New a Series New c Series New e Series...
Page 202: ...202 New a Series New c Series New e Series...
Page 206: ...206 New a Series New c Series New e Series...
Page 218: ...218 New a Series New c Series New e Series...
Page 228: ...228 New a Series New c Series New e Series...
Page 232: ...232 New a Series New c Series New e Series...
Page 242: ...242 New a Series New c Series New e Series...
Page 248: ...248 New a Series New c Series New e Series...
Page 286: ...286 New a Series New c Series New e Series...
Page 300: ...300 New a Series New c Series New e Series...
Page 307: ......
Page 308: ...www raymarine com...


