


• The target echo is weak. The target is very close to land, buoys
or other large targets.
• The target or your own vessel is making rapid manoeuvres.
• Choppy sea state conditions exist and the target is buried in
excessive sea clutter or in deep swells.
• Choppy sea state conditions exist yielding poor stability; own
vessel’s heading data is very unstable.
• Inadequate heading data.
Symptoms of such conditions include:
• target acquisition is difficult and the MARPA vectors are unstable;
• the symbol wanders away from the target, locks-on to another
target, or changes to a lost symbol target.
In these circumstances, target acquisition and tracking may need to
be re-initiated and in some cases might be impossible to maintain.
Better quality heading data might improve performance in these
circumstances.
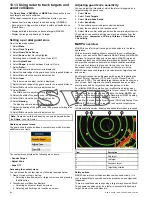
How a MARPA risk is assessed
Each target is monitored to ascertain whether it will be within a
certain distance from your vessel within a certain time. If so, the
target is designated as dangerous, and an audible warning is
sounded and a warning displayed. The target symbol changes to
the dangerous target symbol and flashes to indicate that it is a
dangerous target. Acknowledging the alarm will remove the warning.
If a target is lost, either because the MARPA software has lost
contact with it, or because it has moved out of range, an audible
alarm is sounded and an on-screen warning appears. The on-screen
symbol will change to the target lost symbol. Acknowledging the
warning will silence the alarm and remove the on-screen warning
and the target lost symbol.
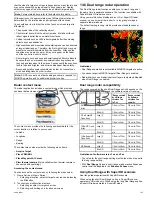
Effective range for MARPA targets
MARPA target acquisition is only available at radar range scales of
up to 12 nm, although tracking continues at all ranges.
If you change to a smaller range scale, targets may be beyond the
range of your radar scanner and will be lost. In such cases, an
on-screen warning indicates that the target is off-screen.
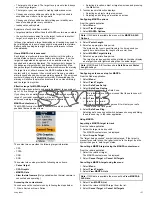
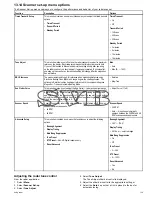
MARPA context menu
The MARPA function includes a context menu which provides
positional data and menu items.
The context menu provides the following target information:
• CPA
• TCPA
• COG
• SOG
The context menu also provide the following menu items:
•
Cancel target
•
CPA Graphic
•
MARPA Data
•
Slew thermal camera
(Only available when thermal camera is
connected and operating.)
Accessing the context menu
You can access the context menu by following the steps below.
1. New e Series or New c Series:
i.
Selecting a location, object or target on-screen and pressing
the
Ok
button.
2. Touchscreen multifunction displays:
i.
Selecting an object or target on-screen.
ii. Selecting and holding on a location on-screen.
Configuring MARPA options
From the radar application:
1. Select
Menu
.
2. Select
Track Targets
.
3. Select
MARPA Options
.
Note:
If AIS data is available the menu will be
MARPA & AIS
Options
.
4. Select
Vector Length
.
5. Select an appropriate time period.
The distance that your vessel travels in the time period you
specify here determines the length of the vector lines.
6. Select
MARPA Target History
.
7. Select an appropriate time period.
The target's previous position will be plotted on the radar display
as a target icon with lighter shading than the actual target.
Note:
MARPA and AIS functions share
Safe Zone
and
Vector
Length
settings.
Configuring safe zone set up for MARPA
From the Radar application:
1. Select
Menu
.
2. Select
Track Targets
.
3. Select
Safe Zone Set-up
.
4. Select
Safe Zone Radius
.
i.
Select a distance for the Safe Zone.
This is the distance from your vessel that the safe zone will
be set up.
5. Select
Time to Safe Zone
.
i.
Select a time period.
A target is considered dangerous if it will enter your safe
zone within this time period.
6. Select
Safe Zone Ring
.
Selecting safe zone ring will switch between showing and hiding
the safe zone ring in the radar application.
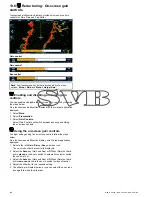
Using MARPA
Acquiring a MARPA target to track
From the radar application:
1. Select the target to be acquired.
The MARPA context menu is displayed.
2. Select
Acquire Target
.
The “target being acquired” symbol is displayed. If the target is
present for several scans, the radar locks-on to the target, and the
symbol changes to “safe target” status.
Cancelling a MARPA target using the MARPA context menu
From the radar application:
1. Select the relevant target.
The MARPA context menu is displayed.
2. Select
Cancel Target
or
Cancel All Targets
.
Cancelling a MARPA target using the menu
1. Select
Menu
.
2. Select
Track Targets
.
3. Select
View MARPA Lists
.
Note:
If AIS data is available the menu will be
View MARPA &
AIS Lists
.
4. Select View
MARPA List
.
5. Select the relevant MARPA target from the list.
6. Select
Cancel Target
or
Cancel All Targets
.
Using radar
157
Summary of Contents for A65
Page 2: ......
Page 4: ......
Page 8: ...8 New a Series New c Series New e Series...
Page 12: ...12 New a Series New c Series New e Series...
Page 20: ...20 New a Series New c Series New e Series...
Page 36: ...36 New a Series New c Series New e Series...
Page 64: ...64 New a Series New c Series New e Series...
Page 86: ...86 New a Series New c Series New e Series...
Page 96: ...96 New a Series New c Series New e Series...
Page 106: ...106 New a Series New c Series New e Series...
Page 138: ...138 New a Series New c Series New e Series...
Page 192: ...192 New a Series New c Series New e Series...
Page 202: ...202 New a Series New c Series New e Series...
Page 206: ...206 New a Series New c Series New e Series...
Page 218: ...218 New a Series New c Series New e Series...
Page 228: ...228 New a Series New c Series New e Series...
Page 232: ...232 New a Series New c Series New e Series...
Page 242: ...242 New a Series New c Series New e Series...
Page 248: ...248 New a Series New c Series New e Series...
Page 286: ...286 New a Series New c Series New e Series...
Page 300: ...300 New a Series New c Series New e Series...
Page 307: ......
Page 308: ...www raymarine com...


