


Screen item
Description
1
Back
• Touchscreen — Select the on-screen
Back
icon to go
back to the previous menu.
• Non–touchscreen — Use the
Back
button to go back to
the previous menu.
2
Menu item
• Touchscreen — Momentarily touching a menu item
highlights and automatically selects the item. To scroll a
menu, touch a menu item and hold your finger down on
the item while dragging your finger up or down
• Non–touchscreen — Use the
Rotary control
to
highlight an item, and the
Ok
button to select it. To scroll
a menu, use the
Rotary control
.
3
Function icon
— Some menu dialogs include an icon
which can be selected to access additional functions. For
example, in the Waypoint Group List menu dialog, the
Add
New
icon can be used to add a new Waypoint group.
4
Close
— On Touchscreen displays you can select this icon
to close the menu(s). The close icon is not available on
non-touchscreen displays.
5
Scroll bar
• Touchscreen — To scroll through the available menu
items, press and hold your finger on the menu to drag it
up or down.
• Non-touchscreen — To scroll through the available
menu items, use the
Rotary control
.
6
Options
— Select a menu item to access more options for
that item. For example, in the Waypoint Group list you can
select a menu item to view the waypoints in the group, edit
the group name, or erase the group.
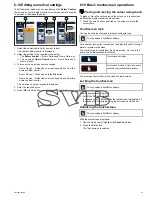
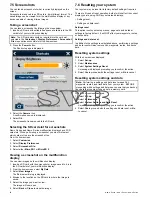
Using list dialogs
List dialogs are full-screen menus that display the details for specific
types of data, such as Waypoints.
The following diagram shows the main features of a list dialog:
D
12278-1
1
3
4
5
2
Screen item
Description
1
Back
• Touchscreen — Select the on-screen
Back
icon to go
back to the previous menu.
• Non–touchscreen — Use the
Back
button to go back to
the previous menu.
2
Sort icon
— Some list dialogs include an icon which can
be selected to sort the items in the list. For example, in
the Waypoint List you can sort the list by name, range,
group, symbol, and so on.
Screen item
Description
3
Close
— On Touchscreen displays you can select this icon
to close the menu(s). The close icon is not available on
non-touchscreen displays.
4
Scroll bar
• Touchscreen — To scroll through the available menu
items, press and hold your finger on the menu to drag it
up or down.
• Non-touchscreen — To scroll through the available
menu items, use the
Rotary control
.
5
Details
— the details for a particular list item are displayed
at the bottom of the dialog.
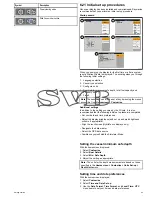
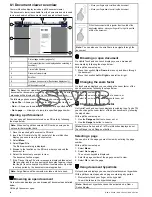
Using edit dialogs
Edit dialogs enable you to edit the details of data items stored on
your multifunction display, such as waypoints, routes, and tracks.
The following diagram shows the main features of a typical edit
dialog:
D
12280-1
1
3
2
Screen item
Description
1
Back
• Touchscreen — Select the on-screen
Back
icon to go
back to the previous menu.
• Non–touchscreen — Use the
Back
button to go back to
the previous menu.
2
Field
— Selecting a text field automatically displays the
on-screen keyboard, which can be used to edit the details.
3
Close
— On Touchscreen displays you can select this icon
to close the menu(s). The close icon is not available on
non-touchscreen displays.
Using control dialogs
Control dialogs enable you to control externally connected
equipment, such as an autopilot unit.
The following diagram shows the main features of a typical control
dialog:
1
3
D
12279-1
2
Getting started
79
Summary of Contents for A65
Page 2: ......
Page 4: ......
Page 8: ...8 New a Series New c Series New e Series...
Page 12: ...12 New a Series New c Series New e Series...
Page 20: ...20 New a Series New c Series New e Series...
Page 36: ...36 New a Series New c Series New e Series...
Page 64: ...64 New a Series New c Series New e Series...
Page 86: ...86 New a Series New c Series New e Series...
Page 96: ...96 New a Series New c Series New e Series...
Page 106: ...106 New a Series New c Series New e Series...
Page 138: ...138 New a Series New c Series New e Series...
Page 192: ...192 New a Series New c Series New e Series...
Page 202: ...202 New a Series New c Series New e Series...
Page 206: ...206 New a Series New c Series New e Series...
Page 218: ...218 New a Series New c Series New e Series...
Page 228: ...228 New a Series New c Series New e Series...
Page 232: ...232 New a Series New c Series New e Series...
Page 242: ...242 New a Series New c Series New e Series...
Page 248: ...248 New a Series New c Series New e Series...
Page 286: ...286 New a Series New c Series New e Series...
Page 300: ...300 New a Series New c Series New e Series...
Page 307: ......
Page 308: ...www raymarine com...


