


4. Select
Range Rings
so that On is highlighted.
Selecting range rings will switch range rings between On and Off.
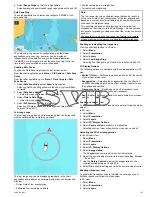
Safe Zone Ring
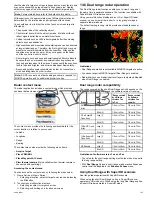
The chart application can display and configure a MARPA / AIS
safe zone ring.
The safe zone ring shares its configuration with the Radar
applications safe zone ring, however can be displayed
independently of the safe zone ring in the Radar application.
If a MARPA or AIS target will reach the safe zone ring within the
time to safe zone selected an alarm is sounded.
Enabling Safe Zones
To show the Safe Zone ring follow the instructions below:
From the chart application go to
Menu > AIS Options > Safe Zone
Set-up
From the radar application go to
Menu > Track Targets > Safe
Zone Set-up
1. Select
Safe Zone Ring
so that
Show
is highlighted.
Selecting Safe Zone Ring will switch the zone ring from hidden
to visible.
2. Select
Safe Zone Radius
.
i.
Select the required radius for the safe zone.
3. Select
Time to Safe Zone
.
i.
Select the required time period.
4. Select
AIS Alarm
so that On is highlighted.
Selecting AIS Alarm will switch the dangerous target alarm
between On and Off.
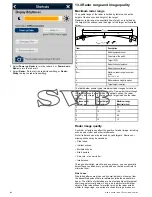
Fuel range rings
The fuel range ring gives an estimated range that can be reached
with the estimated fuel remaining on-board.
The fuel range ring can be displayed graphically in the chart
application and indicates an estimated range that can be reached
with the:
• Current rate of fuel consumption.
• Estimated fuel remaining on-board.
• Course remaining in a straight line.
• Current speed maintained.
Note:
The fuel range ring is an estimated range that can be reached
at the current rate of fuel consumption, of the fuel onboard and
based on a number of external factors which could either extend
or shorten the projected range.
This estimate is based on data received from external fuel
management devices, or via the Fuel Manager. It does not take
into account prevailing conditions such as tide, current, sea state,
wind etc.
You should not rely on the fuel range ring feature for accurate
voyage planning or in emergency and safety critical situations.
Enabling and disabling fuel range ring
From the chart application, in 2D view:
1. Select
Menu
.
2. Select
Presentation
.
3. Select
Layers
.
4. Select
Fuel Range Ring
.
Selecting Fuel Range Ring will switch the function On and Off.
3D Display Options
The following options are available with the chart application in 3D
view:
•
Centre Of View
— Switches a cross hair on and off at the centre
of the screen at sea level.
•
Exaggeration
— Adjusting the exaggeration has the effect of
vertically stretching objects on the chart, making it easier to see
their shape and position.
•
Transducer Cone
— Switches on and off a transducer cone
indicating the coverage of a fishfinder transducer.
•
Depth Scale
— Switches on and off a depth scale at your vessel
position.
Enabling centre of view
To enable the centre of view cross hair at sea level follow the steps
below:
In 3D view:
1. Select
Menu
.
2. Select
Presentation
.
3. Select
Layers
.
4. Select
3D Display Options
.
5. Select
Centre of View
so that On is highlighted.
Selecting centre of view will switch the cross hair on and off.
Adjusting the 3D chart exaggeration
In the 3D chart view:
1. Select
Menu
.
2. Select
Presentation
.
3. Select
Layers
.
4. Select
3D Display Options
.
5. Select
Exaggeration
.
The Exaggeration numeric adjust control is displayed.
6. Adjust the numeric adjust control to the required setting, between
1.0 and 20.0
7. Use the
Rotary Control
to adjust the exaggeration to the
required setting between 1.0 and 20.0.
8. Select
Ok
to confirm setting and close the numeric adjust control.
Enabling transducer cone
To enable the transducer cone to indicate the coverage of your
fishfinder transducer follow the steps below:
In 3D view:
1. Select
Menu
.
2. Select
Presentation
.
3. Select
Layers
.
Using the chart
133
Summary of Contents for A65
Page 2: ......
Page 4: ......
Page 8: ...8 New a Series New c Series New e Series...
Page 12: ...12 New a Series New c Series New e Series...
Page 20: ...20 New a Series New c Series New e Series...
Page 36: ...36 New a Series New c Series New e Series...
Page 64: ...64 New a Series New c Series New e Series...
Page 86: ...86 New a Series New c Series New e Series...
Page 96: ...96 New a Series New c Series New e Series...
Page 106: ...106 New a Series New c Series New e Series...
Page 138: ...138 New a Series New c Series New e Series...
Page 192: ...192 New a Series New c Series New e Series...
Page 202: ...202 New a Series New c Series New e Series...
Page 206: ...206 New a Series New c Series New e Series...
Page 218: ...218 New a Series New c Series New e Series...
Page 228: ...228 New a Series New c Series New e Series...
Page 232: ...232 New a Series New c Series New e Series...
Page 242: ...242 New a Series New c Series New e Series...
Page 248: ...248 New a Series New c Series New e Series...
Page 286: ...286 New a Series New c Series New e Series...
Page 300: ...300 New a Series New c Series New e Series...
Page 307: ......
Page 308: ...www raymarine com...


