background image

Ê

Operating Instructions
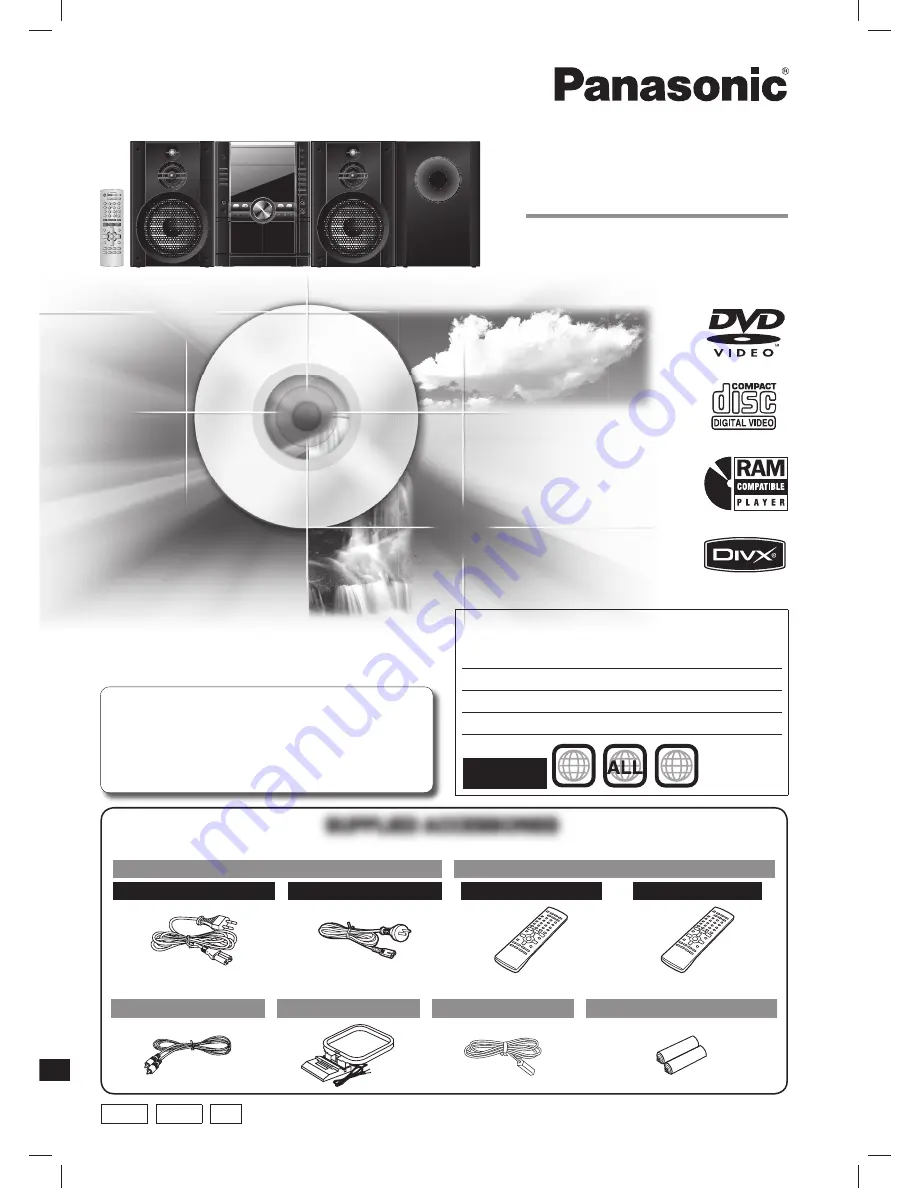
DVD Stereo System

Model No.

 SC-VK660

RQTV0238-L

GCS GCT GN

SUPPLIED ACCESSORIES

SUPPLIED ACCESSORIES

Please check and identify the supplied accessories.

1 x AC power supply cord

1 x Remote control

For Southeast Asia

For Australia and N.Z.

For Southeast Asia

For Australia and N.Z.

(N2QAYB000161)

(N2QAYB000162)

1 x Video cable

1 x AM loop antenna

1 x FM indoor antenna

2 x Remote control batteries

Before connecting, operating or adjusting this product, 
please read the instructions completely. 
Please keep this manual for future reference.

Operations in these instructions are described using 
the remote control, but you can do the operations on 
the main unit if the controls are the same.

Unless otherwise indicated, illustrations in these 
operating instructions are for the Southeast Asia.

Your unit may not look exactly the same as illustrated.

Region number

The player plays DVD-Video marked with labels 
containing the region number or 

“ALL”

.

Region

Number

Southeast Asia

3

Australia and N.Z.

4

Example:

For Southeast 
Asia

SC-VK660_EN(GCS).indd   1

SC-VK660_EN(GCS).indd   1

5/3/07   11:54:51 PM

5/3/07   11:54:51 PM

Summary of Contents for SC-VK660

Page 1: ...this product please read the instructions completely Please keep this manual for future reference Operations in these instructions are described using the remote control but you can do the operations on the main unit if the controls are the same Unless otherwise indicated illustrations in these operating instructions are for the Southeast Asia Your unit may not look exactly the same as illustrated...

Page 2: ...AZARD DUE TO OVERHEATING ENSURE THAT CURTAINS AND ANY OTHER MATERIALS DO NOT OBSTRUCT THE VENTILATION VENTS DO NOT OBSTRUCT THE UNIT S VENTILATION OPENINGS WITH NEWSPAPERS TABLECLOTHS CURTAINS AND SIMILAR ITEMS DO NOT PLACE SOURCES OF NAKED FLAMES SUCH AS LIGHTED CANDLES ON THE UNIT DISPOSE OF BATTERIES IN AN ENVIRONMENTALLY FRIENDLY MANNER The socket outlet shall be installed near the equipment a...

Page 3: ... unit up on a ship or other place where DC is used Power cord protection Ensure the AC power cord is connected correctly and not damaged Poor connection and lead damage can cause fire or electric shock Do not pull bend or place heavy items on the lead Grasp the plug firmly when unplugging the lead Pulling the AC power cord can cause electric shock Do not handle the plug with wet hands This can cau...

Page 4: ...ut Connection using these terminals outputs the color difference signals PB PR and luminance signal Y separately in order to achieve high fidelity in reproducing colors The description of the component video input terminals depends on the television or monitor example Y PB PR Y B Y R Y Y CB CR Connect to terminals of the same color To enjoy progressive video 1 Connect to the component video input ...

Page 5: ...lightning storm FM outdoor antenna FM outdoor antenna not included 75Ω coaxial cable not included Rear panel of this unit Disconnect the FM indoor antenna The antenna should be installed by a competent technician AM outdoor antenna Rear panel of this unit AM outdoor antenna not included 5 12 m AM loop antenna included Run a piece of vinyl wire horizontally across a window or other convenient locat...

Page 6: ... following cases to avoid damage When playing distorted sound When the speakers emit strange noise howling from a microphone or record player noise from FM broadcasts or continuous signals from an oscillator test disc or electronic instrument When adjusting the sound quality When turning the unit on or off Caution Use the speakers only with the recommended system Failure to do so can damage the am...

Page 7: ...rders or DVD video cameras using DVD Video Format 5 Recorded using a format different from DVD Video Format therefore some functions cannot be used 6 A process that allows play on compatible equipment To play a disc that is displayed as Necessary on this unit the disc must first be finalized on the device it was recorded on 7 Closing the session will also work 8 MPEG4 data recorded with the Panaso...

Page 8: ... Disc skip search tape fast forward rewind tuning time adjustment 4 REW FF 10 22 26 2 EXT IN 27 SUBWOOFER 25 To select the desired display mode Every time you press the button Normal Peak hold Reflection Off Normal Indicates strength of the sound in each tonal range Peak hold Peak sound value of each sound range on display for about one second after it occurs Reflection Indicates the strength of t...

Page 9: ...y as the buttons on the main unit MUTING CLOCK TIMER DIMMER Press and hold Press and hold To mute the sound Press the button to activate Press the button again or adjust the volume to cancel Muting is also cancels when you switch the unit to standby To dim the display panel Every time you press and hold the button Setting Effect 1 Display and ambient light dims 2 Display dims and ambient light is ...

Page 10: ...se the tray Start play You can also press 1 5 to select and play the other loaded discs Stop CANCEL The position is memorized while RESUME is on the display Press DVD CD to resume Press again to clear the position Pause Press DVD CD to resume play Handling of the disc trays and discs Handling of the disc trays and discs Not doing the following will cause damage to the unit Removing the power plug ...

Page 11: ...n If the player is stopped all trays will open To close the remaining trays simultaneously press OPEN CLOSE Changing a single disc by main unit only While one disc is playing you can change the discs in other trays Press SINGLE CHANGE again to close the tray If you select a disc which is being played play stops and the tray opens Selecting a disc DISC ENTER Select Confirm or 5 1 2 3 4 Disc menus T...

Page 12: ...tion CD DVD VR Unchecked No Disc DVD Video Track 10 Time 60 15 Not yet read 2 Press the numeric buttons 1 5 to select and play the disc To clear the screen Press DISC QUICK OSD SLEEP A OFF Displaying current playback Displaying current playback condition QUICK OSD condition QUICK OSD The current playback condition is displayed Press QUICK OSD Example Chapter Time 4 Title 1 0 41 23 Program Playback...

Page 13: ...buttons to select the items then press ENTER Repeat steps 1 and 2 to program other items 3 Press DVD CD To select an item using the cursor buttons Press ENTER and to select an item then press ENTER again to confirm the number To change a selected program a Press to select an item b Repeat above steps 1 and 2 To clear a selected program a Press to select an item b Press and hold CANCEL or press to ...

Page 14: ...contents while showing a JPEG image on the screen Select a JPEG file first and then select audio contents The opposite order is not effective To exit the screen Press MENU or RETURN Using the sub menu 1 While the Navigation Menu is displayed Press FUNCTIONS Items shown differ depending on the type of disc Multi List Tree Thumbnail Next group Previous group All Audio Picture Help display Find Video...

Page 15: ...ckground changes to the one recorded on the disc To exit the screen Press MENU PLAYLIST Selecting from the list Selecting from the list 1 Press MENU Example 2 Press then to switch among Playlist Group and Content lists 3 Press then to select an item and press ENTER To exit the screen Press MENU or RETURN Playing RAM and DVD R RW DVD VR Playing RAM and DVD R RW DVD VR discs discs Titles appear only...

Page 16: ...r of channels Example 3 2 1ch 1 Low frequency effect not displayed if there is no signal 0 No surround 1 Mono surround 2 Stereo surround left right 1 Center 2 Front left Front right 3 Front left Front right Center It may take some time for play to start if you change the audio on a DivX video disc To display the current bitrate or sampling frequency Thumbnail To show thumbnail images Subtitle with...

Page 17: ...n xxx p progressive see left select the method of conversion for progressive output to suit the type of material When playing PAL discs MPEG4 or DivX video contents Auto Automatically detects the film and video content and appropriately converts it Video Select when using Auto and the content is distorted Film Select this if the edges of the film content appear jagged or rough when Auto is selecte...

Page 18: ...ct Play as Data Disc QUICK SETUP enables successive settings of the items in the shaded area 1 Press and hold Item Tab Setting 2 ENTER Go to item Select Go to item Display the Setup menu If you have not set QUICK SETUP page 8 the QUICK SETUP screen appears Select the tab 3 ENTER Go to setting Select 4 ENTER Confirm Select 5 8 0 1 2 3 4 6 7 9 10 Select 5 RETURN SETUP Select the item Make the settin...

Page 19: ...y appear blurred NTSC Disc Output Choose PAL 60 or NTSC output when playing NTSC discs page 7 Video systems PAL60 When connected to a PAL television NTSC When connected to an NTSC television Picture Video Output Change the video signal format to be output for JPEG MPEG4 and DivX video if picture output is not smooth during playback For Australia and N Z Automatic PAL NTSC PAL60 For Southeast Asia ...

Page 20: ...s displayed When playing this content The number of remaining plays is reduced by one if you press or press and hold SETUP you press Press pause to pause play you press skip or search etc and arrive at another content or the start of the content being played The Resume page 11 Stop and Marker page 17 Play functions will not work Types of subtitles text file that can be displayed Subtitles text tha...

Page 21: ...tal camera that conform to DCF Standard Design rule for Camera File system Version 1 0 are displayed Files that have been altered edited or saved with computer picture editing software may not be displayed This unit cannot display moving pictures MOTION JPEG and other such formats and still pictures other than JPEG Example TIFF or play pictures with attached audio Extension ASF or asf You can play...

Page 22: ...3 Press the numeric buttons to select a channel For channels 10 to 20 press 10 then the two digits The station occupying a channel is erased if another station is preset to that channel Selecting a preset station Selecting a preset station Press the numeric buttons to select the channel OR Press 4 REW or FF to select the channel TAPE Basic play Basic play You can use either DECK 1 or DECK 2 for ta...

Page 23: ...the disc has stopped Tape to tape recording Press TAPE and then 7 Press 0 OPEN on the main unit to open DECK 1 and insert the cassette you want to record 4 Press RECORD on the main unit to start recording Stop recording Stop recording CANCEL If the tape finishes before the disc The disc continues playing Press main unit STOP to stop it To erase a recorded sound To erase a recorded sound 1 Press TA...

Page 24: ...e s to the microphone jack s 3 Select the music source When singing along with discs Insert the desired disc page 10 When singing along with cassette Insert the desired cassette into DECK 1 page 22 This is applicable only during stop mode When singing along with radio Select your desired station page 22 When singing along from the other equipment Connect and prepare the other equipment page 27 4 P...

Page 25: ...ee right To check the current setting Press SOUND main unit SOUND EQ SOUND Using the Manual Equalizer Using the Manual Equalizer MANUAL EQ MANUAL EQ by remote control only by remote control only Create your own sound quality effects 1 Press SOUND to select MANUAL EQ 2 Within 12 seconds or so Change the sound quality with the cursor buttons Select the sound range to be adjusted with or BASS MID TRE...

Page 26: ...ay timer on REC to turn the record timer on The indicator does not appear if the start and finish times or the clock has not been set 6 Press y to turn off the unit The unit must be off for the timers to operate To change the settings Perform steps 1 to 4 and 6 see left To change the source or volume When the unit is on 1 Press PLAY REC to clear the timer indicator from the display 2 Make changes ...

Page 27: ... 3 Press RECORD on the main unit to start recording Before connection Disconnect the AC power supply cord Turn off all equipment and read the appropriate operating instructions The equipment connections described are examples only Peripheral equipment and optional cables are sold separately unless otherwise indicated QUICK OSD SLEEP A OFF Using the sleep timer Using the sleep timer This function e...

Page 28: ...ENTER and 2 on the remote control for at least 2 seconds Note You can still operate a television using the remote control see left even after switching the mode Operating a television Operating a television Point the remote control at the television for the following operations To switch the television on or off To switch the television s video input mode TV AV Adjust the volume VOLUME Note Some m...

Page 29: ...the signal IMPORTANT If the equipment you connected cannot decode the signal the setting must be changed to PCM If not signals the equipment cannot process will be output by this unit causing high levels of noise which can damage your hearing and the speakers Home Theater Enjoying more powerful sound Home Theater Enjoying more powerful sound Enjoy the powerful movie theater and hall like sound ava...

Page 30: ...on of a frame still so picture quality is lower Progressive Interlace The PAL video signal standard has 576 interlaced i scan lines whereas progressive scanning called 576p uses twice the number of scan lines For the NTSC standard these are called 480i and 480p respectively Using progressive output you can enjoy the high resolution video recorded on media such as DVD Video Your television must be ...

Page 31: ... Check that the disc has something recorded in it 4 5 You have forgotten your ratings password Reset all the settings to Factory Preset While stopped and DVD CD is the source press and hold STOP on the main unit and 10 on the remote control until Initialised disappears from the television Turn the unit off and on again All settings will return to the default values Other products respond to the re...

Page 32: ... N Z Use a multi system or PAL television For Southeast Asia Use a multi system or NTSC television The system used on the disc does not match your television PAL discs cannot be correctly viewed on an NTSC television This unit can convert NTSC signals to PAL 60 for viewing on a PAL television NTSC Disc Output in Video tab 19 Menu is not displayed correctly Restore the zoom ratio to x1 00 Manual Zo...

Page 33: ... number as the unit or if the DVD Video is marked ALL Confirm the region number for the unit on the back of the main unit Cover No on screen display Select On in On Screen Messages in Display tab 19 The operation is prohibited by the unit or disc Cannot display group xx content xx You are trying to display incompatible contents Check the disc This disc may be dirty 21 Authorization Error You are t...

Page 34: ...o CD SVCD 1 MP3 2 7 WMA 3 7 JPEG 4 7 MPEG4 5 7 DivX 6 7 HighMAT Level 2 Audio and Image 1 Conforming to IEC62107 2 MPEG 1 Layer 3 MPEG 2 Layer 3 3 Windows Media Audio Ver 9 0 L3 Not compatible with Multiple Bit Rate MBR 4 Exif Ver 2 1 JPEG Baseline files Picture resolution between 160 x 120 and 6144 x 4096 pixels Sub sampling is 4 0 0 4 2 0 4 2 2 or 4 4 4 Extremely long and slender pictures may no...

Page 35: ...egistered trademarks of DTS Inc This product incorporates copyright protection technology that is protected by method claims of certain U S patents and other intellectual property rights owned by Macrovision Corporation and other rights owners Use of this copyright protection technology must be authorized by Macrovision Corporation and is intended for home and other limited viewing uses only unles...

Page 36: ...Matsushita Electric Industrial Co Ltd Web Site http www panasonic co jp global RQTV0238 L L0507CH0 En SC VK660_EN GCS indd 36 SC VK660_EN GCS indd 36 5 4 07 12 01 03 AM 5 4 07 12 01 03 AM ...

Reviews: