


1
Se Pack
INSTALLATION GUIDE
Welcome to the Thombox universe
.
Get ready to make your home "connected". Allow us to help you discover and
better understand the features of the Thombox!
Our teams have taken the greatest care to pre-configure your Security Pack so that
home installation is as simple as possible. In this quick installation guide you will
find the information needed to install, activate, and understand the basic settings
of your Thombox. To go further, go to our website
www.thomsonbox.eu
for a
presentation of the Thomson Connected Home range, examples of automation,
and the latest installation and user guides.
Thomson is at your service!
Need more help? Have a problem setting up? Our helpline would be happy to
assist you! Simply call
0892701369*
You can also send us an email at:
*Call price: 0.337
€
incl. tax/min from a landline.
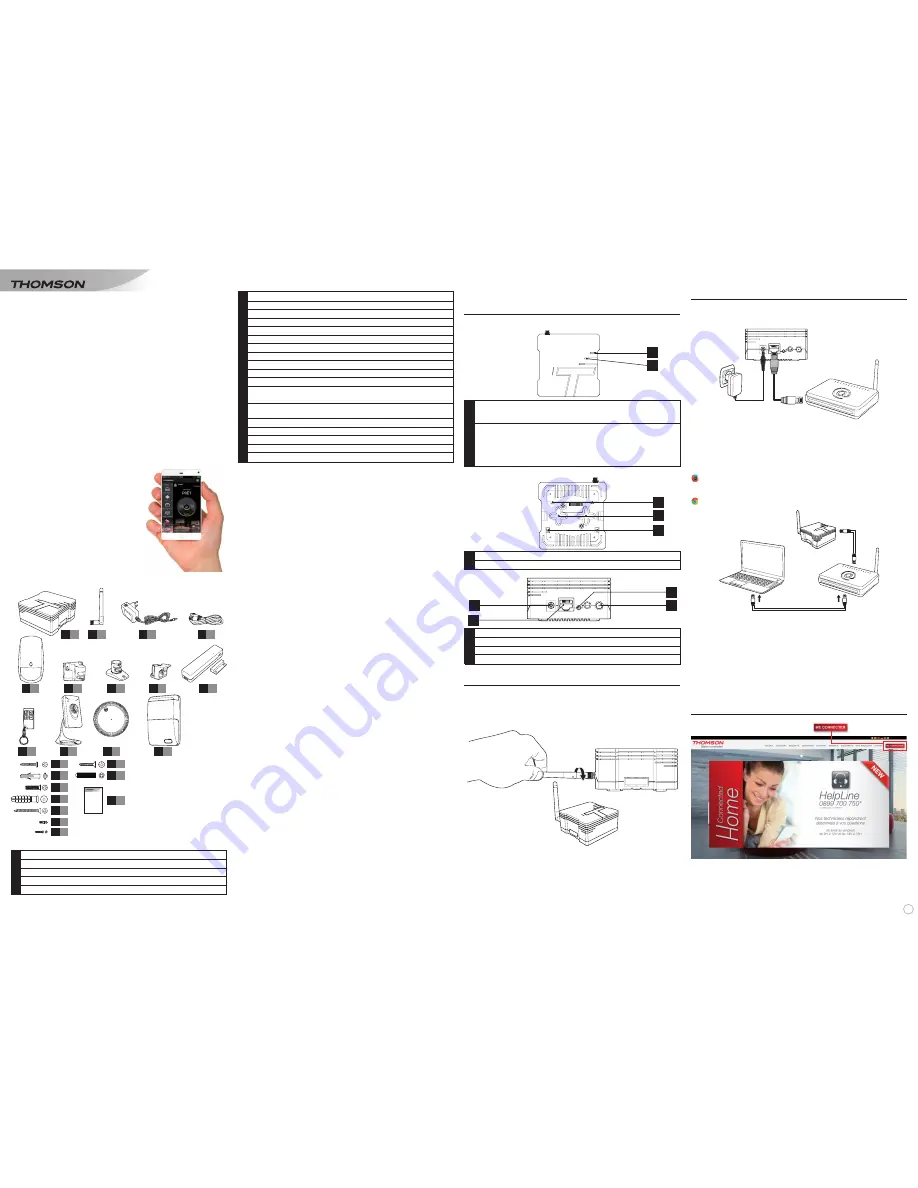
Pack contents
6
Wall bracket for indoor motion detector
7
Ceiling bracket for indoor motion detector
8
Joint for indoor motion detector
9
Opening detector for doors and windows with magnets
10
Alarm remote control with 4 buttons
11
720p indoor fixed IP camera
12
Stand-alone smoke detector alarm
13
Indoor siren
14
Screws for wall or ceiling mounting for smoke detector
15
Wall plugs for wall or ceiling mounting for smoke detector
16
Screw for attaching the indoor motion detector to the adjustable mount
17
Wall plugs for wall mounting the indoor motion detector's adjustable
mount and the indoor siren
18
Screw for wall mounting the indoor motion detector's adjustable mount
and the indoor siren
19
Opening detector cover screw
20
Screws for opening detector magnet
21
Screw for attaching the 720p indoor fixed IP camera
22
Wall plugs for attaching the 720p indoor fixed IP camera
23
Quick installation guide for the Se Pack
1
Thombox
2
ARW-compatible antenna
3
Mains adapter
4
Ethernet or RJ45 cable
5
Indoor motion detector (does not detect pets weighing < 25kg)
1
x 1
5
x 1
6
x 1
7
x 1
8
x 1
9
x 1
10
x 2
11
x 1
15
x 2
22
x 2
16
x 2
17
x 6
18
x 6
19
x 1
20
x 2
23
x 1
14
x 2
21
x 2
12
x 1
13
x 1
2
x 1
3
x 2
4
x 2
Quick
setup
guide
TABLE OF CONTENTS
I- INSTALLING THE BOX
1
A. PRESENTATION
1
B. SCREWING IN THE ANTENNA
1
C. CONNECTIONS
1
II- START-UP ON A PC
1
A. CREATING AN ACCOUNT
1
B. PAIRING THE ACCOUNT WITH THE THOMBOX
2
C. UPDATING THE THOMBOX
2
D. ACTIVATING ACCESSORIES
2
1). 4-BUTTON REMOTE CONTROL
2
2). OPENING DETECTOR
3
3). MOTION DETECTOR
3
4). INDOOR SIREN
4
5). SMOKE DETECTOR
4
E. PAIRING THE IP CAMERA WITH THE THOMBOX
4
F. CONFIGURING THE ALARM
5
1). ALARM PIN CODE
5
2). EMAIL NOTIFICATIONS
5
G. SETTING UP SMARTPHONE/TABLET
ALERT NOTIFICATIONS
5
H. PASSWORD
6
1). CHANGING THE PASSWORD
6
2). FORGOTTEN PASSWORD
6
I. PIN CODE
6
J. PAIRING ADDITIONAL ACCESSORIES
WITH THE THOMBOX
6
III. START-UP ON A SMARTPHONE/TABLET
6
A. CREATING AN ACCOUNT
6
B. PAIRING THE ACCOUNT WITH THE THOMBOX
7
C. UPDATING THE THOMBOX
7
D. PAIRING ACCESSORIES WITH THE THOMBOX
7
IV. USING YOUR ALARM
7
V. SAFETY INSTRUCTIONS
7
A. OPERATING PRECAUTIONS
7
B. MAINTENANCE AND CLEANING
8
C. RECYCLING
8
D. MINIMUM CONFIGURATION REQUIREMENTS
8
VI. TECHNICAL AND LEGAL INFORMATION
8
A. TECHNICAL CHARACTERISTICS
8
B. WARRANTY
8
C. HELP AND ADVICE
8
D. DECLARATION OF CONFORMITY
8
I - INSTALLING THE BOX
A. PRESENTATION
Front
1
2
1
Power supply/wired connection/update LED indicator. During normal
operation, the LED shows a steady green light. If it is flashing green, a
problem with the wired Internet connection has been detected.
2
Power supply/3G connection/update LED indicator. During normal
operation, the LED is off. If it is flashing green, a connection to the
mobile network is currently being established (requires a data SIM card -
not included - to be inserted into the 3G key on the battery module). If the
LED shows a steady green light, the 3G connection has been established
and is operational.
Rear
Serial Number :
0101ED2890Z04JLM55
1
2
2
1
Screw recess for wall mounting using screws
2
Hooks for fixing to a consumer unit DIN rail
Top
4
1
2
3
1
12V DC 1.5A mains socket
2
RJ45 socket for connecting to the Ethernet network
3
Reset button
4
Antenna connector
B. SCREWING IN THE ANTENNA
Warning: The antenna should not be screwed in with
excessive force to prevent damage to the antenna
connector.
C. CONNECTIONS
Connect the Ethernet cable (RJ45) between your Internet Box and your
Thombox then connect the mains.
II - START-UP ON A PC
For your Thombox to function optimally, we recommend that you use the
browsers Firefox or Chrome on your computer. The Thombox interface may not
be totally compatible with other browsers. The browsers Firefox and Chrome
are both free and available for download at the following addresses:
Mozilla Firefox:
http://www.mozilla.org/download
Google Chrome 32 bit:
https://www.google.fr/chrome/browser/desktop
Your Thombox can also be completely controlled and configured from any
smartphone or tablet that is connected to the Internet.
- Find the free Thombox application on Google Play (Android 4.0+ required).
- Carry out installation.
Note: the Thombox application requires certain access rights to your mobile
device's functionalities, with the sole purpose of making your experience even
easier.
To configure your Thombox with only a smartphone or a tablet, see paragraph
III. START-UP ON A SMARTPHONE/TABLET
A. CREATING AN ACCOUNT
Go to
http://www.thomsonbox.eu heading
- Ensure that you have a valid email address.


