5-44
DA80F/DA95F AddressRight™ Printers Service Manual (SV61962 Rev. A)
5 • Removal and Replacement
DA95F (WF96) - Standard Feeder (WF9S) Parts Removal
5.26 Feed
Belts and
Rollers on
Standard
Feeder
1. Disengage the feeder assembly from the printer and remove the side
guides, deck, and rear cover (see section 5.22).
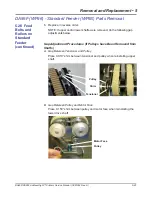
2. Located the feeder assembly and the handle of the swing arm near the
floor of the chassis (see figures below). Insert a long screwdriver or a
long sturdy metal bar behind the handle. Pull the screwdriver against the
belt and feed pulley to use as a fulcrum. This will release the tension on
the belt created by the extension spring.
3. Remove the 3 mm belt from around the other feed pulley and idler pul-
leys. Release the swing arm to finish removing the belt.
4. Pull the belt drive upper or lower shaft assembly from the printer. The
feed belts and a bearing will come out with the shaft assemblies. Re-
move these parts from the printer.
5. The tires and feed belts may be removed by pulling them from the hubs.
Feeder Assembly
in Standard Feeder
Swing Arm Handle
Extension Spring
3mm Belt
✍
TIP:
If pulleys were
removed from the
shafts, you need to
perform the gap ad-
justment procedure
on the next page.
3mm Belt
Hub
Tire
3mm Belt
Tires
3mm Belt
Extension
Spring
3mm
Belt
Fulcrum
Screwdriver
Handle
Handle (in
up position)
Extension
Spring


