DA80F/DA95F AddressRight™ Printers Service Manual (SV61962 Rev. A)
A-13
Printer Control Panel Menus and Utilities • Appendix A
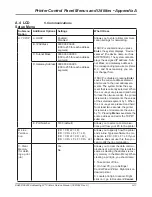
5. Communications
A.4 LCD
Setup Menu
Submenu
Option
Additional Options
Settings
What It Does
A. TCP/IP
A. DHCP
Enabled,
Disabled
Allows you to enter printer communi-
cation settings for networking.
If DHCP is
enabled
and you press
Enter,
the system displays “Device =
xxxxxxx” (the device name, such as
ARPTR1B2C). The system also dis-
plays the
assigned
IP address, Sub-
net Mask, and Gateway address in
the corresponding menu items (items
B, C, and D) as read-only; you can
not change them.
If DHCP is
disabled
, pressing
Enter
saves the current address element
and moves to the next address ele-
ments. The system blinks the seg-
ment that is currently selected. When
the
+
or
-
keys are pressed (and held
for less than two seconds), the printer
increments or decrements the values
of the selected segment by 1. When
the
+
or
-
keys are pressed and held
for at least two seconds, the printer
increments or decrements the value
by 10. Pressing
Menu
saves/sets the
entire address and exits the TCP/IP
submenu.
B. IP Address
000.000.000.00
(000 to 255 for each address
segment)
C. Subnet Mask
000.000.000.000
(000 to 255 for each address
segment)
D. Gateway Address 000.000.000.000
(000 to 255 for each address
segment)
E. Port Number
5100 (default)
Allows you to select a communica-
tions port from your PC to the printer
B. Line
Termina-
tion
(CR = CR; LF = LF),
(CR = CR + LF; LF = LF),
(CR = CR; LF = CR + LF),
(CR = CR + LF; LF = CR + LF)
Allows you to specify how the printer
ends a line. Typical software line ter-
mination is CR = CR; LF = LF. If your
software does not use this, then you
can modify the line termination.
C. Clear
Memory
(for delet-
ing a print
job)
Yes,
No
Allows you to clear the data commu-
nications of a print job (this is
not
the
same as clearing the address recov-
ery memory in the Main Menu).When
clearing a print job, you should also:
1. Take printer off line.
2. On host PC, go to Settings>
Control Panel>Printer. Right click on
desired printer.
3. Locate print job to cancel. Right
click on it; go to Document>
Cancel
.


