5-36
DA80F/DA95F AddressRight™ Printers Service Manual (SV61962 Rev. A)
5 • Removal and Replacement
DA80F (WF81) Parts Removal
5.19 Exit
(Rubber) Roller
1. Remove the rear cover (see section 5.2), front bottom cover (see sec-
tion 5.8), transport timing belt (see section 5.9), feed deck (see section
5.17A), and front plate assembly (see section 5.17B).
2. Raise the print head assembly and “H” blocks fully up.
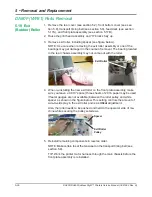
3. Remove exit roller, including spacer (see figure below).
NOTE: Use care when removing the exit roller assembly or one of the
bearings may get damaged in the course of removal. The bearing located
in the rear chassis assembly may not come out with the roller.
Exit Roller
5. Reinstall remaining components in reverse order.
NOTE: Make certain to set the tensioner on the transport timing belt (see
section 5.9).
TIP: Work the printer motor harness through the main chassis before the
front plate assembly is reinstalled.
4. When re-installing the new exit roller on the front plate assembly, make
sure you leave a 0.010” space (three sheets of 20 lb. paper may be used
if feeler gauges are not available) between the roller pulley and white
spacer as shown in the figure below. This setting controls the amount of
side-to-side play in the exit roller and is a
critical
adjustment.
Also, the roller needs to be pushed and held to the operator side of ma-
chine while securing the pulley setscrews.
Spacer
Exit Roller
Pulley

