– 21 –
Chapter 3 Part Names and Functions — Main Frame AV‑HS60U1/AV‑HS60U2
5
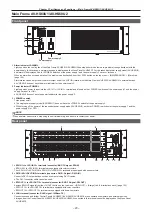
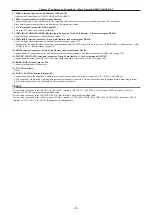
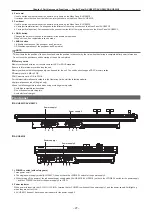
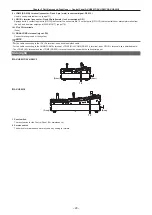
<PANEL> terminal (connector: RJ‑45/signal: 100Base‑TX)
Connects the Control Panel AV-HS60C1/AV-HS60C2/AV-HS60C4.
6
<REF> terminal (connector: BNC
×
2/signal: Genlock)
Loop-through output in the external sync mode. If the loop-through output is not going to be used, provide a 75
Ω
termination.
Black burst signals are output from both terminals in the internal sync mode.
7
<LTC IN> terminal (connector: BNC/signal:LTC)
This is the LTC (linear time code) input terminal.
8
<COM1 (M)>/<COM2 (M)>/<COM3 (M)> terminals (connector: D‑sub 9‑pin (female)
×
3, inch screw/signal: RS‑422)
Used for master connection of external devices. (page 171)
9
<COM4 (M/S)> terminal (connector: D‑sub 9‑pin (female), inch screw/signal: RS‑422)
Used for master connection/slave connection of external devices. (page 171)
f
Master connection and the slave connection can be switched from the <SYS> button on the top menu
→
[PERIPHERAL]
→
[General] tab
→
[MF
COM4] column
→
10 <GPI IN> terminal (connector: D‑sub 25‑pin (female), inch screw/signal: GPI IN)
Equipped with 18 contact input ports (GPI IN) that control the unit externally, and an alarm output port (ALARM OUT). (page 170)
11
<GPI OUT1>/<GPI OUT2> terminals (connector: D‑sub 25‑pin (female)
×
2, inch screw/signal: GPI OUT)
12
<SIGNAL GND> terminal (signal: SG)
Connects to the ground of the system.
13
<F1>/<F2> terminals
(Fuse)
14 <AC IN 1>/<AC IN 2> terminals (signal: AC)
Connects one end of the supplied AC cable to this terminal and the other end to the AC outlet. (AC 100 V to 240 V, 50 Hz/60 Hz)
f
The supplied AC cable has a 3-pin plug with a grounding terminal. Connect to a 3-pin power outlet which is equipped with a grounding terminal.
f
If a 3-point power outlet is not available, be sure to consult your dealer.
@
@
NOTE
t
For the cable connecting to the <SDI IN 1> to <SDI IN 32> terminals, <SDI OUT 1> to <SDI OUT 16> terminals, <REF> terminal, or <LTC IN>
terminal, use a 5C-FB compliant double-shielded cable.
t
For the cable connecting to the <DVI-D IN1>/<DVI-D IN2> terminals, use a double-shielded cable.
t
For the cable connecting to the <LAN> terminal, <PANEL> terminal, <COM1 (M)>/<COM2 (M)>/<COM3 (M)>/<COM4 (M/S)> terminals, <GPI IN>
terminal, or <GPI OUT1>/<GPI OUT2> terminals, use a shielded cable.
Summary of Contents for AV-HS60C1E
Page 5: ...Please read this chapter and check the accessories before use Chapter 1 Overview ...
Page 52: ...This chapter describes menu operations Chapter 5 Basic Operations ...
Page 162: ...This chapter describes the difference with the Standard mode Chapter 9 3G mode 4K mode ...
Page 168: ...This chapter describes the terminals and signals of the unit Chapter 10 External Interfaces ...
Page 184: ...This chapter describes the setting menu table and terms Chapter 12 Appendix ...
Page 206: ...Web Site http www panasonic com Panasonic Corporation 2014 ...

