– 17 –
Chapter 2 Installation and Connection (To installation personnel) — Connection (To installation personnel)
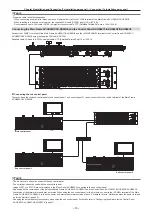
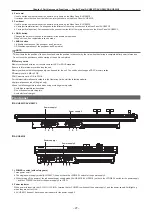
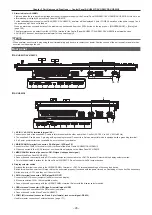
Connecting the Menu Panel AV‑HS60C3
Connect the optional Menu Panel AV-HS60C3 or DVI-D monitor with resolution 1366
×
768 and USB mouse.
DVI-D monitor
Mouse
r
Connecting a computer
Connect to the <LAN> terminal of the Main Frame AV-HS60U1/AV-HS60U2 and control from the Web browser of the computer.
If using Internet Explorer, IE8 or earlier browser versions cannot be used.
For details on the compatible OS and browser, refer to “Required computer environment” (page 9).
COM4 (M/S)
GPI IN
COM3 (M)
COM1 (M)
REF
COM2 (M)
LTC IN
CHR
LIN
LUM
FULL
4
SDI
IN3
3
SDI
IN2
2
SDI
IN1
1
Black
24
23
22
21
20
19
18
17
16
15
14
13
12
11
10
SDI
IN9
9
SDI
IN8
SDI
IN11
SDI
IN12
Still
1V
Still
2V
Still
3V
Still
4V
Clip
1V
Clip
2V
Clip
3V
Clip
4V
CBGD
1
ME1
PGM
ME2
PGM
SDI
IN10
8
SDI
IN7
7
SDI
IN6
6
SDI
IN5
5
SDI
IN4
RECALL
STORE
DEL
RECALL
CBGD
STORE
DEL
MIX
02s01f
MIX
01s00f
MIX
01s00f
WIPE
01s00f
CHR
LIN
FULL
FULL
WIPE
01s00f
MIX
01s00f
MIX
01s00f
MIX
CG5V
CG6V
CAM1
CAM2
CG5V
CG6V
CAM1
CAM2
CG1V
CG2V
CG3V
CG4V
01s00f
MIX
ME2
01s00f
MIX
ME1
01s00f
BUS
SHFT
BUS
SHFT
1-7
4-1
1-8
1-9
SHOT000
1-1
SHOT001
1-2
SHOT002
1-3
SHOT003
1-4
1-5
1-6
PLAY
SEL
AUK
DSK
ME2
XPT
ME1
4
SDI
IN3
3
SDI
IN2
2
SDI
IN1
1
Black
24
23
22
21
20
19
18
17
16
15
14
13
12
11
10
SDI
IN9
9
SDI
IN8
SDI
IN11
SDI
IN12
Still
1V
Still
2V
Still
3V
Still
4V
Clip
1V
Clip
2V
Clip
3V
Clip
4V
CBGD
1
ME1
PGM
ME2
PGM
SDI
IN10
8
SDI
IN7
7
SDI
IN6
6
SDI
IN5
5
SDI
IN4
4-3
4-2
4-4
4-6
4-5
4-7
4-9
4-8
OP
STILL1
Computer
Main control panel
f
Computer settings
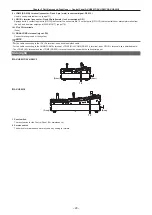
The IP address of the computer to connect is set to a different address from the Main Frame AV-HS60U1/AV-HS60U2 within the private address
range, and the subnet mask is set to the same address as the Main Frame AV-HS60U1/AV-HS60U2.
For details of network setting of the Main Frame AV‑HS60U1/AV‑HS60U2, refer to “Configuring the network for the Main Frame AV‑HS60U1/
f
Web browser settings
-
Start the Web browser in the computer, and enter the IP address of the Main Frame AV-HS60U1/AV-HS60U2 (default value: 192.168.0.5).
-
When the Web browser launches, enter the following user name and password.
User name: admin
Password: admin
External device control
For details on the connection with external devices, refer to “External Interfaces” (page 168).
r
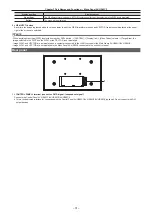
GPI I/O
Connect the <GPI IN> terminal, <GPI OUT1> terminal, and <GPI OUT2> terminal of the Main Frame AV-HS60U1/AV-HS60U2, and the <GPI I/O>
terminal of the Control Panel AV-HS60C1/AV-HS60C2/AV-HS60C4 to external devices.
r
LAN
Connect the <LAN> terminal of the Main Frame AV-HS60U1/AV-HS60U2 to external devices such as a computer.
f
It supports plug-in software.
Summary of Contents for AV-HS60C1E
Page 5: ...Please read this chapter and check the accessories before use Chapter 1 Overview ...
Page 52: ...This chapter describes menu operations Chapter 5 Basic Operations ...
Page 162: ...This chapter describes the difference with the Standard mode Chapter 9 3G mode 4K mode ...
Page 168: ...This chapter describes the terminals and signals of the unit Chapter 10 External Interfaces ...
Page 184: ...This chapter describes the setting menu table and terms Chapter 12 Appendix ...
Page 206: ...Web Site http www panasonic com Panasonic Corporation 2014 ...

