5-54
Operation on the Machine > Using a Custom Box
5
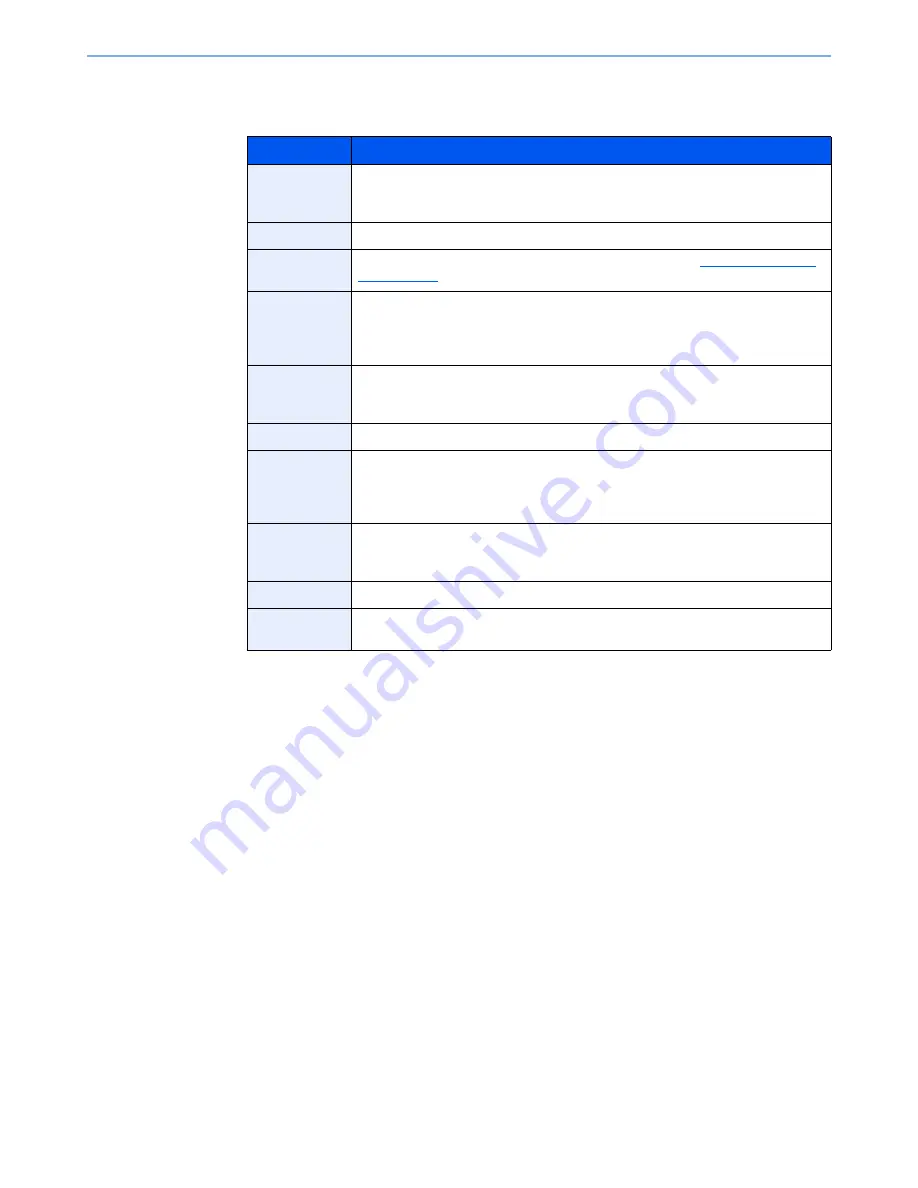
Enter the information and then press [OK].
The table below lists the items to be set.
*
Displayed when the user login administration is enabled.
6
Check the details you have entered and then press [Save].
The Custom Box is created.
Item
Description
Box No.
Enter the box number by pressing [+], [-] or number keys. The box number can be
from 0001 to 1000. A Custom Box should have a unique number. If you enter 0000,
the smallest number available will be automatically assigned.
Owner*
Set the owner of the box. Select the owner from the user list that appears.
Box Name
Enter a box name consisting of up to 32 characters. Refer to
Entering Characters
on page 11-11
for details on entering characters.
Usage
Restriction
To preserve the hard disk capacity, the storage capacity for a box can be restricted.
To enable a capacity restriction enter a value for the storage capacity of the Custom
Box in megabytes by pressing [-], [+] or number keys. You can enter a limit between
1 and 30,000 (MB).
Box Password
User access to the box can be restricted by specifying a password to protect the
box. Entering a password is not mandatory. Enter the same password of up to 16
characters in both [Password] and [Confirm Password].
Permission*
Select whether to share the box.
Auto File
Deletion
Automatically deletes stored documents after a set period of time. Press [On] to
enable automatic deletion and then use [+] and [-] or the numeric keys to enter the
number of days for which documents are stored. You can enter any number
between 1 and 31 (day(s)). To disable automatic file deletion, press [Off].
Overwrite
Setting
Specifies whether or not old stored documents are overwritten when new
documents are stored. To overwrite old documents, press [Permit]. To retain old
documents, press [Prohibit].
Free Space
Displays the free space on the box.
Delete after
Printed
Automatically delete a document from the box once printing is complete. To delete
the document, press [On]. To retain the document, press [Off].
Summary of Contents for TASKalfa 2551ci
Page 1: ...OPERATION GUIDE TASKalfa 2551ci ...
Page 17: ...xvi About the Operation Guide this Guide ...
Page 24: ...xxiii Glossary 11 28 Index Index 1 ...
Page 44: ...xliii Menu Map ...
Page 62: ...1 18 Legal and Safety Information Notice ...
Page 116: ...2 54 Installing and Setting up the Machine Transferring data from our other products ...
Page 166: ...3 50 Preparation before Use Registering Destinations in the Address Book ...
Page 178: ...4 12 Printing from PC Printing Data Saved on the Printer ...
Page 322: ...6 72 Using Various Functions Functions ...
Page 444: ...10 4 Troubleshooting Regular Maintenance DP 772 1 2 3 4 ...
Page 445: ...10 5 Troubleshooting Regular Maintenance DP 773 1 2 ...
Page 447: ...10 7 Troubleshooting Regular Maintenance 3 4 5 6 ...
Page 478: ...10 38 Troubleshooting Troubleshooting Cassette 2 1 2 ...
Page 480: ...10 40 Troubleshooting Troubleshooting Large Capacity Feeder 1 500 sheet x 2 1 2 3 B1 B2 ...
Page 481: ...10 41 Troubleshooting Troubleshooting Multi Purpose Tray 1 2 3 4 ...
Page 482: ...10 42 Troubleshooting Troubleshooting Duplex unit 1 2 ...
Page 483: ...10 43 Troubleshooting Troubleshooting Inner Tray Fixing unit 1 2 3 ...
Page 487: ...10 47 Troubleshooting Troubleshooting Job Separator 1 2 3 Bridge Unit Option 1 2 ...
Page 488: ...10 48 Troubleshooting Troubleshooting 1 000 Sheet Finisher Option 1 2 3 D1 D2 2 1 D3 ...
Page 489: ...10 49 Troubleshooting Troubleshooting Clearing a Staple Jam 1 2 3 2 1 CLICK ...
Page 490: ...10 50 Troubleshooting Troubleshooting ...
Page 522: ...11 32 Appendix Glossary ...
Page 531: ...Index 9 ...
Page 532: ...Index 10 ...
Page 533: ......
Page 536: ...First edition 2013 7 2NPKDEN000 ...


