Intel® Server System M50FCP1UR System Integration and Service Guide
73
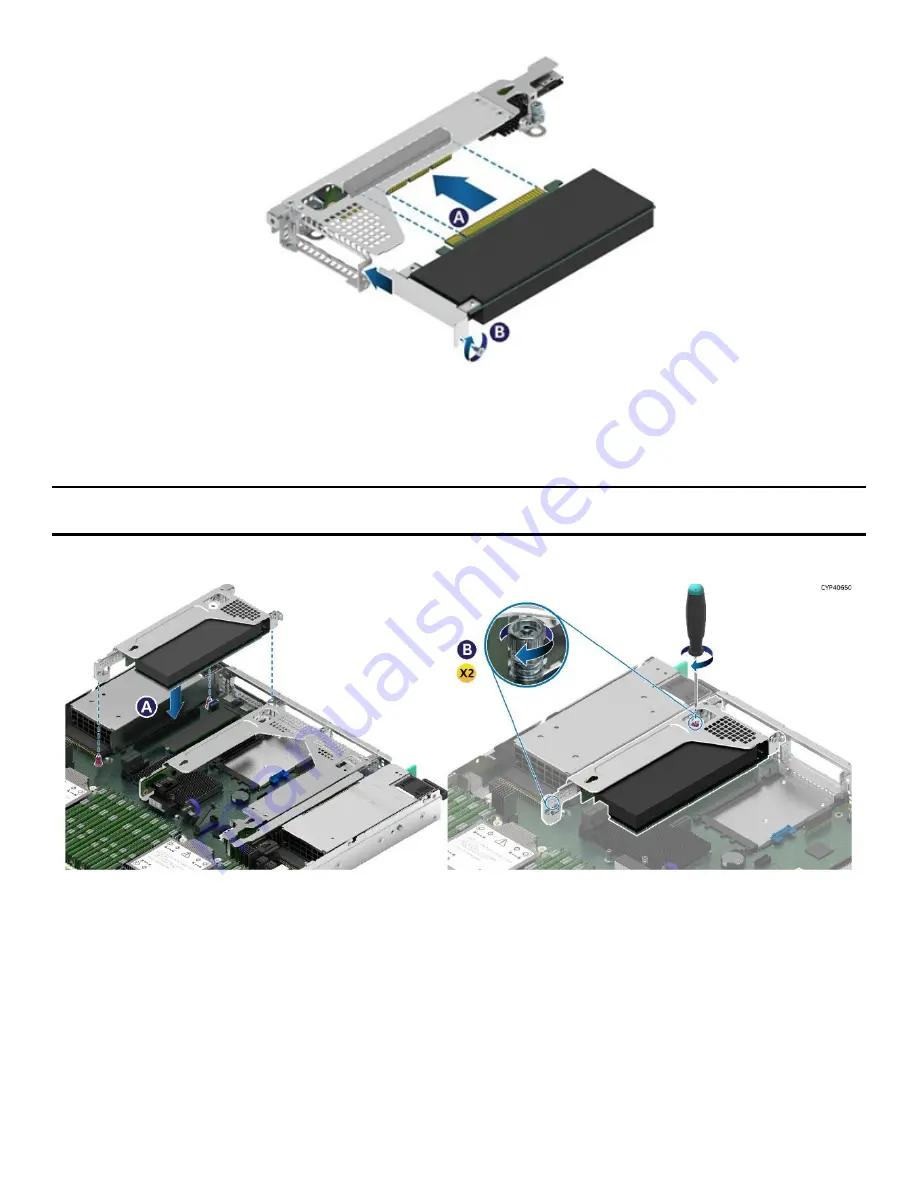
Figure 95. Add-in Card Installation
10.
Reinstall the add-in card into the riser card
11.
Using the fastener screws, secure the add-in card to the riser card bracket (see Letter B). Tighten to
5 in-lb.
Note:
For add-in cards with internal cable connectors, it may be necessary to connect cables before installing
the riser card assembly into the system. See
Section 3.2
The following installation procedure is the same for all riser card assemblies.
Figure 96. Add-in Card Assembly Installation
12.
Position the riser card edge connector over the server board riser slot.
13.
Align the two key slots on the back edge of the riser card assembly with the mounting keys on the
back of the chassis.
14.
Once aligned, press the riser card assembly straight down into the riser slot (see Letter A).
15.
Using the two static screw heads on the riser bracket, secure the riser card assembly to the server
board (see Letter B).
Tighten to 5 in-lb.
16.
Connect any cables to the add-in card that are required. See your add-in card documentation for
additional information.
17.
Reinstall the system top cover.
Summary of Contents for M50FCP1UR
Page 2: ...2 This page intentionally left blank...
Page 118: ...Intel Server System M50FCP1UR System Integration and Service Guide 118 1 2 3 4 5 6 1 2 3...
Page 119: ...Intel Server System M50FCP1UR System Integration and Service Guide 119 1 2 3 4 5...
Page 120: ...Intel Server System M50FCP1UR System Integration and Service Guide 120 7 8 9 10 11 12 4 5 6...
Page 121: ...Intel Server System M50FCP1UR System Integration and Service Guide 121 6 7 8 9 10...
Page 130: ...Intel Server System M50FCP1UR System Integration and Service Guide 130 1 2 3 4 5 ESD 6 1 2 3...
Page 131: ...Intel Server System M50FCP1UR System Integration and Service Guide 131 1 2 3 4 5...


