Intel® Server System M50FCP1UR System Integration and Service Guide
65
Caution:
If debris is observed, blow it away gently with an air blower. Do not use tweezers or any other
hard tools to remove it manually.
If reinstalling the processor later, then Intel highly recommends installing the processor socket protective
cover that shipped with the system to prevent possible pin damage while the socket is not populated.
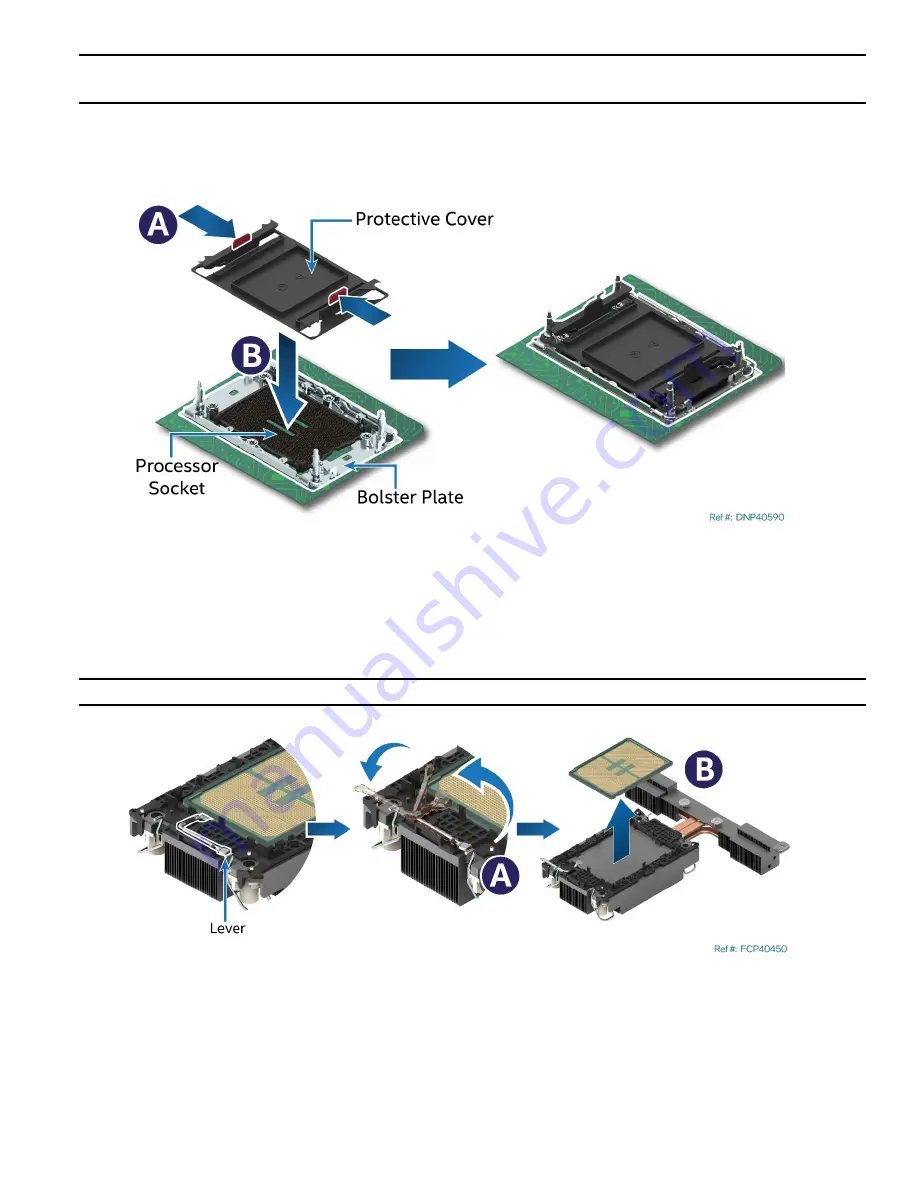
Figure 78. Reinstall the Socket Cover
•
Squeeze the finger grips at each end of the cover (see Letter A) and carefully lower the cover on the
socket (see Letter B). Then, release finger grips.
•
Ensure that the socket cover is locked in place.
Caution:
Do not press the center of the socket cover.
Figure 79. Processor Removal from PHM Assembly
10.
While holding down the PHM, carefully rotate the lever (see Letter A) from left to right until the
processor lifts from the processor carrier clip.
11.
While holding down the processor carrier clip, carefully lift the processor from it (see Letter B).
Summary of Contents for M50FCP1UR
Page 2: ...2 This page intentionally left blank...
Page 118: ...Intel Server System M50FCP1UR System Integration and Service Guide 118 1 2 3 4 5 6 1 2 3...
Page 119: ...Intel Server System M50FCP1UR System Integration and Service Guide 119 1 2 3 4 5...
Page 120: ...Intel Server System M50FCP1UR System Integration and Service Guide 120 7 8 9 10 11 12 4 5 6...
Page 121: ...Intel Server System M50FCP1UR System Integration and Service Guide 121 6 7 8 9 10...
Page 130: ...Intel Server System M50FCP1UR System Integration and Service Guide 130 1 2 3 4 5 ESD 6 1 2 3...
Page 131: ...Intel Server System M50FCP1UR System Integration and Service Guide 131 1 2 3 4 5...


