


1126800
SmartPAC 2 with WPC Integration
page 298
Chapter 5
SmartPAC 2 Program Mode
NOTICE
If you are not sure how to set the ready signal, estimate it. You can adjust the setting later in
Run mode after you run the press. SmartPAC 2 will display the sensor actuation angles in
the Run mode.
Setting the "Ready on" and "Ready off" Angles
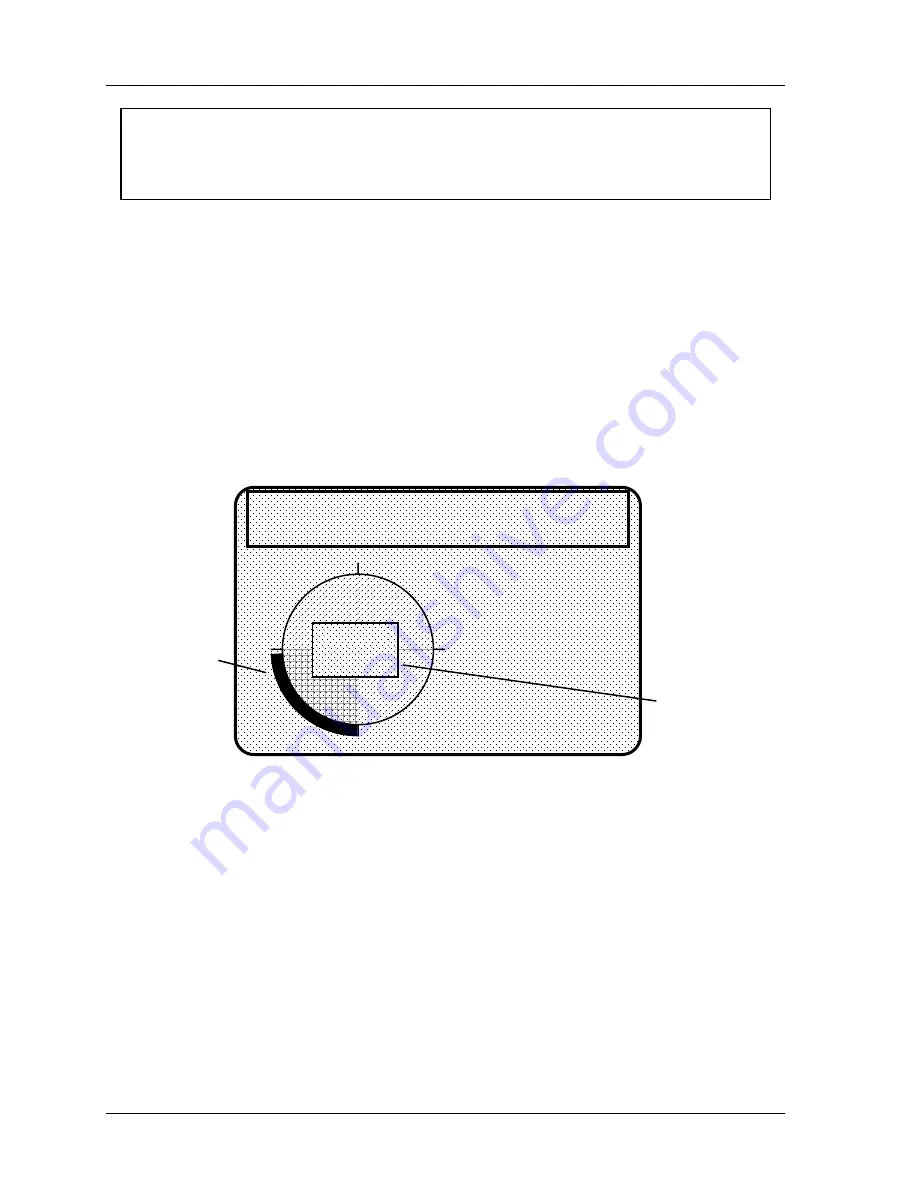
1. Use the cursor keys to move the arc around the "circle diagram.” The
circle diagram
dynamically illustrates the on and off angle settings that you programmed for a sensor
and/or cam channel. To set the "Ready ON" time, you increase the angle with the
"right" cursor key and decrease with the "left" cursor key. Conversely, to set the "Ready
OFF" time, you increase the angle with the "up" cursor key, and decrease with the
"down" key. Notice how the bar changes to reflect these keystrokes. Also the numeric
values appear in the "Ready" box on the screen.
If necessary, see "Cursor keys" under "Using the keyboard" in Chapter 3 for step-by-step
instructions. This display shows a green sensor with the ready signal for part ejection set
to 180° on, 265° off.
USE L/R CURSOR KEYS TO
SET READY ON. USE U/D
CURSOR KEYS TO SET
READY OFF. PRESS
RESET WHEN DONE.
programmed
ready signal
arc on "circle
diagram"
graphically
shows ready
signal
READY
ON 180°
OFF 265°
0
90
180
270
TOOL NUMBER 1234567
CHAIR BRACKET
CRITICAL ANGLE 0
SENSOR 1
PART EJECTION
GREEN ESTOP
Figure 5 - 24. Example of a Programmed Ready Signal for Part Ejection
2. After setting the ready signal, press RESET to go back to the sensor menu. If you are
completely done, press RESET one more time to return to the Programming mode menu.
The highlight bar automatically scrolls down to the next sensor to program.
Setting Counter Value for Green Special Sensor
After setting the sensor type for a green special sensor, you will see the following display.
You can set the maximum number of strokes that the press can make without this sensor
actuating. The preset limit is 99. Use your up or down cursor keys to set the value. Then
press the RESET key to set the next sensor.
Summary of Contents for SmartPAC 2
Page 192: ...1126800 SmartPAC 2 with WPC Integration Page 170 Chapter 2 Installing SmartPAC 2 and WPC ...
Page 294: ...1126800 SmartPAC 2 with WPC Integration Page 272 Chapter 4 SmartPAC 2 Initialization Mode ...
Page 342: ...1126800 SmartPAC 2 with WPC Integration page 320 Chapter 5 SmartPAC 2 Program Mode ...
Page 404: ...1126800 SmartPAC 2 with WPC Integration Page 382 Chapter 6 SmartPAC 2 Run Mode ...
Page 448: ...1126800 SmartPAC 2 with WPC Integration Page 426 Chapter 7 SmartPAC 2 Fault Messages ...
Page 476: ...1126800 SmartPAC 2 with WPC Integration page 454 Appendix C Updating SmartPAC 2 Firmware ...
Page 482: ...1126800 SmartPAC 2 with WPC Integration page 460 Appendix F Replacing SmartPAC 2 PC Board ...
Page 492: ...1126800 SmartPAC 2 with WPC Integration page 470 Glossary ...