


GE Analytical Instruments ©2010
63 of 226
DLM 74001-04 Rev. A
Chapter 3: Installation
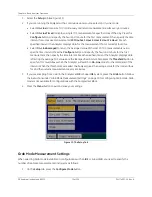
prompts you to archive data to free up memory; when
Archive Data
is set to
Off
, the Analyzer will make space
for new data in memory by overwriting the oldest data. The data history can accommodate approximately
33,000 entries (at least 90 days of usage).
1. Select the
Data
tab.
2. Press the
Setup History
button.
3. Set
Archive Data
to
On
.
4. Press the
Menu
button.
Setting Up the Printer (Optional)
If you installed a printer in “Installing the Printer” on page 54, configure the printer port to match the printer.
1. Select the
I/O
tab and press the
Printer
button.
2. Press the
Printer
button and select your printer model, either
Citizen
,
Seiko
, or
Epson
. If you do not
have a printer, make sure
No Printer
is selected.
3. Press the
Header Freq.
button and select
First Page
to print a header only on the first page of output
or select
All Pages
to print a header on all pages of output.
4. Press the
Print Freq.
button and select how often you would like to print TOC data information.
Exporting and Printing System Settings
Calibration constants and other key parameters are stored in the Analyzer’s memory. You should export and
print the factory settings for future reference.
To export the system to a configured file and an encrypted file for DataShare 500 software, follow these steps:
1. Select the
Maintenance
tab.
2. Press the
Advanced
button.
3. Press the
USB I/O
button. Make sure that the USB flash memory drive from the Analyzer’s accessory kit
is attached to the USB port, then press the
Save System
button. Archive the exported files in a secure
location on your computer.
4. Press the
Back
button and then press the
Menu
button.
If you have a printer attached to the Analyzer, you can print these settings for future reference by following these
steps:
Note:
If DataGuard is enabled, data must either be sent to storage or the serial port. See
“Using DataGuard” on page 105 for more information.
Summary of Contents for Sievers 500 RL
Page 8: ...GE Analytical Instruments 2010 8 of 226 DLM 74001 04 Rev A ...
Page 10: ...GE Analytical Instruments 2010 10 of 226 DLM 74001 04 Rev A ...
Page 36: ...GE Analytical Instruments 2010 36 of 220 DLM 74001 04 Rev A ...
Page 66: ...GE Analytical Instruments 2010 66 of 226 DLM 74001 04 Rev A Chapter 3 Installation ...
Page 152: ...GE Analytical Instruments 2010 152 of 226 DLM 74001 04 Rev A Chapter 7 Maintenance ...
Page 170: ...GE Analytical Instruments 2010 170 of 226 DLM 74001 04 Rev A Chapter 8 Troubleshooting ...
Page 178: ...Appendix A GE Analytical Instruments 2010 178 of 186 DLM 74001 04 Rev A ...
Page 185: ...Notes GE Analytical Instruments 2010 185 of 186 DLM 74001 04 Rev A 186 ...
Page 186: ...Notes GE Analytical Instruments 2010 186 of 186 DLM 74001 04 Rev A 186 ...