


GE Analytical Instruments ©2010
163 of 226
DLM 74001-04 Rev. A
Chapter 8: Troubleshooting
10. On the Analyzer’s touch screen, press the
Menu
button, then select
Maintenance
Advanced
Diagnostics
Test Pumps
.
11. Press the
Sample Pump
button and then select
On
.
12. Let the Analyzer run this way for approximately 5 minutes. Then, press the
Sample Pump
button and
select
Off
.
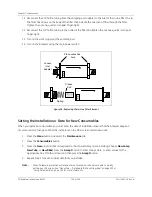
13. Restore the sample pump tubing connections to their normal configuration.
14. Restore the inlet and waste fittings to their normal configuration.
Negative, High, or Erratic Measurements
Many of the previous steps in this chapter will help troubleshoot negative or erratic measurements. If the
previous steps did not remedy the situation, you may need to perform one of the following procedures.
Conductivity Autozero
If the Analyzer is returning unusually high IC or conductivity values, a sample conductivity cell autozero may be
necessary. If you have recently run a system protocol, let the Analyzer run for at least five hours before
performing a conductivity autozero.
1. Make sure the Analyzer is not taking measurements.
2. Press the
Menu
button and select the
Maintenance
tab.
3. Press the
Advanced
button.
4. Press the
Cond. Autozero
button.
Sample Conductivity Cell Calibration
If for any reason the sample conductivity cell has been replaced, or you suspect poor performance of the cell,
then you may need to perform a sample conductivity cell calibration. For this protocol you will need a Sievers 25
µS/cm Conductivity Standard (as HCl). If you have a Super
iOS
, place this standard in vial port 1.
1. Make sure the Analyzer is not taking measurements.
2. Press the
Menu
button and select the
Maintenance
tab.
3. Press the
Cal/Ver/Validate
button.
4. Press the
Sample Cell Cal
button.
Summary of Contents for Sievers 500 RL
Page 8: ...GE Analytical Instruments 2010 8 of 226 DLM 74001 04 Rev A ...
Page 10: ...GE Analytical Instruments 2010 10 of 226 DLM 74001 04 Rev A ...
Page 36: ...GE Analytical Instruments 2010 36 of 220 DLM 74001 04 Rev A ...
Page 66: ...GE Analytical Instruments 2010 66 of 226 DLM 74001 04 Rev A Chapter 3 Installation ...
Page 152: ...GE Analytical Instruments 2010 152 of 226 DLM 74001 04 Rev A Chapter 7 Maintenance ...
Page 170: ...GE Analytical Instruments 2010 170 of 226 DLM 74001 04 Rev A Chapter 8 Troubleshooting ...
Page 178: ...Appendix A GE Analytical Instruments 2010 178 of 186 DLM 74001 04 Rev A ...
Page 185: ...Notes GE Analytical Instruments 2010 185 of 186 DLM 74001 04 Rev A 186 ...
Page 186: ...Notes GE Analytical Instruments 2010 186 of 186 DLM 74001 04 Rev A 186 ...