


GE Analytical Instruments ©2010
142 of 226
DLM 74001-04 Rev. A
Chapter 7: Maintenance
To replace the UV lamp:
1. If the Analyzer is taking measurements, press the
Stop Analysis
button.
2. Turn off the Analyzer by using the main power switch.
3. Open the Analyzer front panel.
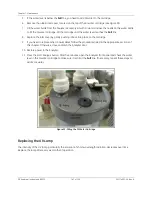
4. Locate the UV lamp enclosure at the right of the Analyzer (see Figure 32 on page 140). The UV enclosure
has a brass nut and a gray wire with a black connector extending from the nut.
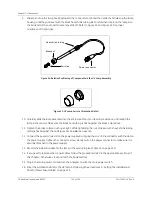
5. Disconnect the black power connector from the power supply by turning the connector and then
carefully pulling the two halves of the plug apart.
6. Loosen the brass nut on the UV enclosure. The nut should only be finger-tight; do not use a wrench.
7. Slowly slide the UV lamp out of the enclosure.
8. Put on the glove provided with the new UV lamp, to avoid leaving fingerprints on the quartz window of
the lamp. Remove the new lamp from the packet and the nut and ferrules from the zip-top bag.
Warning
The UV lamp contains mercury and may be considered hazardous material in your
local area. Dispose of the UV lamp in accordance with federal, state, or local
government regulations.
Warning
Installation of the UV lamp requires access to the inside of the
Analyzer. To avoid potentially dangerous shock, disconnect the power
cord before opening the Analyzer’s front panel.
Warning
Should the UV lamp become broken or damaged, it should be handled in
accordance with your organization's toxic waste handling procedure and disposed
of in accordance with federal, state, or local government regulations.
Note:
A cotton glove to be worn during the installation is included with the replacement UV
lamp to avoid leaving fingerprints on the quartz window of the lamp. Fingerprints
absorb UV radiation and decrease the performance of the oxidation reactor. If
necessary, use methanol to remove any fingerprints before installing the new lamp.
Summary of Contents for Sievers 500 RL
Page 8: ...GE Analytical Instruments 2010 8 of 226 DLM 74001 04 Rev A ...
Page 10: ...GE Analytical Instruments 2010 10 of 226 DLM 74001 04 Rev A ...
Page 36: ...GE Analytical Instruments 2010 36 of 220 DLM 74001 04 Rev A ...
Page 66: ...GE Analytical Instruments 2010 66 of 226 DLM 74001 04 Rev A Chapter 3 Installation ...
Page 152: ...GE Analytical Instruments 2010 152 of 226 DLM 74001 04 Rev A Chapter 7 Maintenance ...
Page 170: ...GE Analytical Instruments 2010 170 of 226 DLM 74001 04 Rev A Chapter 8 Troubleshooting ...
Page 178: ...Appendix A GE Analytical Instruments 2010 178 of 186 DLM 74001 04 Rev A ...
Page 185: ...Notes GE Analytical Instruments 2010 185 of 186 DLM 74001 04 Rev A 186 ...
Page 186: ...Notes GE Analytical Instruments 2010 186 of 186 DLM 74001 04 Rev A 186 ...