background image

6 Scanning

137

3.

Tap [Scan to Email].

4.

Enter the e-mail address for the recipient.

Note

• You can also use the address book or an LDAP server to specify the e-mail address. For details, see "Using the Address 

Book (P.279)."

5.

Tap the button next to

, and then select the file format of the scanned data to be sent.

6.

Tap

, and then configure the scan settings as needed.

Refer

• For details about the settings, see "Configuring the Detailed Settings (P.140)."

7.

Tap [Send].

Note

• If the message about the next document is displayed, follow the on-screen instructions to finish scanning.

Checking the Scanned Data

You can check the scanned data before sending the data. On the detailed setting screen, display the check mark 
for [Preview], and then tap [Preview] on the upper right corner. When a document is scanned, the Preview screen 
for the document is displayed.

Refer

• For details about the [Preview] setting, see "Configuring the Detailed Settings (P.140)."

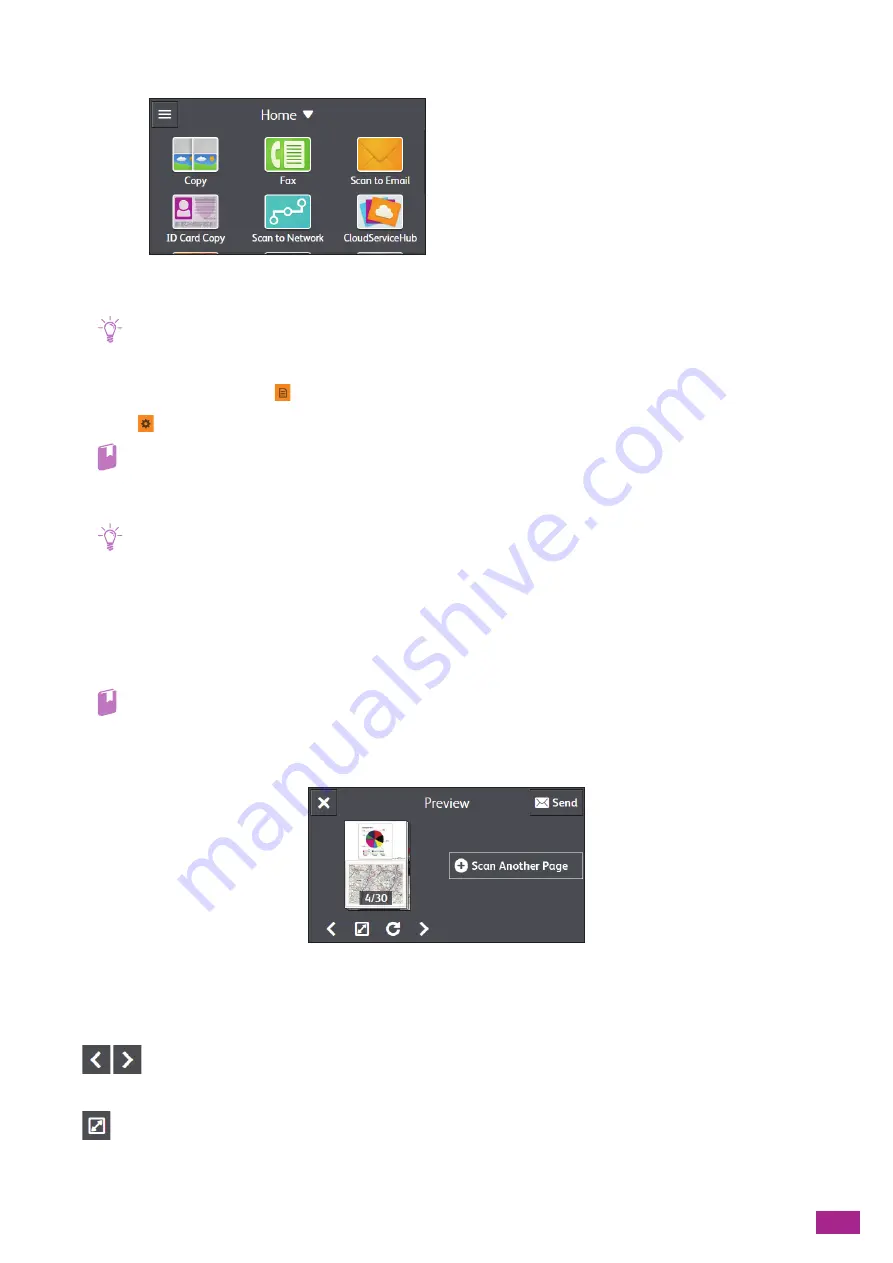
Preview Screen

You can perform the following operations.

[Scan Another Page]

Displayed when the document is placed on the document glass. Tap to scan the next document.

Switches the page to be displayed.

Opens the Preview details screen.

Summary of Contents for DocuCentre SC2022

Page 1: ...DocuCentre SC2022 User Guide...

Page 2: ...rk or trademark of Fuji Xerox Co Ltd In this manual safety instructions are preceded by the symbol Always read and follow the instructions before performing the required procedures As the copying mach...

Page 3: ...is machine This manual assumes you are familiar with computers and the basics of network operation and configuration For the basic information or operations about your computer or the network environm...

Page 4: ...dress 30 2 2 6 Installing Software for Windows 33 2 2 7 Installing Software for Mac 35 2 2 8 Installing Print Drivers on Linux Computers CUPS 45 3 Using Your Machine 46 3 1 Using the Operator Panel 47...

Page 5: ...4 6 Printing on Envelopes 97 5 Copying 100 5 1 Making a Copy 101 5 1 1 Basic Copying 101 5 1 2 Various Copy Features 103 5 2 Making ID Card Copies 110 5 2 1 Basic ID Card Copy 110 5 2 2 Various ID Car...

Page 6: ...ng Menus 215 10 2 Language 227 10 3 About 228 10 4 Information Pages 229 10 4 1 Printing Information Pages 230 10 5 Trays 231 10 5 1 Bypass Tray 231 10 5 2 Tray 1 231 10 5 3 Tray 2 232 10 5 4 Tray Pri...

Page 7: ...262 10 13 Advanced Settings 263 10 13 1 PCL Settings 263 10 13 2 PDF Settings 265 10 13 3 USB Port Settings 266 10 13 4 Copy Settings 266 10 13 5 Scan Settings 266 10 13 6 Output Settings 266 10 13 7...

Page 8: ...the Drum Cartridges 349 12 1 3 Replacing the Waste Toner Container 350 12 2 Cleaning the Machine 354 12 2 1 Cleaning Outside the Machine 354 12 2 2 Cleaning the Touch Panel 355 12 2 3 Cleaning Inside...

Page 9: ...Feeder 402 Tray 2 One Tray Module Optional 403 Optional Accessories 404 About Supplies 405 Life of Consumables 405 Collection and Recycling of Consumables 405 Attaching Removing the Optional Wireless...

Page 10: ...User Guide 10 1 Before Beginning 1 1 Types of Manuals 11 1 2 About This Manual 12 1 3 Features of the Machine 14 1 4 Machine Overview 17 1 5 Graphic Symbols on the Machine and Their Meanings 21...

Page 11: ...he machine safely User Guide this manual Software Product Manual disc Describes how to get ready to print copy fax and scan as well as set various features It also covers the operator panel menus trou...

Page 12: ...Describes the instructions for basic scan operations and various features of the scan function 7 Faxing Optional P 161 Describes the instructions for basic fax operations and various features of the f...

Page 13: ...information useful for operations Indicates reference sections or documents A cross reference included in this manual Names of DVD ROM operator panel messages and input text XXXXX Manual Indicates the...

Page 14: ...wo Pages of a Document Onto a Single Page 2 Up P 106 You can copy two pages of a document to fit onto one side of a sheet of paper Copying Both Sides of an ID Card ID Card Copy P 110 You can copy both...

Page 15: ...Faxing Faxing From the Machine P 162 You can send or receive faxes by using the operator panel of the machine Sending a Fax From a Windows Computer Direct Fax P 176 You can send a fax from your compu...

Page 16: ...nfidential Document Secure Print P 83 Store the print data in the machine with your user ID and passcode specified You can later start printing when you are at the machine Printing From Smartphones or...

Page 17: ...ont and Left Side View 1 Document Glass Cover 7 Tray 2 One Tray Module Optional 2 Document Glass 8 Stand Cabinet Optional 3 Operator Panel 9 Left Side Cover B 4 Output Tray 10 Tray 5 Bypass 5 Front Co...

Page 18: ...ly on the model with the fax function Internal View 1 USB Port 4 Wall Jack Connector 2 Ethernet Port 5 Power Cord Connector 3 Phone Connector 6 Wireless LAN Kit Optional 1 Toner Cartridges 3 Waste Ton...

Page 19: ...settings by directly tapping the screen Displays various settings instructions and error messages 2 Home button Moves to the Home screen 3 Power button Turns on off the machine Switches the machine be...

Page 20: ...he machine is turned on a job is completed the machine receives an identification signal from a mobile device an authentication is completed successfully or when an error is cleared Blinks in orange w...

Page 21: ...s tray Maximum Fill Line Add Paper Push down Bottom Plate Paper Jam Do not remove forcefully Ethernet USB Phone connector Line connector Toner Cleaning Wand Location Remove Lock Unlock Supply Paper Do...

Page 22: ...User Guide 22 2 Setting Up the Machine 2 1 Turning On Off the Machine 23 2 2 Connecting Your Machine to a Computer 24...

Page 23: ...e Power button 2 1 2 Turning Off the Machine Important The print data and stored data in the memory is cleared when the machine is turned off 1 Press the Power button 2 Tap Power Off on the touch pane...

Page 24: ...simultaneously If you connect the machine to a wireless network disconnect the Ethernet cable from the machine Wired LAN or USB connection Preparation Connect an Ethernet cable or a USB cable to the...

Page 25: ...35 Wireless LAN connection Preparation Install the optional Wireless LAN Kit and then remove the Ethernet cable Attaching the Optional Wireless LAN Kit P 406 Windows Connect the machine to a wireless...

Page 26: ...rnet cable is connected to the machine disconnect it turn off the machine and then turn it on again You can configure the settings for wireless LAN connection as follows Connecting automatically from...

Page 27: ...wireless router within 2 minutes When connection to an access point or wireless router is complete the machine will restart automatically When Connecting With WPS PIN code method 1 Press the Home butt...

Page 28: ...Tap Device 3 Tap Network Settings Wi Fi 4 Tap Wi Fi Setup Wizard 5 Tap the desired access point or wireless router Note If the desired access point or wireless router does not appear enter the SSID m...

Page 29: ...he encryption type set to WEP you cannot use Quick Setup Configure the wireless network settings from the operator panel of the machine and install the software using Custom Installation For details a...

Page 30: ...hange the IP address Note When you specify an IP address in IPv6 mode use the Support Tools in the Software Product Manual disc or CentreWare Internet Services For details about the Support Tools see...

Page 31: ...IP IP Addressing 7 Set the IP address To set the IP address automatically a Tap DHCP AutoIP BOOTP RARP or DHCP To set the IP address manually a Tap Manual Input b Tap IP Address c Enter the IP address...

Page 32: ...nting the System Settings report Using the Operator Panel 1 Press the Home button 2 Tap Device 3 Tap About 4 Check the IP address displayed in IPv4 or IPv6 Using the System Settings Report 1 Print the...

Page 33: ...ll see Installing With Quick Setup P 34 For details about Print Scan Hub see Print Scan Hub Windows P 274 2 Custom Installation Driver You can select and install only the drivers that you need The fol...

Page 34: ...LAN settings Refer For details about the settings see Connecting Using Support Tools Windows P 29 7 Media Information You can view the contents in the Software Product Manual disc 8 Model specific Ma...

Page 35: ...lowing 1 Click Start All Programs Accessories Run For Windows 10 right click the Start button and then click Run 2 Enter D Launcher exe D is the drive letter of the optical drive and then click OK 2 C...

Page 36: ...The following procedure uses macOS 10 12 as an example 1 Turn on the machine 2 Connect the USB cable to the machine and your computer 3 From the Apple menu open System Preferences and then click Print...

Page 37: ...etting Up the Machine 37 6 From the Name list select the name of your machine with USB displayed in the Kind column 7 From the Use drop down list box select a driver supported for the machine 8 Click...

Page 38: ...re uses macOS 10 12 as an example 1 Turn on the machine 2 Make sure that your computer and the machine are connected If you use a wired connection connect the machine to the network using an Ethernet...

Page 39: ...2 Setting Up the Machine 39 4 Click 5 Click IP 6 From the Protocol drop down list box select Line Printer Daemon LPD...

Page 40: ...User Guide 40 7 Enter the IP address for the machine in the Address area 8 From the Use drop down list box select a driver supported for the machine 9 Click Add...

Page 41: ...ocedure uses macOS 10 12 as an example 1 Turn on the machine 2 Make sure that your computer and the machine are connected If you use a wired connection connect the machine to the network using an Ethe...

Page 42: ...r Guide 42 4 Click 5 From the Name list select the name of your machine with Bonjour Multifunction displayed in the Kind column 6 From the Use drop down list box select a driver supported for the mach...

Page 43: ...n the machine and then click OK 9 Make sure that the machine is displayed in the Printers list Enabling Optional Accessories On the driver specify the optional accessories installed on the machine to...

Page 44: ...User Guide 44 1 From the Apple menu open System Preferences and then click Printers Scanners 2 Select the machine in the Printers list and then click Options Supplies 3 Click Options...

Page 45: ...l accessories installed on the printer and then click OK 2 2 8 Installing Print Drivers on Linux Computers CUPS The latest print drivers for Linux computers can be downloaded from our official web sit...

Page 46: ...User Guide 46 3 Using Your Machine 3 1 Using the Operator Panel 47 3 2 Power Saver Mode 59 3 3 Checking Jobs 61 3 4 Print Media Guidelines 63 3 5 Loading Print Media 67 3 6 Loading a Document 74...

Page 47: ...ay the Home screen press the Home button You can customize the Home screen to suit your preference or work style Refer For details about how to customize your Home screen see Customizing the Home Scre...

Page 48: ...send scanned data to an e mail address that you use to login Refer Using the Cloud Service Hub P 179 Address Book You can register an address to the address book or edit delete the contact informatio...

Page 49: ...messages network information and Wi Fi Direct information Note The sidebar button may appear with a mark to show the status of the machine To show the details tap the sidebar button Shows that there a...

Page 50: ...can easily access the tiles you often use or you can delete the tiles from the Home screen that you do not often use Also if you make the tiles with the frequently used job settings like taking 15 se...

Page 51: ...he place the tile is moved to Confirm the place and release the tile 3 Tap Done Adding the Predefined Tiles You can add the predefined tiles to the Home screen 1 Tap Home Customize 2 Tap Add 3 Tap the...

Page 52: ...s for other jobs such as faxing or scanning follow the same procedures on the job settings screen of each job 1 Tap Copy on the Home screen 2 Change the copy settings Refer For details about the copy...

Page 53: ...ur custom tile The following explanation is an example to edit your custom tile for copying To edit your custom tiles for other jobs such as faxing or scanning follow the same procedures on the job se...

Page 54: ...ator panel For details see Language P 227 3 1 5 Restricting the Touch Panel Operation You can restrict access to the settings with a passcode This prevents unauthorized users from changing the setting...

Page 55: ...ock 1 Press the Home button 2 Tap Device 3 Tap Security Settings Panel Lock 4 Tap for Panel Lock Settings to display the check mark 5 Enter a four digit passcode and then tap OK 6 Re enter the passcod...

Page 56: ...User Guide 56 2 Tap Device 3 Tap Security Settings 4 Enter the current passcode and then tap OK 5 Tap Panel Lock Change Passcode 6 Enter the current passcode and then tap OK...

Page 57: ...ock Note You need to disable Secure Fax Receive User Authentication and Service Lock before disabling the Panel Lock For details see Secure Fax Receive P 257 User Authentication P 257 and Service Lock...

Page 58: ...users permission to use the features or limit the features that unregistered users guest users can use Furthermore you can limit the features that each registered user can use To use the machine regi...

Page 59: ...power saver mode the Power button blinks slowly 3 2 2 Phases of the Power Saver Mode The power saver mode has two phases the low power mode and the sleep mode The low power mode is the first phase Wh...

Page 60: ...User Guide 60 3 2 4 Recovering From the Power Saver Mode Press the Power button to recover from the power saver mode...

Page 61: ...For details see Job History P 229 or the CentreWare Internet Services Help 3 3 1 Checking the Job Status 1 Press the Home button 2 Tap Jobs Job status is listed Note You can list only the fax print or...

Page 62: ...ting Deleting Stored Print Jobs You can print or delete the jobs that are stored for Secure Print and Sample Set Refer For details see Secure Print P 83 or Sample Set P 84 Printing Faxes Received Usin...

Page 63: ...d media contact our Customer Support Center Important The toner may come off print media if it gets wet by water rain or steam For details contact our Customer Support Center 3 4 2 Usable Paper Weight...

Page 64: ...169 Covers Thick 170 256 170 216 Covers Thick Reload 170 256 170 216 Coated 106 169 Coated Reload 106 169 Coated Thick 170 256 170 216 Coated Thick Reload 170 256 170 216 Labels 106 256 106 216 Prepr...

Page 65: ...ased or wrinkled print media B5 182 x 257 mm LEF Orientation SEF Orientation A5 148 x 210 mm LEF Orientation SEF Orientation 8K 270 x 390 mm LEF Orientation SEF Orientation 16K 195 x 270 mm LEF Orient...

Page 66: ...ls contact our Customer Support Center 3 4 4 Storing and Handling Print Media Storing Print Media Store print media in a cabinet or a place with low humidity Print media containing moisture may cause...

Page 67: ...rinting 1 Pull out the paper tray until it stops Important Do not load different sizes or types of paper on top of any remaining paper in a tray Doing so may cause paper jams or loading errors Pulling...

Page 68: ...edia above the fill line shown as MAX Doing so may cause a jam or a malfunction Note If the paper guides are not aligned with the paper it may cause a paper jam When the paper guides are not aligned w...

Page 69: ...elect the Display Tray Prompt check box for each tray 7 Tap the paper type on the bottom right of the screen and select the paper type 8 Tap OK 3 5 2 Loading Print Media in Tray 5 Bypass Important Do...

Page 70: ...n appears to specify the paper hide the check mark for Use Driver Setting Note The machine is set at the factory to display the screen to specify the paper If the screen does not appear tap Device Tra...

Page 71: ...e of paper loaded in Tray 5 bypass correctly Refer For details about a print driver feature see the print driver help Copying on Print Media Loaded in Tray 5 Bypass 1 Load paper in Tray 5 bypass 2 Cle...

Page 72: ...not load different sized envelopes at the same time The maximum height of envelopes that can be loaded in Tray 5 bypass is about 10 mm 0 39 If envelopes are not fed correctly curl the edge of the env...

Page 73: ...with the side to be copied or printed facing down so that the top edge side with a flap is pulled in first to the machine Envelopes With a Flap on the Short Edge Top Opening Envelopes Load envelops w...

Page 74: ...in the Duplex Automatic Document Feeder DADF When document is loaded in the Duplex Automatic Document Feeder DADF the machine detects the document size automatically The following standard size docume...

Page 75: ...tapes or staples before loading documents Otherwise they may cause a jam or a malfunction on the Duplex Automatic Document Feeder DADF Important Do not load a document above the fill line shown as MAX...

Page 76: ...CAUTION Do not apply excessive force to hold thick document on the document glass It may break the glass and cause injuries Note When Original Size is set to Auto an error screen appears when you pla...

Page 77: ...nting From a Computer 78 4 2 Canceling a Print Job 81 4 3 Printing Color Jobs in Black and White 82 4 4 Using Stored Print Windows 83 4 5 Printing a File in a USB Flash Drive USB Direct Print Optional...

Page 78: ...ator panel For details about a print driver feature see the print driver help The following describes a typical printing procedure 4 1 1 For Windows 1 Open the file that you want to print 2 From the F...

Page 79: ...with a USB connection click Connectivity on the left pane in CentreWare Internet Services select AirPrintTM in Mobile Printing and select the USB Connection check box For details see the CentreWare In...

Page 80: ...User Guide 80 3 Select the machine from Printer and then configure the print settings as needed 4 Click Print...

Page 81: ...on 2 Tap Jobs 3 Tap All Jobs Print Jobs and then select the print job that you want to cancel 4 Tap Delete Job 4 2 2 Canceling a Job From a Computer Cancel a print job from the operating system or app...

Page 82: ...on each user For details see Using Print Accounting P 290 You cannot print color jobs in black and white from Mac 1 Press the Home button 2 Tap Device 3 Tap Security Settings Print Accounting 4 Tap Pr...

Page 83: ...hen you print a document from Windows Secure Print You can store print jobs secured with a passcode in the machine This feature is useful to print confidential documents since the job can be printed o...

Page 84: ...int Deleting Secure Print Jobs 1 Press the Home button 2 Tap Jobs 3 Tap Stored Print Jobs to select the desired folder 4 Enter the specified passcode 5 Tap of the document to be deleted 6 Tap Yes 4 4...

Page 85: ...int Jobs to select the desired folder 4 Select the document you want to print and then specify the number of printouts 5 Tap Print Deleting Sample Set Jobs 1 Press the Home button 2 Tap Jobs 3 Tap Sto...

Page 86: ...B Flash Drive and File Formats Supported USB Flash Drive You can use a USB flash drive with the following specification USB 2 0 USB 1 1 Type A connector FAT16 FAT32 Note This feature cannot be used on...

Page 87: ...nt settings as needed Refer For details about PDF TIFF Print see Configuring the Detailed Settings P 89 and for details about Photo Print JPEG see Configuring the Detailed Settings P 93 6 Tap Print Im...

Page 88: ...lain Reload Bond 91 105 gsm Bond Reload Recycled 60 89 gsm Recycled Reload Prepunched 60 89 gsm Letterhead 60 89 gsm Covers 106 169 gsm Covers Reload Covers Thick 170 256 gsm Covers Thick Reload Coate...

Page 89: ...hen tap OK Note Tap to display the preview image of the selected file 5 Select the desired setting item Select the file that you want to print Color Black Specify whether to print in color or black an...

Page 90: ...Tray Module Optional is installed 2 Sided Printing Specify whether to print on both sides of a sheet of paper For two sided printing specify whether the printouts are bound at the long edge or short...

Page 91: ...e Resetting or Saving the Settings Perform the following procedure to reset or save the configured settings 1 Tap PDF TIFF Print Auto Prints PDF TIFF files in the Text mode Photos Standard Quality Pri...

Page 92: ...210 mm A4 210 x 297 mm B5 257 x 182 mm B5 182 x 257 mm A5 148 x 210 mm 8K 270 x 390 mm 11 x 17 Legal 8 5 x 14 8 5 x 13 Letter 8 5 x 11 Letter 8 5 x 11 Paper Type Plain 60 90 gsm Plain Reload Bond 91...

Page 93: ...3 Tap Photo Print JPEG 4 Select the file that you want to print and then tap OK Note To select all the photos in a folder tap To deselect all the files in a folder tap 5 Select the desired setting ite...

Page 94: ...to specify the number of printouts Layout Specify the number of pages to be imposed on one side of print media Paper Trays Select a paper feed tray Available only when Tray 2 One Tray Module Optional...

Page 95: ...multiple page file Image Type Select the print image quality Resetting or Saving the Settings Perform the following procedure to reset or save the configured settings Collated Prints out the file set...

Page 96: ...Print 2 Select the desired setting item Reset Resets the Photo Print JPEG settings of the machine Save as New Default Saves as new default settings Change the name for the tile as necessary and then...

Page 97: ...them as shown in the illustration before loading the envelopes Do not load different sized envelopes at the same time The maximum height of envelopes that can be loaded in Tray 5 bypass is about 10 mm...

Page 98: ...lap is pulled into the machine first When loading envelopes with a flap on the short edge top opening envelopes Load envelops with the side to be printed facing down so that the bottom edge side witho...

Page 99: ...al Document Size drop down list box select the document size 8 From the Scale Options drop down list box select Automatically Scale 9 From the Output Paper Size drop down list box select the envelope...

Page 100: ...User Guide 100 5 Copying 5 1 Making a Copy 101 5 2 Making ID Card Copies 110...

Page 101: ...Document on the Duplex Automatic Document Feeder DADF P 74 2 Press the Home button 3 Tap Copy 4 Tap and then configure the copy settings as needed Refer For details about the copy settings see Configu...

Page 102: ...e Remove any documents from the Duplex Automatic Document Feeder DADF before copying from the document glass 1 Place a document Refer For details about loading a document see Loading a Document on the...

Page 103: ...Note Zoom ratio can be set manually between 25 and 400 Paper Trays Auto Bypass Paper Size A3 297 x 420 mm B4 257 x 364 mm A4 297 x 210 mm A4 210 x 297 mm B5 257 x 182 mm B5 182 x 257 mm A5 148 x 210...

Page 104: ...o automatically determine whether to copy the document in color or black and white Configuring the Detailed Settings 1 Tap Original Size Auto A3 297 x 420 mm B4 257 x 364 mm A4 297 x 210 mm A4 210 x 2...

Page 105: ...to is selected the optimal zoom ratio is automatically specified according to the document size and the paper size See the following table for specific zoom ratios from the standard size document to t...

Page 106: ...ent size and the zoom ratio Bypass Paper Size Select the paper size Paper Type Select the paper type Tray 1 Tray 2 1 1 Sided Copies one sided documents into one sided printouts 1 2 Sided Copies one si...

Page 107: ...document size automatically Original Type Select the document type You can make a copy with image quality that is optimal for the document type Collation Specify whether to print out the copies page...

Page 108: ...e shadows on the top and bottom the left and right or the middle when copying a thick document or a booklet Resetting or Saving the Settings Perform the following procedure to reset or save the config...

Page 109: ...aves as new default settings Change the name for the tile as necessary and then select the color and icon Save as New App Copies the existing settings and saves as a new tile Change the name for the t...

Page 110: ...s at the same time 1 Press the Home button 2 Tap ID Card Copy Front Back ID card ID card orientation Copy output When copying only one ID card When copying two ID cards at the same time Front Copy out...

Page 111: ...number of copies tap plus or minus beside Quantity Or tap Quantity and enter using the numeric keys To specify the number of ID cards to be copied tap Number Of Cards Refer For details about the copy...

Page 112: ...cument glass cover 8 Tap Start After the front of the ID card is scanned a message is displayed on the operator panel prompting you to turn over the card To copy the back of the ID card follow the on...

Page 113: ...11 Custom Paper Size Paper Type Plain 60 90 gsm Plain Reload Bond 91 105 gsm Bond Reload Recycled 60 89 gsm Recycled Reload Prepunched 60 89 gsm Letterhead 60 89 gsm Covers 106 169 gsm Covers Reload...

Page 114: ...e numeric keys to specify the number of copies Output Color Specify whether to copy in color or black and white When Auto Detect is selected the machine detects color documents and black and white doc...

Page 115: ...aper tray Available only when Tray 2 One Tray Module Optional is installed Number Of Cards Select the number of cards to be copied at the same time Sharpness Specify the sharpness level to make the im...

Page 116: ...e the configured settings 1 Tap ID Card Copy 2 Select the desired setting item Reset Resets the ID Card Copy settings of the machine Save as New Default Saves as new default settings Change the name f...

Page 117: ...6 Scanning 117 6 Scanning 6 1 Overview 118 6 2 Scanning Using the Operator Panel of the Machine 119 6 3 Scanning From a Computer 152...

Page 118: ...For details see Using the Cloud Service Hub P 179 Operate From the Machine Storing to a Computer Connected to the Network Scan to WSD P 129 Operate From a Computer Mobile Device Scanning From a Comput...

Page 119: ...rs are registered using the Address Book Editor Note Install the Address Book Editor by Custom Installation using the Software Product Manual disc For details about how to install see Installing With...

Page 120: ...lows Setting Up a User Account To store scanned data to a Server Message Block SMB shared folder it is necessary to create a shared folder on a computer To create a shared folder a user account with a...

Page 121: ...Share name Note The shared name is required in the next setting procedure 6 Click Permissions 7 Click Add 8 Select the user login name by performing either of the following Click Advanced and then sea...

Page 122: ...Preferences window and then click Sharing 3 Select the File Sharing check box 4 Click under Shared Folders 5 Select the folder you created on step 1 and then click Add 6 Click Options 7 Select the Sha...

Page 123: ...k for Preview and then tap Preview on the upper right corner When a document is scanned the Preview screen for the document is displayed Refer For details about the Preview setting see Configuring the...

Page 124: ...Network feature are as follows are the factory default values File Format PDF Multi Page TIFF TIFF JPEG XDW DocuWorks Preview On Off Output Color Color Black White Grayscale Resolution 200 dpi 300 dp...

Page 125: ...lect the desired setting item Select an FTP or SMB server address from the address book Displays the information of the registered network address File Format Select the file format of the scanned dat...

Page 126: ...is selected documents are output as black and white images When Grayscale is selected documents are output as grayscale images Resolution Select the scan resolution rate when scanning a document Note...

Page 127: ...trast makes the difference bigger and the lower contrast smaller Background Suppression Tap to display the check mark to suppress the background density of the document to enhance the scanned image Or...

Page 128: ...cified up to 32 characters When the scanned data is stored as one page per file or if the file name is the same with that of the existing file on the server hyphen and consecutive four digit number 00...

Page 129: ...reating New Tiles P 52 Storing to a Computer Connected to the Network Scan to WSD If the machine is connected to a computer via network using Web Services on Devices WSD you can send scanned data to a...

Page 130: ...that the WSD Scan check mark is displayed Setting the Computer The following procedure uses Windows 7 and Windows 10 as examples For Windows 7 1 Click Start Control Panel Add a device 2 Select the ma...

Page 131: ...fy how your computer acts if the computer receives the scanned data Open Scan properties of this machine on your computer and specify the action in Actions under Events tab For details see the help of...

Page 132: ...computer acts if the computer receives the scanned data Open Scan properties of this machine on your computer and specify the action in Actions under Events tab For details see the help of your comput...

Page 133: ...ext document is displayed follow the on screen instructions to finish scanning 8 In the screen displayed on the computer that the scanned data is sent to select the application to receive the scanned...

Page 134: ...the IP address of the machine in your web browser and start CentreWare Internet Services Note To check the IP address of the machine press the Home button on the operator panel and then tap Device Ab...

Page 135: ...ddress depending on your network environment 7 Click OK 8 Click Restart Now 9 When restarting the machine is complete click Refresh Registering the Mail Server Settings in the Machine 1 Enter the IP a...

Page 136: ...the server settings and then click OK Refer For details about the settings see the CentreWare Internet Services Help 11 Click Restart Now 12 When restarting the machine is complete click Refresh Note...

Page 137: ...he next document is displayed follow the on screen instructions to finish scanning Checking the Scanned Data You can check the scanned data before sending the data On the detailed setting screen displ...

Page 138: ...Enlarges reduces the preview Rotates the displayed page by 90 degrees clockwise each time you tap it Pages are also rotated on the output data Note is not displayed depending on the file format Close...

Page 139: ...al Darken 1 Darken 2 Darken 3 Sharpness Higher Normal Lower Contrast Higher Normal Lower Background Suppression On Off Original Size Auto A3 297 x 420 mm B4 257 x 364 mm A4 297 x 210 mm A4 210 x 297 m...

Page 140: ...e Detailed Settings 1 Tap 2 Select the desired setting item Preview Tap to display the check mark to display the preview of the scanned data before sending Output Color Select the color mode when scan...

Page 141: ...e density to make the scanned data darker or lighter Sharpness Specify the sharpness level to make the image sharper or softer Contrast Specify the difference between the light and the dark The higher...

Page 142: ...Suffix YYMMDDHHMMSS_specified characters extension Note YYMMDDHHMMSS stands for the last two digits of year two digits of month and day two digits of hour minute and second Prefix and suffix can be s...

Page 143: ...g item Reset Resets the Scan to Email settings of the machine Save as New Default Saves as new default settings Change the name for the tile as necessary and then select the color and icon Save as New...

Page 144: ...Drive 5 Tap and then select the folder to store the scanned data 6 Tap the button under File Format and then select the file format of the scanned data to be saved 7 Tap and then configure the scan se...

Page 145: ...ed Settings P 147 Preview Screen You can perform the following operations Scan Another Page Displayed when the document is placed on the document glass Tap to scan the next document Switches the page...

Page 146: ...s the Home button File Format PDF Multi Page TIFF TIFF JPEG XDW DocuWorks Preview On Off Output Color Color Black White Grayscale Resolution 200 dpi 300 dpi 400 dpi 600 dpi 2 Sided Scanning 1 Sided 2...

Page 147: ...to the front USB port of the machine 3 Tap Scan to USB Drive 4 Select the desired setting item Select a folder to store the scanned data File Format Select the file format of the scanned data to be sa...

Page 148: ...scanned data before storing Output Color Select the color mode when scanning a document Resolution Select the scan resolution rate when scanning a document 2 Sided Scanning Specify whether to scan bot...

Page 149: ...e between the light and the dark The higher contrast makes the difference bigger and the lower contrast smaller Background Suppression Tap to display the check mark to suppress the background density...

Page 150: ...ified up to 32 characters When the scanned data is stored as one page per file or if the file name is the same with that of the existing file on the server hyphen and consecutive four digit number 000...

Page 151: ...Select the desired setting item Reset Resets the Scan to USB Drive settings of the machine Save as New Default Saves as new default settings Change the name for the tile as necessary and then select t...

Page 152: ...ossible Also check that you have all the pages of your document in hand after you finish scanning 6 3 1 For Windows Scanning Using Print Scan Hub You can scan documents using the Print Scan Hub progra...

Page 153: ...difference between the light and the dark Clicking makes the difference between the light and the dark bigger and clicking makes the difference smaller 6 Click Scan to start scanning 7 Edit the scanne...

Page 154: ...ollowing operating systems Windows 7 Windows 8 1 Windows 10 Windows Server 2008 Windows Server 2008 R2 Windows Server 2012 Windows Server 2012 R2 Windows Server 2016 Setting Up Web Services on Devices...

Page 155: ...10 as examples For Windows 7 1 Click Start Control Panel Add a device 2 Select the machine and then click Next 3 Follow the on screen instructions The machine is connected to your computer using Web S...

Page 156: ...User Guide 156 2 Click Devices 3 Click Printers scanners Add a printer or scanner...

Page 157: ...such as Print Scan Hub or Windows Fax and Scan The following procedure uses Windows 7 and Windows 10 as examples 1 Load a document Refer For details about loading a document see Loading a Document P...

Page 158: ...SB cable You need to install the scanner driver on your computer For details about how to install the driver see Installing Software for Windows P 33 Depending on the applications scanning may stop if...

Page 159: ...e is connected to a computer via a USB cable You need to install the scanner driver on your computer For details about how to install the driver see Installing Software for Windows P 33 The following...

Page 160: ...he scanner driver on your computer For details about how to install the driver see Installing Software for Mac P 35 The following procedure uses macOS 10 12 as an example 1 Load a document Refer For d...

Page 161: ...7 Faxing Optional 161 7 Faxing Optional 7 1 Sending Receiving a Fax 162 7 2 Sending a Fax From a Computer Direct Fax 176...

Page 162: ...start the machine accordingly Refer You can check a fax transmission result by viewing the Jobs screen or printing a confirmation report For details see Checking Jobs P 61 Job History P 229 Fax Activi...

Page 163: ...e fax job tap Delete Job while sending the fax When the automatic redial function is enabled the machine redials at a specified interval of time if the line is busy or there is no answer from the reci...

Page 164: ...sing on hook dialing you cannot use the automatic redial function Sending a Fax at a Specified Time You can specify the time to send the fax This feature is useful for sending faxes when communication...

Page 165: ...the message about the next document is displayed follow the on screen instructions to finish scanning Checking the Outgoing Fax You can check the scanned data before sending the fax On the detailed s...

Page 166: ...emory If you receive a fax while you are copying or printing or while the machine runs out of paper or toner the machine stores incoming faxes in the memory And then as soon as you finish copying prin...

Page 167: ...en register a two digit code as Remote Receive Tone For details see Remote Receive P 241 Set the dialing system of your external telephone to DTMF 1 When the external telephone rings pick up the hands...

Page 168: ...ap General Fax Settings Fax Line Settings DRPD Pattern Note If Panel Lock is enabled enter the passcode For details about this setting see Restricting the Touch Panel Operation P 54 4 Tap the desired...

Page 169: ...Tap Security Settings Panel Lock 4 Tap for Panel Lock Settings to display the check mark 5 Enter a four digit passcode and then tap OK 6 Re enter the passcode and then tap OK 7 Tap 8 Tap Secure Fax Re...

Page 170: ...rint Secure Fax on the Jobs screen to let you know that there is a fax stored Printing Received Faxes 1 Press the Home button 2 Tap Jobs 3 Tap Print Secure Fax 4 Enter a four digit passcode and then t...

Page 171: ...achine enables you to configure the settings for various fax features as needed You can configure the following setting items are the factory default values Preview On Off Broadcast Fax On Off Lighten...

Page 172: ...fax number from the address book Recalls the last dialed fax number Original Size Auto A3 297 x 420 mm B4 257 x 364 mm A4 210 x 297 mm B5 182 x 257 mm A5 148 x 210 mm 8K 270 x 390 mm 11 x 17 Legal 8 5...

Page 173: ...ng Specify on hook dialing to send or receive faxes manually Configuring the Detailed Settings 1 Tap 2 Select the desired setting item Preview Tap to display the check mark to display the preview of t...

Page 174: ...tch to the polling receive mode You can receive faxes from the remote fax machine by operating this machine Delay Send Specify whether to send a fax at a specified time Select Specific Time to specify...

Page 175: ...name for the tile as necessary and then select the color and icon Note If the number of registered fax destinations is more than 31 Save as New Default is not displayed Save as New App Copies the exi...

Page 176: ...stall the driver see Installing Software for Windows P 33 or Installing Software for Mac P 35 1 Open the file that you want to fax 2 From the File menu select Print 3 Perform either of the following F...

Page 177: ...fax transmission settings Refer For details about the settings see the help of the PCL or fax driver For Windows For Mac 5 Perform either of the following For Windows a Click OK to close the Printing...

Page 178: ...User Guide 178 6 Specify the destination Refer For details about how to specify the destination see the help of the PCL or fax driver For Windows For Mac 7 Click Start Sending...

Page 179: ...the Cloud Service Hub 179 8 Using the Cloud Service Hub 8 1 Connecting to the Cloud Service Hub 180 8 2 Using the Cloud Service Hub 182 8 3 Accessing the Cloud Service Hub From the Print Scan Hub Wind...

Page 180: ...quired Cloud storage services that are available in the Cloud Service Hub will differ depending on your contracts 8 1 1 Registering User Account To use the Cloud Service Hub user registration is requi...

Page 181: ...is available tap and then select an e mail address If the check mark for Save User ID and Password is displayed the machine saves the user ID and password of the user who logs in last When you select...

Page 182: ...file to print by tapping on the Select Cloud screen and entering a search word If favorites are already registered the Favorites screen is displayed when you tap Print from Cloud You can select and u...

Page 183: ...11 Letter 8 5 x 11 Paper Type Plain 60 90 gsm Plain Reload Bond 91 105 gsm Bond Reload Recycled 60 89 gsm Recycled Reload Prepunched 60 89 gsm Letterhead 60 89 gsm Covers 106 169 gsm Covers Reload Co...

Page 184: ...ng item Quantity Tap plus or minus or tap the numeric keys to specify the number of printouts Output Color Specify whether to print in color or black and white Paper Trays Select the paper tray Bypass...

Page 185: ...dge Layout Specify the number of pages to be imposed on one side of print media PDF Password Enter the password to open the secured PDF Image Type Select the print image quality Auto Prints PDF TIFF f...

Page 186: ...the folder that stores the files as favorites Note You can register up to five settings 8 2 2 Saving Scanned Data in a Cloud Storage Service Scan to Cloud Using the Scan to Cloud Feature You can store...

Page 187: ...then configure the scan settings as needed Refer For details about the scan settings see Configuring the Detailed Settings P 190 6 Tap Start Note If the message about the next document is displayed fo...

Page 188: ...ed data to a cloud storage service Preview Details Screen You can perform the following operations Switches the page to be displayed You can also switch the page by flicking or swiping the screen to t...

Page 189: ...er Preview On Off Output Color Color Black White Grayscale Resolution 200 dpi 300 dpi 400 dpi 600 dpi 2 Sided Scanning 1 Sided 2 Sided Long Edge Bind 2 Sided Short Edge Bind Lighten Darken Lighten 3 L...

Page 190: ...the preview of the scanned data before storing Output Color Select the color mode when scanning a document Resolution Select the scan resolution rate when scanning a document 2 Sided Scanning Specify...

Page 191: ...the difference between the light and the dark The higher contrast makes the difference bigger and the lower contrast smaller Background Suppression Tap to display the check mark to suppress the backgr...

Page 192: ...number 0001 9999 are added after the file name The following characters cannot be used for the file name even though they are displayed on the screen keyboard Edge Erase Specify whether to remove the...

Page 193: ...t and use the registered setting 4 Tap Subject to enter an e mail subject and then tap OK 5 Tap and then configure the scan settings as needed Refer For details about the scan settings see Configuring...

Page 194: ...etails screen Rotates all the pages by 90 degrees clockwise each time you tap it Pages are also rotated on the output data Note is not displayed depending on the file format Closes the preview Send Se...

Page 195: ...bject File Format PDF JPEG file formats available on the server Preview On Off Output Color Color Black White Grayscale Resolution 200 dpi 300 dpi 400 dpi 600 dpi 2 Sided Scanning 1 Sided 2 Sided Long...

Page 196: ...etailed Settings 1 Tap 2 Select the desired setting item Preview Tap to display the check mark to display the preview of the scanned data before sending Output Color Select the color mode when scannin...

Page 197: ...nned data darker or lighter Sharpness Specify the sharpness level to make the image sharper or softer Contrast Specify the difference between the light and the dark The higher contrast makes the diffe...

Page 198: ...d right or the middle when scanning a thick document or a booklet Resetting or Saving the Settings To reset or save the settings tap Scan to Me Reset Resets the Scan to Me settings of the machine Save...

Page 199: ...rox com Refer For details about the Print Scan Hub see Using Software Supplied With the Machine P 274 For details about how to install the Print Scan Hub see Installing Software for Windows P 33 While...

Page 200: ...r Guide 200 9 Printing and Scanning From Smartphones or Tablets 9 1 Connecting the Machine to Smartphones Tablets 201 9 2 Printing and Scanning Using Print Utility 206 9 3 Using Other Print Services 2...

Page 201: ...1 1 Via Wireless Network Setting Up the Machine 1 Make sure that the machine is connected to the wireless network Refer For details about connecting to the wireless network see Connecting to a Wireles...

Page 202: ...ssphrase the mobile device will be connected to the machine via Wi Fi Direct Setting Up the Machine Note You can also use CentreWare Internet Services to specify the machine For details see the Centre...

Page 203: ...ile Device From the Wi Fi Direct Network P 203 9 Tap SSID 10 Change the SSID as necessary and then tap OK Note When the SSID is changed the mobile devices shown on the screen in step 8 above are disco...

Page 204: ...e machine via Wi Fi Direct 4 Tap Disconnect All 5 Tap Disconnect Now or Disconnect and Reset Passphrase 6 When the confirmation message is displayed tap Yes Resetting the Passphrase Note Resetting the...

Page 205: ...Tablets 205 5 Tap Reset Passphrase Yes Mobile devices are disconnected and the new passphrase is displayed Resetting the PIN Code 1 Press the Home button 2 Tap Device 3 Tap Network Settings Wi Fi Dir...

Page 206: ...document to your iOS or Android mobile device When your Android mobile device supports the NFC function waving your device over the NFC reader of the machine starts printing or scanning For details vi...

Page 207: ...icated User Print P 258 Enabling the AirPrint Setting 1 Enter the IP address for the machine in your web browser and start CentreWare Internet Services Note To check the IP address for the machine pre...

Page 208: ...Tap Print 9 3 2 Google Cloud Print Google Cloud Print is a printing service offered by Google Inc By registering the machine to Google Cloud Print you can print from various programs supported by Goo...

Page 209: ...e Turn off the machine and then turn it on again Registering the Machine to Google Cloud Print Use CentreWare Internet Services or Google Chrome to register the machine to Google Cloud Print Registeri...

Page 210: ...site 8 Enter your Google account on the login screen 9 Click Finish printer registration Manage your printers The machine is listed in the Printers list and ready for use with the Google Cloud Print...

Page 211: ...assword for the administrator and then click Log In Refer For details about the default user name and password see Logging In As the Administrator P 273 4 Click Connectivity on the left pane of the sc...

Page 212: ...ne 1 Enter the IP address for the machine in your web browser and start CentreWare Internet Services Note To check the IP address for the machine press the Home button on the operator panel and then t...

Page 213: ...9 Printing and Scanning From Smartphones or Tablets 213 5 Click Mopria in Mobile Printing 6 Click On OK Printing With Mopria Print Service Refer Visit http mopria org for details...

Page 214: ...Setting Menus 215 10 2 Language 227 10 3 About 228 10 4 Information Pages 229 10 5 Trays 231 10 6 Supplies 233 10 7 Billing Meters 234 10 8 General 235 10 9 Network Settings 243 10 10 App Defaults 249...

Page 215: ...in Tray 1 Tray 5 bypass or Tray 2 One Tray Module optional Supplies You can check the status of consumables Billing Meters You can check the total number of printed pages General You can configure th...

Page 216: ...0 89 gsm Covers 106 169 gsm Covers Reload Covers Thick 170 256 gsm Covers Thick Reload Coated 106 169 gsm Coated Reload Coated Thick 170 256 gsm Coated Thick Reload Labels 106 256 gsm Preprinted 60 89...

Page 217: ...Sound On Select 0 1 2 3 Invalid 0 1 2 3 Copy Print 0 1 2 3 Fax Print 0 1 2 3 Fax Sent 0 1 2 3 Secure Print Received 0 1 2 3 Login Logout 0 1 2 3 Error Fault 0 1 2 3 Out of Paper 0 1 2 3 Near Life End...

Page 218: ...ormal Loud DRPD Pattern Pattern 1 Pattern 2 Pattern 3 Pattern 4 Pattern 5 Pattern 6 Pattern 7 External Phone Hook Threshold Low Normal High Off Hook Wake Up Off On Incoming Fax Settings Receive Mode T...

Page 219: ...Manual Fax Recipient Off On Fax Reports Fax Activity Auto Print Manual Print Fax Transmit Print Always Print On Error Print Disabled Fax Broadcast Print Always Print On Error Print Disabled Protocol M...

Page 220: ...TP RARP DHCP Manual Input IP Address Subnet Mask Gateway Address Modem Speed Auto 10BASE T Half 10BASE T Full 100BASE TX Half 100BASE TX Full 1000BASE TX Full Disable IPsec Protocol LPD Off On Port 91...

Page 221: ...7 mm B5 257 x 182 mm B5 182 x 257 mm A5 148 x 210 mm 8K 270 x 390 mm 16K 270 x 195 mm 16K 195 x 270 mm 11 x 17 Legal 8 5 x 14 8 5 x 13 Letter 8 5 x 11 Letter 8 5 x 11 Original Type Text Photo Text Pho...

Page 222: ...off hook is A4 210 x 297 mm and for other modes is Auto Delay Send 21 00 Scan Settings File Format PDF Multi Page TIFF TIFF JPEG XDW DocuWorks Preview On Off Output Color Color Black White Grayscale R...

Page 223: ...ize Home and App Unlock Disable Service Copy Unlock Color Disabled Disable Service Scan to Email Unlock Disable Service Fax Unlock Disable Service Scan to Network Unlock Disable Service Scan to WSD Un...

Page 224: ...t Heavyweight Adjust Transfer Belt Unit 0 Adjust 2nd BTR Plain 60 90 gsm 0 Bond 91 105 gsm 0 Recycled 60 89 gsm 0 Covers 106 169 gsm 0 Covers Thick 170 256 gsm 0 Coated 106 169 gsm 0 Coated Thick 170...

Page 225: ...e A3 297 x 420 mm B4 257 x 364 mm A4 210 x 297 mm B5 182 x 257 mm A5 148 x 210 mm 8K 270 x 390 mm 16K 195 x 270 mm 11 x 17 Legal 8 5 x 14 8 5 x 13 Letter 8 5 x 11 Custom Paper Size Original Orientatio...

Page 226: ...TIFF V6 TTN2 Quality File Size Low Quality Small Size Standard Quality Normal Size High Quality Large Size Output Settings RAM Disk Disable Enable 100 MB Print ID Off Top Left Top Right Bottom Left B...

Page 227: ...10 Changing the Machine Settings 227 10 2 Language You can select the display language...

Page 228: ...User Guide 228 10 3 About You can check the information such as model name IP address and serial number of the machine Fax number is also displayed on the model with the fax function...

Page 229: ...settings for the machine PCL Fonts List Prints a sample of the available Printer Control Language PCL fonts PCL Macros List Prints the information on the downloaded PCL macro PDF Fonts List Prints a s...

Page 230: ...faxes you recently received and sent Fax Pending List Prints a list of all pending faxes Stored Documents List Prints a list of print jobs saved using the Sample Set feature Note This setting is avail...

Page 231: ...to use the paper size and type specified on the print driver Paper Size Select the paper size When the non standard size paper is used tap Custom Paper Size and specify the length and width of the pa...

Page 232: ...paper in Custom Paper Size Paper Size When the standard size paper is used with the check mark displayed in Auto Detect the detected paper size is displayed When the non standard size paper is specif...

Page 233: ...us of consumables Note For non genuine toner cartridges the remaining amount of toner is not displayed in percentage When the toner cartridge is empty Replace is displayed and when the toner cartridge...

Page 234: ...printed pages Meter 1 Displays the total number of color printouts Meter 2 Displays the total number of monochrome printouts Meter 3 Displays the total number of large size color prints Meter 4 Displ...

Page 235: ...ize Detected 237 Check Document Guide 238 Default Paper Size 238 Fax Settings 238 Email Settings 242 10 8 1 Date Time Set the date time and time zone 10 8 2 Display Brightness Specify the screen brigh...

Page 236: ...Set the volume of the notification sound that is played when a job ends abnormally or a problem occurs Out of Paper Set the volume of the notification sound that is played when the machine runs out o...

Page 237: ...il the machine returns to the Home screen when the machine is not operated for a certain period of time Fault Timeout Specifies the amount of time the machine waits before clearing an error message an...

Page 238: ...d properly 10 8 11 Default Paper Size Selects A4 or letter for paper size to print data whose size is not specified such as reports 10 8 12 Fax Settings Specify the settings for the fax function Fax N...

Page 239: ...swer Setup and then the machine starts receiving the fax When the machine receives a phone call the ringtone is heard from the internal speaker Ans FAX Mode This mode is intended for use with an answe...

Page 240: ...eceive mode after the external telephone receives an incoming call Ans FAX Mode Set the interval at which the machine goes into the fax receive mode after the external answering machine receives an in...

Page 241: ...be printed Outgoing Fax Settings Configure the settings for sending faxes Auto Redial Setup Specify the settings for automatic redial Number of Redials Specify the number of redial attempts If you ent...

Page 242: ...n Print Always Prints a transmission report after every fax transmission Print On Error Prints a transmission report only when an error occurs Print Disabled Does not print a transmission report after...

Page 243: ...outer on the displayed screen or by tapping Enter SSID or WPS Enter SSID Enter the name to identify the access point or wireless router Infrastructure Select the encryption type for an infrastructure...

Page 244: ...IPv4 Uses IPv4 to specify the IP address IPv6 Uses IPv6 to specify the IP address TCP IP Configure the TCP IP settings IP Addressing DHCP AutoIP Specifies the IP address automatically BOOTP Specifies...

Page 245: ...Group Owner Sets the machine as the group owner of the Wi Fi Direct network When the machine is set to the group owner the machine functions as the access point or wireless router and mobile devices...

Page 246: ...N Code Prints the PIN code 10 9 3 Ethernet Note This setting item is available only when the machine is connected to a wired network Configure the wired network settings IP Mode Select the IP mode Dua...

Page 247: ...duplex settings of Ethernet Auto 10BASE T Half 10BASE T Full 100BASE TX Half 100BASE TX Full 1000BASE TX Full Disable IPsec Disables IPsec communication Note This setting is available only when IPsec...

Page 248: ...machine on CentreWare Internet Services Note This feature does not apply to communication via Wi Fi Direct Disable IEEE 802 1x Disables IEEE 802 1x authentication Note This setting is available only w...

Page 249: ...and white Paper Trays Specify the paper tray to be selected as the default setting When Auto is selected the machine automatically selects the paper tray with the optimal size of paper loaded accordin...

Page 250: ...nta cyan and black each for low medium and high density 2 Sided Specify whether to copy on both sides of a sheet of paper as the default setting 1 1 Sided Copies one sided documents into one sided pri...

Page 251: ...can both sides of documents as the default setting For two sided documents specify whether the document is bound at the long edge or the short edge Lighten Darken Specify the default density of outgoi...

Page 252: ...difference between the light and the dark When More is selected the difference between the light and the dark is bigger and when Less is selected the difference is smaller Background Suppression Spec...

Page 253: ...is stored 10 10 4 Direct Print Settings Configure the default settings for the USB Direct Print feature Output Color Specify whether to print in color or black and white as the default setting Paper...

Page 254: ...User Guide 254 Uncollated Prints out the file page by page PDF Password Set the default password used to print PDF files protected by a password...

Page 255: ...firm Recipients 259 Domain Filtering 259 Software Download 259 Login Attempts 259 Security Warning 259 10 11 1 Panel Lock Specify whether to limit access to the settings with a passcode and to change...

Page 256: ...an to Network Specify whether to enable the Scan to Network feature Scan to WSD Specify whether to enable the Scan to WSD feature Scan to USB Drive Specify whether to enable the Scan to USB feature US...

Page 257: ...the Service Lock setting see Service Lock P 256 Refer For details about how to register users to the machine and set the usage restrictions for each features on users see Using the User Authentication...

Page 258: ...obs enable this feature The jobs without account information are the following Jobs generated using other company s print drivers or utilities Jobs submitted using the following features Printing usin...

Page 259: ...Filtering Specify whether to restrict sending e mails to specified domains Note Specify the domains from Domain Filtering on CentreWare Internet Services For details see the CentreWare Internet Servic...

Page 260: ...Calibration 261 Initialize NVM 261 Initialize Print Meter 262 Clear Stored Jobs 262 Non Genuine Toner 262 Adjust Altitude 262 Delete Job History 262 10 12 1 Adjust Paper Type Select the paper type 10...

Page 261: ...deteriorates when copying or printing specify the target function and perform the calibration for that function 10 12 8 Initialize NVM Initializes the non volatile NV memory After performing this set...

Page 262: ...s saved using the Sample Set feature 10 12 11 Non Genuine Toner Specify whether to use toner cartridges of another manufacturer Important When non genuine toner cartridges are used you may not be able...

Page 263: ...68 Optional Apps 269 10 13 1 PCL Settings Configure the machine settings related to the Printer Control Language PCL Paper Trays Select the default paper tray Output Size Specify the paper size Origin...

Page 264: ...ature makes the boundary line between black and white smoother to decrease jagged edges and enhance the visual appearance Hex Dump Specify whether to help to isolate the source of a print job problem...

Page 265: ...g a dot matrix printer High Speed Prints with higher speed than the Normal mode but with lower quality PDF Password Set the password used to print PDF files protected by a password Collation Specify w...

Page 266: ...3 4 Copy Settings Configure the advanced copy settings BackgroundSuppressionLevel Select the background suppression level to adjust the background density of the original Output Color Recognition Spec...

Page 267: ...pass Note If the size of the paper loaded in Tray 5 bypass does not match the paper size specified by the job the machine cannot print the job A4 Letter Switch Specify whether to print A4 size jobs on...

Page 268: ...nded that the drum cartridge should be replaced with a new one as the printing quality is not guaranteed if you continue to use after the message is displayed Replace the Drum Cartridge R1 now indicat...

Page 269: ...and e mail addresses on the model with the fax function On Fax Only Enables searching for only fax numbers On Email Only Enables searching for only e mail addresses This setting is displayed on the mo...

Page 270: ...CentreWare Internet Services 271 11 2 Using Software Supplied With the Machine 274 11 3 Using the Address Book 279 11 4 Using Print Accounting 290 11 5 Using Copy Accounting 310 11 6 Using the User Au...

Page 271: ...led Note Some settings become available when you restart the machine from CentreWare Internet Services or manually turn the machine off and then turn it on again Refer For details about settings avail...

Page 272: ...Is Treated as Exception 1 Click Tools Internet Options The Internet Options dialog box is displayed 2 Click LAN settings of Local Area Network LAN settings in the Connections tab The Local Area Networ...

Page 273: ...ble the Administrator Mode the settings of the machine can be changed by all users Logging In 1 Enter the IP address of the machine in your web browser and start CentreWare Internet Services Note To c...

Page 274: ...ing With a Cloud Storage Service P 277 Checking the Status of the Machine Jobs Consumables Note This feature is available only when the machine is connected to a network You can check whether an error...

Page 275: ...3 Check the status of the machine and jobs 4 To check the status of consumables click Device Status CentreWare Internet Services starts and you can check the status of consumables Notification of Pri...

Page 276: ...indows 10 click Start Fuji Xerox Print Scan Hub Print Scan Hub 2 Click on the upper right corner 3 Select the Auto Refresh check box 4 Specify Refresh Interval as needed and then click OK Scanning and...

Page 277: ...achine Editing the address book for Direct Fax registered on your computer Importing CSV files exported from this product or from certain other products using the Address Book Editor Exporting destina...

Page 278: ...ridge Utility Windows This software allows you to directly send the files saved on a computer to the machine and print them You can print PDF files and TIFF files To start the ContentsBridge Utility d...

Page 279: ...server addresses can be registered Both a fax number and e mail address can be assigned in one contact Note For server addresses you can register up to 32 contacts For fax numbers e mail addresses you...

Page 280: ...contact as a favorite you can easily and quickly select it from the favorites list in the address book 11 Tap OK Registering Destinations in a Group 1 Press the Home button 2 Tap Address Book 3 Tap Ad...

Page 281: ...desired address Note indicates a contact and indicates a group The following keys help you to find your desired destination displays only destinations registered as favorites enables you to search fo...

Page 282: ...indicates a group 4 To edit the contact tap Edit To delete the contact tap Delete Contact and proceed to step 6 5 Tap the desired item to edit Note If you want to register this contact as a favorite...

Page 283: ...up tap Edit To delete the group tap Delete Group and proceed to step 6 5 Tap the desired item to edit Note If you want to register this destination as a favorite tap To delete the e mail address or fa...

Page 284: ...tribute names Refer For details about how to start CentreWare Internet Services see Starting CentreWare Internet Services P 273 Setting an Authentication Type 1 Enter the IP address of the machine in...

Page 285: ...ros Windows ADS in Protocols For details see the CentreWare Internet Services Help 8 Click Restart Now 9 When restarting the machine is complete click Refresh Setting the LDAP Server Address Note When...

Page 286: ...d then click Log In Refer For details about the default user name and password see Logging In As the Administrator P 273 4 Click Connectivity on the left pane of the screen 5 Click LDAP in Protocols 6...

Page 287: ...machine press the Home button on the operator panel and then tap Device About 2 Click Log In on the upper right corner Note If Local User is displayed on the upper right corner proceed to step 4 3 En...

Page 288: ...Now 10 When restarting the machine is complete click Refresh Specifying Destinations From an LDAP Server Note To specify destinations from an LDAP server you need to enable LDAP Address Book For deta...

Page 289: ...11 Making Better Use of Your Machine 289 7 For Fax Tap Send For Scan to Email Tap OK Send...

Page 290: ...h Registered User P 295 Permitting Printing Only in Black and White P 296 Limiting the Number of Pages Printable in Color Black and White P 301 Permitting Print Jobs Without Account Information P 307...

Page 291: ...ion Specify account information user name and password that is required for authentication when printing from a print driver or an application provided by Fuji Xerox The following procedure uses the P...

Page 292: ...mpt User for Entry when Submitting Job b Select the Display Last Entered User Details and Mask User ID check boxes as necessary When always using the same user account by using Windows login name as u...

Page 293: ...t on again Registering Users on CentreWare Internet Services Register user account information user name and password that has been set on the print driver or an application in the machine To configur...

Page 294: ...d on the upper right corner proceed to step 4 3 Enter the User Name and Password for the administrator and then click Log In Refer For details about the default user name and password see Logging In A...

Page 295: ...ls Password 4 12 alphanumeric characters and symbols The following symbols cannot be used in the user name 11 4 3 Setting Printing Restrictions on Each Registered User To use this feature settings nee...

Page 296: ...hen printing from a print driver or an application provided by Fuji Xerox The following procedure uses the PCL driver on Windows 7 and Windows 10 as examples 1 Click Start Devices and Printers For Win...

Page 297: ...ntered User Details and Mask User ID check boxes as necessary When always using the same user account by using Windows login name as user name a Select Always Use Default User Details b From the Speci...

Page 298: ...gure the settings login to CentreWare Internet Services as the administrator 1 Enter the IP address of the machine in your web browser and start CentreWare Internet Services Note To check the IP addre...

Page 299: ...11 Making Better Use of Your Machine 299 4 Click Accounting on the left pane of the screen 5 Click Add...

Page 300: ...number of characters you can enter for the user names and passwords are as follows User name 1 32 alphanumeric characters and symbols Password 4 12 alphanumeric characters and symbols The following sy...

Page 301: ...inting in black and white instead of canceling the jobs follow the procedure below to enable Auto Color To Mono Print 1 Press the Home button 2 Tap Device 3 Tap Security Settings Print Accounting 4 Ta...

Page 302: ...nting on our print driver or application The following procedure uses the PCL driver on Windows 7 and Windows 10 as examples 1 Click Start Devices and Printers For Windows 10 right click the Start but...

Page 303: ...ntered User Details and Mask User ID check boxes as necessary When always using the same user account by using Windows login name as user name a Select Always Use Default User Details b From the Speci...

Page 304: ...gure the settings login to CentreWare Internet Services as the administrator 1 Enter the IP address of the machine in your web browser and start CentreWare Internet Services Note To check the IP addre...

Page 305: ...11 Making Better Use of Your Machine 305 4 Click Accounting on the left pane of the screen 5 Click Add...

Page 306: ...number of characters you can enter for the user names and passwords are as follows User name 1 32 alphanumeric characters and symbols Password 4 12 alphanumeric characters and symbols The following sy...

Page 307: ...ccount Information When Print Accounting is enabled printing jobs without account information user name and password is not permitted To permit printing enable Unauthenticated User Print You can also...

Page 308: ...ermitting Printing in Color Black and White 1 Press the Home button 2 Tap Device 3 Tap Security Settings 4 Tap Print Accounting 5 Tap Unauthenticated User Print Enable 6 Tap Auto Color To Mono Print O...

Page 309: ...Checking Printing Usage Print a Printer Meter report to check the current settings of printing restrictions and the total number of printed pages Refer For details about how to print the Printer Meter...

Page 310: ...chine works with Copy Accounting Copy Accounting has the following features Permitting Only Registered Users to Copy P 311 Setting Copying Restrictions on Each Registered User P 313 Permitting Copying...

Page 311: ...1 Press the Home button 2 Tap Device 3 Tap Security Settings Copy Accounting 4 Tap On 5 Turn off the machine and then turn it on again Registering Users on CentreWare Internet Services Register user...

Page 312: ...d on the upper right corner proceed to step 4 3 Enter the User Name and Password for the administrator and then click Log In Refer For details about the default user name and password see Logging In A...

Page 313: ...characters and symbols Password 4 12 alphanumeric characters and symbols The following symbols cannot be used in the user name 11 5 3 Setting Copying Restrictions on Each Registered User To use this...

Page 314: ...guring Usage Restriction Settings on CentreWare Internet Services Register user account information user name and password in the machine and set the copying restrictions To configure the settings log...

Page 315: ...r is displayed on the upper right corner proceed to step 4 3 Enter the User Name and Password for the administrator and then click Log In Refer For details about the default user name and password see...

Page 316: ...word and then click Add Note The number of characters you can enter for the user names and passwords are as follows User name 1 32 alphanumeric characters and symbols Password 4 12 alphanumeric charac...

Page 317: ...11 Making Better Use of Your Machine 317 A user account is added 7 Click the added user account 8 Click Edit...

Page 318: ...ck OK Setting the Limit for Color Black and White Copying Set the maximum number of pages that can be copied in color or in black and white Enabling Copy Accounting on the Operator Panel 1 Press the H...

Page 319: ...of the machine in your web browser and start CentreWare Internet Services Note To check the IP address of the machine press the Home button on the operator panel and then tap Device About 2 Click Log...

Page 320: ...word and then click Add Note The number of characters you can enter for the user names and passwords are as follows User name 1 32 alphanumeric characters and symbols Password 4 12 alphanumeric charac...

Page 321: ...11 Making Better Use of Your Machine 321 A user account is added 7 Click the added user account 8 Click Edit...

Page 322: ...te Copies 11 Click OK 11 5 4 Using Copy Accounting When using the copy function with the Copy Accounting feature enabled registered users need to login to their user account registered in the machine...

Page 323: ...me period specified on Auto Clear passes with no operation of the machine Logging Out 1 Press the Home button 2 Tap the user name on the upper right corner 3 Tap Log Out 11 5 5 Checking Copying Usage...

Page 324: ...can be applied on the following features Customizing the Home screen and widget tiles Copying Scanning Scan to Email Scan to Network Scan to WSD Scan to USB Drive Faxing USB Direct Print The Direct F...

Page 325: ...ngs To use the User Authentication feature settings need to be configured on the operator panel and on CentreWare Internet Services Enabling the Panel Lock and User Authentication Feature on the Opera...

Page 326: ...Security Settings Panel Lock 4 Tap for Panel Lock Settings to display the check mark 5 Enter a four digit passcode and then tap OK 6 Re enter the passcode and then tap OK 7 Tap 8 Tap User Authenticat...

Page 327: ...entreWare Internet Services as the administrator 1 Enter the IP address of the machine in your web browser and start CentreWare Internet Services Note To check the IP address of the machine press the...

Page 328: ...User Guide 328 4 Click Permissions on the left pane of the screen 5 Click Add...

Page 329: ...and then click Add Note The number of characters you can enter for the user names and passwords are as follows User name 1 32 alphanumeric characters and symbols Password 4 128 alphanumeric characters...

Page 330: ...tions for each feature To set the usage restrictions on a guest user a Click Setup b Click the desired setting item and then change the setting Refer For details about the setting items see the Centre...

Page 331: ...11 Making Better Use of Your Machine 331 To set the usage restrictions on a registered user a Click the added user account b Click Edit...

Page 332: ...OK 11 6 3 Using the User Authentication Feature When using the machine with the User Authentication feature enabled registered users need to login to their user account registered in the machine If a...

Page 333: ...ser name is displayed on the upper right corner Note The machine automatically logs out in the following cases When the machine enters the sleep mode When the time period specified on Auto Clear passe...

Page 334: ...he encryption feature 11 7 1 Preparing for Encryption Enabling the SSL TLS Server Communication Before using the encryption feature with digital certificates enable the SSL TLS server communication 1...

Page 335: ...The method differs depending on whether you generate a self signed certificate using CentreWare Internet Services or you use a certificate signed by the certificate authorities CA Generating a Self Si...

Page 336: ...s about the default user name and password see Logging In As the Administrator P 273 4 Click System on the left pane of the screen 5 Click Security 6 Click Security Certificates 7 Make sure that Devic...

Page 337: ...b browser and start CentreWare Internet Services Note To check the IP address of the machine press the Home button on the operator panel and then tap Device About 2 Click Log In on the upper right cor...

Page 338: ...d certificate Note For details about how to send the CSR follow the procedure specified by the certificate authority CA Importing a Certificate Signed by the Certificate Authorities CA Important Befor...

Page 339: ...ertificate and then select Trusted Root CA Certificate or Intermediate CA Certificate 8 Click Import 9 Click Select and select the file to be imported 10 Enter a password corresponding to the certific...

Page 340: ...ord see Logging In As the Administrator P 273 4 Click System on the left pane of the screen 5 Click Security 6 Click Security Certificates 7 Click Device Certificate and then select Trusted Root CA Ce...

Page 341: ...ting the HTTP Communication and the IPP Printing When the communication between the web browser and the machine is encrypted enter the address in the address text box starting with https instead of ht...

Page 342: ...see Logging In As the Administrator P 273 4 Click System on the left pane of the screen 5 Click Security 6 Click SSL TLS Settings 7 Click SMTP SSL TLS Communication and then select the connection meth...

Page 343: ...tor P 273 4 Click System on the left pane of the screen 5 Click Security 6 Click SSL TLS Settings 7 Click for LDAP SSL TLS Communication to display the check mark 8 Click OK 9 Click Restart Now 10 Whe...

Page 344: ...terprise Note This setting is available only when Infrastructure is specified for Network Type 7 From Authentication Method select EAP TLS 8 Click Root Certificate and then select the root certificate...

Page 345: ...ick Connectivity on the left pane of the screen 5 Click Wi Fi in Connections 6 From the Encryption Type in Security Settings select WPA2 Enterprise Note This setting is available only when Infrastruct...

Page 346: ...User Guide 346 12 Maintenance 12 1 Replacing Consumables 347 12 2 Cleaning the Machine 354 12 3 Counting up the Number of Printed Pages 361...

Page 347: ...the eyes wash it out with plenty of water for at least 15 minutes until irritation is gone Consult a physician if necessary If you inhale toner particles move to a fresh air location and rinse your mo...

Page 348: ...use of toner cartridges not recommended by Fuji Xerox may impair machine quality and performance Use only toner cartridges recommended by Fuji Xerox Replacing the Toner Cartridge 1 Make sure that the...

Page 349: ...as the uninstalled toner cartridge 4 Gently shake the new toner cartridge 10 times to distribute the toner evenly 5 Hold the toner cartridge so that the arrow on the label is on the top side and then...

Page 350: ...ntainer toner may spill and soil the floor We recommend laying paper on the floor beforehand Proper disposal of used waste toner container is required Return the old waste toner container to our Custo...

Page 351: ...the machine is not operating and then open the front cover 2 Turn the lock lever counterclockwise 3 Unlock the waste toner container 4 To prevent the toner from spilling gently pull the waste toner co...

Page 352: ...waste toner container as shown in the illustration This may cause the toner to spill out 5 Put the used waste toner container into the plastic bag that came with the new waste toner container and seal...

Page 353: ...12 Maintenance 353 9 Turn the lock lever clockwise 10 Close the front cover...

Page 354: ...print data and stored data in the memory is cleared when the machine is turned off 12 2 1 Cleaning Outside the Machine Important Using volatile solvents such as benzine or thinner or spraying with ins...

Page 355: ...the cloth lightly Using volatile solvents such as benzine or thinner or spraying with insecticide may cause discoloration deformation or cracks on the covers or exterior Do not wipe the panel strongly...

Page 356: ...as attached to the machine facing up Important Take care not to drop the waste toner container while you are removing it After removing the waste toner container do not touch the parts shown in the il...

Page 357: ...pull it out Note Insert the cleaning rod with the pad side up It is not necessary to move the cleaning rod back and forth repeatedly 7 Repeat step 6 for the other three holes 8 Return the cleaning rod...

Page 358: ...nt sizes properly To ensure clean output results at all times perform cleaning about once a month Important Do not use chemicals such as benzine or thinner Doing so may damage the paint or coating on...

Page 359: ...stained smudges may appear on copy fax or scan results and a document jam may occur To ensure clean output results at all times perform cleaning about once a month Important Do not use chemicals such...

Page 360: ...er drops from falling into the machine If water gets into the machine it may cause the machine to malfunction Note When stains cannot be removed easily wipe lightly with the soft cloth slightly moiste...

Page 361: ...12 3 1 Checking by Meter There are three meters classified according to color mode 1 Press the Home button 2 Tap Device 3 Tap Billing Meters Refer For details about the function of each meter see Bil...

Page 362: ...User Guide 362 2 Tap Device 3 Tap Information Pages Printer Meter...

Page 363: ...13 Troubleshooting 363 13 Troubleshooting 13 1 Clearing Jams 364 13 2 Troubleshooting 370 13 3 Understanding Machine Messages 389...

Page 364: ...itch off the product immediately and contact your local Fuji Xerox representative Important When working on the machine with the power turned off check that the data LED is off before turning off the...

Page 365: ...the inner cover 6 Turn the knob to convey the document to the top and then remove the document Important If the document is fed into the feeder do not pull it out directly This may cause the document...

Page 366: ...touch panel you must clear all print media from the print media path Clearing Paper Jams From Inside the Left Side Cover A Important When removing paper there may be toner on the transfer belt black...

Page 367: ...le A1 to its original position 4 Pushing the center part of the left side cover A close the cover gently and then close Tray 5 bypass Clearing Paper Jams From Inside the Left Side Cover A 1 Lift the h...

Page 368: ...ay 1 and Tray 2 1 Remove the jammed paper Refer For details about Tray 1 see Clearing Paper Jams From Inside the Left Side Cover A P 366 For details about Tray 2 One Tray Module optional see Clearing...

Page 369: ...the paper tray until it stops Clearing Paper Jams From Tray 5 Bypass 1 Check the inside of Tray 5 bypass around the paper feed entrance and then remove the jammed paper Important If multiple sheets of...

Page 370: ...enter Is paper or a document jammed Remove the jammed paper or document Refer If paper is jammed see Clearing Paper Jams P 366 and if a document is jammed see Clearing Documents P 364 Is the front cov...

Page 371: ...P 69 The print quality is poor An image quality problem may have occurred See Print Quality Problems that is described below to solve the problem Refer For details see Print Quality Problems P 373 Un...

Page 372: ...tray Replace with paper that meets machine specifications Refer For details see Print Media Guidelines P 63 Is paper exceeding the maximum fill line in the paper tray Load paper in the paper tray so t...

Page 373: ...nside Refer For details see Clearing Documents P 364 The edge of the document is creased Is the document curled Flatten the curl and load the document again Unable to copy in color Is Output Color set...

Page 374: ...ssy printing paper easily sticks to the document glass and shadows can resemble dirt in the copy Place a transparent sheet such as transparency film under the document before copying Black lines appea...

Page 375: ...ts or unclear copies Replace the paper with new paper Is creased or wrinkled paper loaded in the paper tray Remove any problematic sheets or replace the paper with new paper Is a cut and pasted or cre...

Page 376: ...e information contact your local Fuji Xerox representative Black or colored lines appear in printouts The drum cartridge has deteriorated or been damaged The drum cartridge needs to be replaced with a...

Page 377: ...match the type of the paper loaded in the tray Specify the paper type correctly Refer For details on specifying the paper type see Loading Print Media P 67 The entire printout is black The drum cartri...

Page 378: ...n the paper well and then load it again The paper is wrinkled The paper is unsuitable Load the correct type of paper Paper has been added to the paper loaded Replace the paper with new paper The paper...

Page 379: ...is too small The minimum size document that can be loaded in the Duplex Automatic Document Feeder DADF is A5 The type of document is not supported The Duplex Automatic Document Feeder DADF does not su...

Page 380: ...not suitable to the document If the copy output of black text is too light set Original Type to Text Refer For details see Original Type P 107 The color of the copy differs from that of the document T...

Page 381: ...For details see Original Size P 107 The specified paper size is not correct Specify the paper size correctly Refer For details see Loading a Document P 74 The copy is not the desired size The documen...

Page 382: ...e Connecting to a Wired Ethernet Network P 25 or Connecting to a Computer With USB P 26 For details about connecting to a wireless network see Connecting to a Wireless Network P 26 An error has occurr...

Page 383: ...he optional accessory required for the specified setting is not installed Check the optional accessories installed on the machine and on the print driver specify the configuration of the optional acce...

Page 384: ...end Check the surface of the document glass and narrow glass strip for dirt and clean it Refer For details see Clean the Document Glass Cover Document Glass Document Presser and Narrow Glass Strip P 3...

Page 385: ...ce the cable Make sure that the scanner is properly configured On the software you are using check that the scanned data is sent to the correct port The machine scans very slowly Photographic images a...

Page 386: ...completed try again Invalid handle Scanning has failed There may be a copy or print job in progress When the job in progress is completed try again The selected port is currently being used Restart yo...

Page 387: ...point or wireless router The network mode of the machine cannot be set to an Ad hoc mode Make sure that Wi Fi Direct is disabled Refer For details about the settings see Wi Fi Direct P 245 Problem Act...

Page 388: ...retrieve the address book data from the machine on the Address Book Editor Make sure that the USB or Ethernet cable is properly connected to the machine For a wireless network make sure that the machi...

Page 389: ...t our Customer Support Center 016 404 There is a problem with the certificate Contact your system administrator Tap OK to start initialization 016 405 016 503 Unable to resolve the SMTP server hostnam...

Page 390: ...isk Refer For details about the RAM disk feature see RAM Disk P 266 016 720 An unsupported Page Description Language PDL is included Use the supported print drivers Refer For details about how to inst...

Page 391: ...transmission is completed If you are using the secure receiving mode print the stored fax jobs Refer For details about the secure receiving mode see Using the Secure Receiving Mode P 168 027 446 IPv6...

Page 392: ...oblem persists contact our Customer Support Center 031 543 SMB server login error Check login permitted time with your system administrator 031 544 SMB server login error Password is expired Check the...

Page 393: ...he TYPE command error has occurred Try the same operation again If the problem persists contact our Customer Support Center 031 595 The PORT command error has occurred Try the same operation again If...

Page 394: ...screen disappears turn off the machine and then turn it on again If the problem persists contact our Customer Support Center Important During the Cooling mode the fan inside the machine is working to...

Page 395: ...pendix Specifications 396 Optional Accessories 404 About Supplies 405 Attaching Removing the Optional Wireless LAN Kit 406 Software Product Manual Disc 408 Resetting Defaults 409 New Zealand FAX modem...

Page 396: ...89 x 98 mm for Tray 5 bypass Image loss width 5 5 mm at lead trail right left edges Paper Weight Tray 1 60 90 gsm Tray 2 One Tray Module 60 256 gsm Tray 5 Bypass 60 216 gsm Important The use of paper...

Page 397: ...pply AC220 240 V 10 5 A 50 60 Hz common AC110 V 10 10 A 60 Hz Maximum Power Consumption 1 1 kW AC220 V 10 1 2 kW AC240 V 10 Sleep Mode 1 4 W AC230 V Ready Mode 81 W AC230 V Dimensions Width 595 x Dept...

Page 398: ...s Operating System Standard Windows 10 32 bit Windows 10 64 bit Windows 8 1 32 bit Windows 8 1 64 bit Windows 7 32 bit Windows 7 64 bit Windows Server 2016 64 bit Windows Server 2012 R2 64 bit Windows...

Page 399: ...pi 200 x 200 dpi 150 x 150 dpi Windows Image Acquisition WIA driver Image Capture Architecture ICA driver Monochrome binary Grayscale Full colour 400 x 400 dpi 300 x 300 dpi 200 x 200 dpi 150 x 150 dp...

Page 400: ...10 12 OS X 10 11 OS X 10 10 OS X 10 9 OS X 10 8 Important For information about the latest supported OS visit the Fuji Xerox web site Scan to Network File Format Monochrome binary TIFF DocuWorks docu...

Page 401: ...l Size Maximum A3 11 x 17 Recording Paper Size Maximum A3 11 x 17 Minimum A4 8 5 x 11 Letter Transmission Time 3 seconds and more but fewer than 4 seconds Important When A4 size document with approxim...

Page 402: ...Windows 7 64 bit Windows Server 2016 64bit Windows Server 2012 R2 64bit Windows Server 2012 64bit Windows Server 2008 R2 64bit Windows Server 2008 32bit Windows Server 2008 64bit macOS 10 13 macOS 10...

Page 403: ...USB Drive feature Important The scanning speed varies depending on the documents Paper Size Max A3 11 x 17 Min A5 Paper Weight 60 256 gsm Feeding Capacity Number of Tray 500 sheets x 1 tray Important...

Page 404: ...ess LAN Fax Kit Adds the fax function to the machine One Tray Module A tray that can hold 500 sheets of paper When using 80 gsm paper USB Memory Kit Adds the front USB port for USB flash drives to the...

Page 405: ...r waste toner containers and drum cartridges to make recycle parts recycle materials or energy recovery Proper disposal is required for toner cartridges waste toner containers and drum cartridges no l...

Page 406: ...Kit 1 Turn off the machine Refer For details about how to turn off the machine see Turning Off the Machine P 23 2 Push the lever to the left to remove the cover of the optional Wireless LAN Kit socke...

Page 407: ...less LAN Kit 1 Turn off the machine Refer For details about how to turn off the machine see Turning Off the Machine P 23 2 Push the lever and pull out the optional Wireless LAN Kit 3 Attach the cover...

Page 408: ...l disc Software XPS i386_amd64 language folder to be used Note XPS stands for XML Paper Specification Scanner Driver for USB connection Refer Installing With Quick Setup P 34 Installing With Custom In...

Page 409: ...Enable disable setting in USB Port Settings User Authentication setting To reset the machine perform the following procedure Initializing Fax Settings Scan Settings User Account Settings User App Sett...

Page 410: ...User Guide 410 4 To initialize the wireless network settings tap Wi Fi Reset Wi Fi Settings To initialize the wired network settings tap Other Reset Network Settings 5 Tap Start...

Page 411: ...Notice Under power failure conditions this telephone may not operate Please ensure that a separate telephone not dependent on local power is available for emergency use Some parameters required for c...

Page 412: ...DocuCentre SC2022 User Guide ME8229E2 3 Edition 1 July 2018 Fuji Xerox Co Ltd Copyright 2018 by Fuji Xerox Co Ltd...

Reviews: