background image

30

Q-TECH™ ProgrammEr:  oPEraTIon

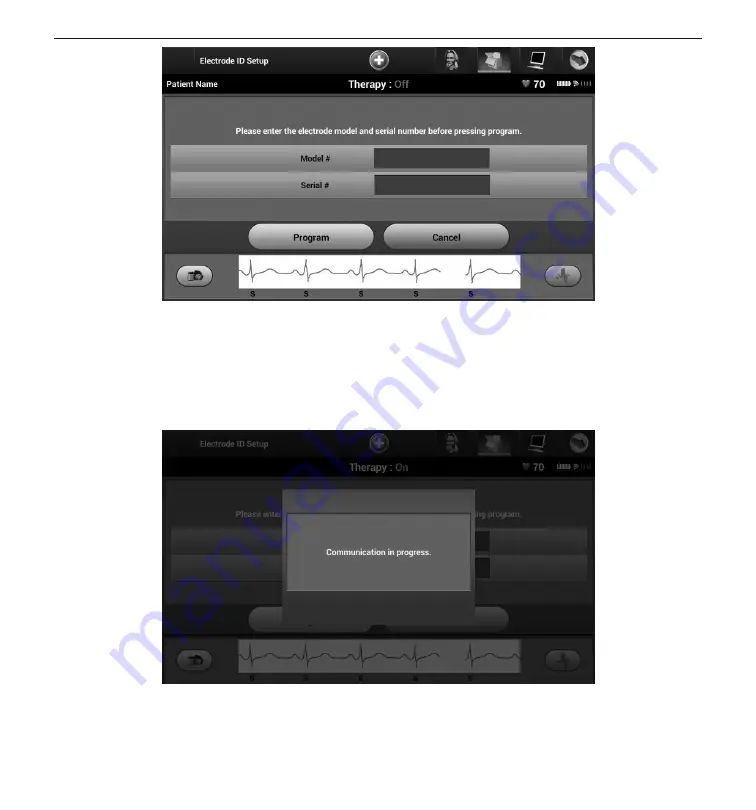
Figure 19: 

 Entering electrode information

6. 

Select the Program button to save the information. A confirmation screen will appear 

during communication with the SQ-RX device (Figure 20). Select Cancel to cancel 

information storage and return to the Automatic Setup screen.

Figure 20: 

 Confirmation screen showing communication in progress

Summary of Contents for Q-Tech 3200

Page 1: ...Q TECH PROGRAMMER A COMPONENT OF THE S ICD SYSTEM USER S MANUAL 3200 ...

Page 2: ...arks of Cameron Health Inc Manuals or other written documentation may not be copied or distributed without Cameron Health Inc authorization Cameron Health Inc 905 Calle Amanecer Suite 300 San Clemente CA 92673 USA 1 800 CARDIAC 227 3422 1 651 582 4000 www cameronhealth com Cameron Health BV World Trade Center Nieuwe Stationsstraat 10 6811 KS Arnhem The Netherlands 1 800 CARDIAC 227 3422 1 651 582 ...

Page 3: ...ial Adverse Events 5 Operation Setup of the Q TECH Programmer 7 Packaging 7 Charging the Programmer 7 Using the Q TECH Programmer 8 Turning the Programmer On 8 Placing the Programmer in Suspend Mode 9 Turning the Programmer Off 10 Using the Programmer Touch Screen 10 Using the Wand 10 Navigation 12 Screen Header 12 Navigation Bar 12 Restarting the Programmer 14 Configuring the Q TECH Programmer 15...

Page 4: ...Entering Electrode Information 29 Creating the Patient Chart 31 Automatic Setup 33 Programming Therapy Parameters 36 Defibrillation Testing 39 Performing an SQ RX Follow up 42 Sensing Configuration and Automatic Setup 42 Viewing SQ RX Device Status 42 Viewing Stored Episodes 44 Printing Reports from the Programmer 45 Printing Reports 45 Summary Report 46 Captured S ECG Report 47 Episodes Report 48...

Page 5: ...ter 65 Inability to Communicate With the SQ RX Device 65 Compliance statements Federal Communications Commission FCC US 66 1999 5 EC R TTE Directive 66 EMI RFI 66 Declarations tables Declaration Electromagnetic Emission 67 Declaration Electromagnetic Immunity Part 1 67 Declaration Electromagnetic Immunity Part 2 68 Recommended Separation Distances 69 EMI RFI Information 69 Specifications Product G...

Page 6: ......

Page 7: ... who do not have symptomatic bradycardia incessant ventricular tachycardia or spontaneous frequently recurring ventricular tachycardia that is reliably terminated with anti tachycardia pacing Contraindications Unipolar pacemakers are contraindicated for use with the S ICD System Programmer Warnings and Cautions General External defibrillation equipment should be available for immediate use during ...

Page 8: ...ing section of this manual If the programmer is used near other medical or office equipment all equipment should be observed to verify normal operation Other equipment may interfere with the programmer even if that other equipment complies with the International Special Committee on Radio Interference CISPR emission requirements Use of non Cameron Health Boston Scientific approved accessories may ...

Page 9: ...e programmer or contact your Cameron Health Boston Scientific representative or the customer service department for instructions Do not touch or connect the telemetry wand to the programmer unless ESD precautionary procedures are used S ICD System Warnings and Cautions Before using the S ICD System read and follow all warnings and cautions provided in this manual Refer to the SQ RX Pulse Generator...

Page 10: ...propriate therapy If interference occurs move and reposition the programmer or wand away from the source of the interference Ionizing radiation therapy such as radioactive cobalt linear accelerators and betatrons may adversely affect the S ICD System operation Therapeutic ionizing radiation cannot be immediately detected however it can damage the electronic components of the SQ RX Pulse Generator ...

Page 11: ...furnaces Large radio frequency transmitters such as radar Alternators on running engines in automobiles Communications equipment such as high power radio transmitters Sources of strong static magnetic fields may include the following Industrial transformers and motors Large stereo speakers Magnetic wands such as those used for airport security Patients should seek medical guidance from their physi...

Page 12: ...k delivery Infection Keloid formation Migration or dislodgement Muscle stimulation Nerve damage Pneumothorax Post shock post pace discomfort Premature battery depletion Random component failures Stroke Subcutaneous emphysema Surgical revision or replacement of the system Syncope Tissue redness irritation numbness or necrosis If any adverse events occur invasive corrective action and or S ICD Syste...

Page 13: ...y but may also be operated on battery power provided that the internal battery is adequately charged The programmer is recharged whenever it is connected to the AC powered external power supply When not in use it is recommended that the programmer remain connected to the external power supply in order to maintain an adequate battery charge Typical charge time for a fully discharged battery is 4 ho...

Page 14: ...onnect the external power supply cable to the programmer Figure 1 Figure 1 Connecting the external power supply 2 Plug the external power supply cord into an AC power outlet Using the Q TECH Programmer Turning the Programmer On The programmer power button is located in the recess above and behind the left corner of the screen Press and hold the button until the display screen is active Figure 2 Ex...

Page 15: ...ly can then be reconnected Placing the Programmer in Suspend Mode The programmer has a Suspend Mode which is activated automatically to conserve power The display will be blank when this mode is in effect The programmer enters Suspend Mode whenever The power button Figure 2 is momentarily pressed and released The programmer is not connected to the external power supply it is not in active communic...

Page 16: ...d to the desired viewing angle by using the kick stand located on the back of the programmer All interaction with the programmer is conducted using the fingers to touch the appropriate areas on the screen Scroll on screen lists by sliding a finger up and down the list Figure 3 An on screen keyboard is presented whenever text entry is required Figure 3 Scrolling on screen lists Using the Wand Model...

Page 17: ...ire a replacement wand Figure 4 Connecting the wand To obtain optimal telemetry the wand should be placed directly over the implanted SQ RX device Although the programmer may receive S ECG telemetry at greater distances programming should be performed with the wand placed over the SQ RX device When telemetry loss occurs the display screen will turn yellow and a message will appear with the text Co...

Page 18: ... the screen header displays the Battery Status Indicator When viewing Offline Stored Sessions the screen header displays Patient name Therapy On Off Battery status indicator When the programmer is online active communication the screen header displays Therapy On Off Patient name Patient heart rate Programmer Battery and Telemetry status indicator Screen title Rescue shock icon Navigation Bar The N...

Page 19: ... screen Captured and Stored Episodes S ECG Button Allows user to access captured S ECG and stored episode screens InductionTest Button Allows user to access induction screen Manual Shock Button Allows user to access the manual shock screen Battery Telemetry Meter Left side of the meter allows user to view the programmer s battery status The right side of the meter allows viewing of telemetry signa...

Page 20: ...restart sequence The programmer may need to be manually restarted if You cannot exit a screen The operating system stops responding A manual restart is accomplished by pressing and holding the power button until the system shutdown menu appears on the screen Select Restart from the popup and confirm by pressing OK If the programmer does not respond to a restart process contact your Cameron Health ...

Page 21: ...tting the date and time format time zone language and printer Once these settings are configured during the initial setup process they become the default parameters and will not normally need to be changed with each session To configure the programmer settings 1 Select the Programmer Settings button on the Startup screen Figure 5 to display the Programmer Settings screen Figure 6 Figure 5 Startup ...

Page 22: ...ECH PROGRAMMER Operation Figure 6 Programmer Settings screen 2 Select the corresponding line to access each setting The settings that can be configured include Date and time format Time zone Language Printer ...

Page 23: ...t Cancel to return to the Programmer Settings screen without saving the changes Figure 7 Date and Time Settings screen Time Zone To set the time zone in which the programmer will be used 1 Select Set Time Zone on the Programmer Settings screen The time zone selec tion screen appears Figure 8 2 Select the country time zone button for the zone in which the programmer will be used A checkmark will ap...

Page 24: ...een The Language Settings screen appears 2 Select the Save button to save the changes or select Cancel to return to the Programmer Settings screen without saving the changes If the language is changed the programmer will automatically restart and return to the Startup screen Printer Selection Only Cameron Health Boston Scientific approved printers can be used with the programmer To select the prin...

Page 25: ...inter of choice Figure 9 If no printers are found a window will appear stating that there are no printers Select the Scan Again button or the Cancel button to return to the Programmer Settings screen If a printer was selected during another session the Printer Setup screen is displayed Figure 9 Printer Selection screen 4 Once the scan is complete the Printer Selection screen appears Figure 9 Note ...

Page 26: ...nter 6 Select the Save button to save the changes and return to the Programmer Settings screen or select Cancel to return to the Programmer Settings screen without saving the changes A confirmation screen will appear when the printer setup is completed Figure 11 Figure 11 Printer Setup confirmation screen ...

Page 27: ...ammer Settings screen Note The patient printed report contains the programmer software version Modes of Operation for the Q TECH Programmer Online Behavior The programmer s interface varies according to whether the programmer is Online actively communicating or Offline not communicating with a selected SQ RX device An Online session begins when the programmer establishes a telemetry link with a sp...

Page 28: ...s until the shock is delivered or aborted Offline Behavior When the programmer is not actively communicating with an SQ RX device it is Offline During Offline sessions programmer settings can be accessed and stored patient sessions can be viewed and or printed Stored Patient Sessions During a patient follow up visit the programmer will retrieve data from the SQ RX device s memory The programmer ca...

Page 29: ...apy On Mode The Therapy On mode is the primary operating mode of the SQ RX device allowing automatic detection of and response to ventricular tachyarrhythmias Note The SQ RX device must be programmed out of Shelf mode before being programmed to Therapy On Therapy Off Mode The Therapy Off mode disables automatic therapy delivery and enables manual control of shock delivery Programmable parameters m...

Page 30: ...ting connecting to and disconnecting from the SQ RX device Scanning For SQ RX Devices 1 Select the Scan For Devices button on the Startup Screen Figure 13 The Device List screen appears after the Scan Progress Bar displayed during the scanning process Select the Cancel button at any time to end the scanning process Figure 13 Startup screen ...

Page 31: ...ed Any SQ RX devices that were previously taken out of Shelf mode are displayed either as Implanted or with the stored patient name Figure 14 Device List screen scrollable list 3 If the desired SQ RX device is not listed select the Scan Again button to re initiate the scanning process Select the Cancel button to return to the Startup screen Note Refer to the Inability to Communicate with the SQ RX...

Page 32: ...connects to the selected SQ RX device A window will appear indicating connection is in process 2 Once communication is established with the SQ RX device the Device Identification screen appears Figure 15 Figure 15 Device Identification screen Note The Device Identification screen is visible only while connecting to an SQ RX device in Shelf mode 3 The SQ RX device model and serial numbers are autom...

Page 33: ... warning message will be displayed to the user if any of the following conditions exists Automatic Therapy is programmed to Off Reference S ECG has not been acquired Automatic Setup or Optimization has not been completed This message is typically displayed following the implant procedure as Setup Optimization was not performed Figure 17 4 Select the Continue button to end the patient session and r...

Page 34: ...essage Note Once the Continue button is selected the session is stored and communication is terminated Note In order to confirm that Automatic Therapy is programmed On upon disconnection always use the End Session process and review all displayed warning messages ...

Page 35: ... for a patient s new or replacement electrode 1 Select the Main Menu button 2 Select the Implant button 3 Select the Automatic Setup button in the Navigation Bar 4 Select Set Electrode ID button Figure 18 Figure 18 Select the Set Electrode ID button to enter electrode information Note ECG and heart rate information is not present on the Automatic Setup and Electrode ID setup screens until the elec...

Page 36: ...t the Program button to save the information A confirmation screen will appear during communication with the SQ RX device Figure 20 Select Cancel to cancel information storage and return to the Automatic Setup screen Figure 20 Confirmation screen showing communication in progress ...

Page 37: ... chart 3 Select the Patient View icon to access the Patient View screen 4 The SQ RX device model and serial numbers appear on the first line of the chart The electrode model and serial numbers appear on the second line of the chart The implant date appears on the third line of the chart Figure 22 Using the on screen keyboard enter the following patient information Patient Name up to 25 characters ...

Page 38: ...eld will automatically wrap the text with the presence of a space between any characters within the first line 5 Select the Save button to update the SQ RX device with the patient information Note Failure to save the new patient information will result in loss of the entered data ...

Page 39: ...te is less than 130 bpm For rates greater than 130 bpm select the Cancel button and refer to the instructions for Manual Setup Figure 23 Automatic Setup screen 5 Once started the Automatic Setup will Perform the shock electrode integrity check to measure electrode impedance Figure 24 Normal sub threshold impedance range is 400 Ohms Select the best sensing configuration The sense electrode configur...

Page 40: ...ction is complete the arrow next to the function moves to a down position 6 The Automatic Setup Sensing Optimization screen will be displayed The programmer will display a message requesting that the patient sit up however this process can be omitted during the implantation procedure by selecting the Skip button Figure 25 Figure 25 Automatic Setup screen ...

Page 41: ...screen will appear when Automatic Setup is complete Figure 26 Figure 26 Confirmation of successful Automatic Setup 8 Following the optional optimization process the Acquire Reference S ECG screen is displayed Figure 27 Select the Continue button to acquire a reference S ECG Figure 27 Acquire Reference S ECG screen ...

Page 42: ...ct the Continue button Programming Therapy Parameters Once Automatic Setup has been completed the SQ RX device therapy parameters may be selected Note Data from clinical testing of the S ICD System demonstrated a significant reduction in inappropriate therapy with the activation of the Conditional Shock Zone prior to hospital discharge To set the therapy parameters 1 Select the Main Menu button on...

Page 43: ...one maintain at least a 10 bpm difference between the two zones If the Conditional Shock Zone slider yellow is dragged over the Shock Zone slider red the two sliders will merge to create a single Shock Zone 6 If post shock pacing is desired slide the Post Shock Pacing switch to the On position Post shock bradycardia pacing occurs at a non programmable rate of 50 bpm for up to 30 seconds Pacing is ...

Page 44: ...tton to proceed to the next operation Note If any of the SQ RX device settings are changed from the Device Settings screen and not subsequently programmed the Pending Program Changes screen will appear You may select Cancel to return to the Device Settings screen or select Continue to cancel all SQ RX device setting changes ...

Page 45: ...ility of the S ICD System to sense and convert VF Note Episode data associated with rescue shocks manual shocks and induction testing is not stored in the SQ RX device To induce VF and test the S ICD System 1 Select the Programmer Main Menu button on the Navigation Bar to access the Main Menu 2 Select the Patient Test button to setup the induction test Figure 31 Figure 31 Select the Patient Test B...

Page 46: ...nergy may be programmed from 10 to 80 J A 15 J safety margin is recommended for defibrillation testing Figure 32 Setting the desired first shock energy for defibrillation testing 5 Select the Continue button to display the next Induction Test screen Note Ensure that noise markers N are not present on the S ECG prior to induction The presence of noise markers may delay detection and therapy deliver...

Page 47: ...ythm Upon detection and confirmation of an induced arrhythmia the S ICD System automatically delivers a shock at the programmed energy output and polarity If the shock fails to convert the arrhythmia re detection occurs and subsequent shocks are delivered at the SQ RX device s maximum energy output 80 J Note Following the release of the Hold To Induce button evaluate the sensing markers during the...

Page 48: ...d After the setup process is complete evaluate the streaming S ECG during a pectoral exercise Sensing performance during high rate exercises can also be performed Acceptable sensing will yield S markers synchronous to all QRS complexes If other markers are noted use the Manual Setup process to evaluate other sensing configurations Note If Manual Setup was previously used to override a sensing conf...

Page 49: ... overview of all SQ RX device activity since the last communication session Figure 34 Figure 34 Device Status screen The Device Status overview reports Date of the last follow up session Total number of shocks delivered since the last follow up session Total number of treated episodes since the last follow up session Total number of untreated episodes since the last follow up session Remaining SQ ...

Page 50: ...aneous episode occurs during a patient s follow up session while the SQ RX device is wirelessly communicating with the programmer the episode will not be stored To view stored episodes 1 Select the Main Menu button 2 Select the Follow Up button 3 Select the Captured and Stored Episodes S ECG icon from the Navigation Bar 4 Select the Episodes option to access the episodes pick list 5 Select an epis...

Page 51: ... An Untreated Episode is defined as any high rate episode that spontaneously terminates during the charging process before a shock is delivered Up to 128 seconds of S ECG data is stored for each Untreated Episode Pre episode S ECG 44 seconds of pre episode S ECG Episode S ECG Up to 84 seconds of tachycardia S ECG data Printing Reports from the Programmer Printing Reports Patient reports can be pri...

Page 52: ...Name Date of Current Follow Up Date of Last Follow Up Printed Report Date SQ RX Device Model Serial Number Electrode Model Serial Number Implant Date Therapy Parameters Programmed Gain Settings and Sensing Configuration Initial Shock Polarity Configuration Episode Summary Since Last Follow Up and Since Initial Implant Battery Status Electrode Impedance Measurement SQ RX Device Integrity Check if a...

Page 53: ...G strips is displayed Select the button next to the Cap tured S ECG s to be printed A checkmark appears next to the selected Captured S ECG Figure 36 Figure 36 Selecting Captured S ECG Reports for printing 2 Select Continue to return to the Print Reports pick list screen 3 Select the Print button to print the selected report 4 Select the Cancel button to return to the previously accessed screen ...

Page 54: ...xt to the episode s to be printed A checkmark appears next to the selected episode s Figure 37 Stored Episode List screen scrollable 2 Select Continue to return to the Print Reports pick list screen 3 Select the Print button to print the selected report 4 Select the Cancel button to return to the previously accessed screen Note In order to be available for printing episodes must be individually do...

Page 55: ...kers are shown in the S ECG Markers on Programmer Display Screens and Printed Reports table Table 2 and an example is shown in the Sample ECG Markers illustration Figure 38 Table 2 S ECG Markers on Programmer Display Screens and Printed Reports Description Marker Charging C Sensed Beat S Noisy Beat N Paced Beat P Tachy Detection T Discard Beat Shock Return to NSR Marker present on printed report b...

Page 56: ...e selected setting The gain setting controls the visual gain The programmer defaults to Full Range for SQ RX devices with a gain setting of x1 and to 1 2 Range for SQ RX devices with a gain setting of x2 The Sweep Speed slider controls the display speed of the scrolling Live S ECG The nominal sweep speed setting is 25 mm sec Figure 39 Adjusting Gain and Sweep Speed Note Amplitude settings and disp...

Page 57: ... button If an additional recording is required then the oldest previous recording is replaced with the new recording To capture a new S ECG rhythm strip 1 Select the Capture S ECG button located to the left of the Live S ECG window Figure 40 The S ECG will scroll across the display screen Calipers appear below the Captured S ECG rhythm strip Figure 41 Each 12 second recording is date and time stam...

Page 58: ...ect one Captured S ECG from the list The Captured S ECG Details screen appears 5 Select and drag the calipers to view details 6 Select the Continue button to return to the Captured S ECG list screen Utilities Menu The programmer Utilities menu provides access to additional SQ RX device features These include Acquire Reference S ECG Beeper Control Manual Setup and Smart Charge To access the Utiliti...

Page 59: ...3 Select the Continue button to complete the process and return to the Utilities screen The Cancel button can be used at any time to end S ECG acquisition and return to the Utilities screen Figure 43 The patient should remain still while the Reference S ECG is acquired Beeper Control The SQ RX device has an internal alert system that emits an audible beeping tone when an alert condition occurs Ale...

Page 60: ...he Main Menu button to display the Main Menu 2 Select the Utilities button to display the Utilities Menu 3 Select the Beeper Control button 4 Select the Reset Beeper button to suspend audible beeping tones triggered by an alert condition Figure 44 If the alert condition is not corrected the audible beeping tones will be reactivated during the next automatic S ICD System self check Figure 44 Resett...

Page 61: ...try The sensing configuration can be evaluated by temporarily activating any of the vectors or gain settings The Live S ECG and markers will reflect the temporary selections for evaluation purposes 4 There are three available sensing vectors that can be manually selected Primary Sensing from the proximal electrode ring on the subcutaneous electrode to the surface of the active SQ RX device Seconda...

Page 62: ...ment 1x Gain 4 mV 1x Gain should be selected when the signal amplitude is large enough to cause clipping when the 2x gain is selected 2x Gain 2 mV 2x Gain should be selected when the signal amplitude is small enough to allow use of a more sensitive setting without causing clipping of the captured signal The 2x gain selection amplifies the signal twice as much as the 1x gain selection ...

Page 63: ...d Reference S ECG confirmation Smart Charge Through the Smart Charge feature the SQ RX device charge initiation sequence adapts to the occurrence of non sustained ventricular arrhythmia episodes by delaying capacitor charging This conserves battery longevity and may prevent unnecessary shocks for non sustained arrhythmias Smart Charge is enabled automatically when an untreated ventricular arrhythm...

Page 64: ...he Reset button to reset the Smart Charge to zero or press Cancel to return to the Utilities Menu without resetting the Smart Charge 5 A confirmation window will appear with the message Smart Charge successfully reset 6 Press the Continue button to return to the Utilities screen ...

Page 65: ...mum 80 J rescue shock can be delivered upon programmer command To deliver a rescue shock 1 Select the red Rescue Button at the top of the programmer screen The Rescue Shock screen appears Figure 49 Figure 49 Rescue Shock screen 2 Select the Shock button to begin charging the SQ RX device for a Rescue shock A red background screen with the word Charging will appear Figure 50 Selecting the Abort but...

Page 66: ...on Figure 50 Abort Rescue Shock 3 A confirmation screen will appear with notification that the shock was delivered successfully along with the corresponding shock impedance Figure 51 Figure 51 Confirmation of Rescue Shock delivery ...

Page 67: ... Figure 52 Manual shock may also be utilized at a low energy to assess system impedance integrity either at implant or as warranted by patient condition A manual shock may be administered with the S ICD detection zone s either ON or OFF Figure 52 Manual shock S ICD System Magnet Model 4520 Model 4520 Magnet the magnet is a nonsterile accessory used to inhibit the delivery of therapy from the SQ RX...

Page 68: ...n does not affect wireless communication between the SQ RX device and the programmer Charging the Programmer When not in use it is recommended that the programmer remain connected to the external power supply This will ensure that the internal battery is adequately charged Cleaning the Programmer Keep the programmer away from dust and dirt Do not use harsh chemicals cleaning solvents or strong det...

Page 69: ...r you turn on the programmer The normal power up process verifies that the programmer has passed its internal checks and is ready for use Safety Measurements National regulations may require that the user manufacturer or manufacturer representative periodically perform and document safety tests of the programmer If such testing is required in your country follow the testing interval and extent of ...

Page 70: ...e steps below 1 Ensure that the printer is turned On and that it contains paper and a sufficient ink supply 2 Check printer feed for paper jam 3 Ensure asapplicable thatthewirelessfunctionisenabledontheprinterorthattheCameron Health BostonScientificapprovedwirelessadapterisfullyinsertedintotheleftsideofthe printer No Printer Available The No Printer Available screen will appear if a printer was no...

Page 71: ...e printer 3 Move the programmer closer to the printer 4 Move any devices and the associated cables that may be interfering with the RF communication Inability to Communicate With the SQ RX Device If the programmer is unable to communicate with the SQ RX device follow the steps below 1 Attempt to reposition the wand 2 Select Scan For Devices from the Main Menu or select Scan Again from the Device L...

Page 72: ...0 1999 5 EC R TTE Directive The S ICD System contains radio equipment in the frequency range 402 MHz to 405 MHz for ultra low power active medical implants Cameron Health hereby declares that this transmitter is in compliance with the essential requirements and other relevant provisions of Directive 1999 5 EC To obtain a full text Declaration of Conformity please contact Cameron Health Boston Scie...

Page 73: ... 8 kV air 6 kV contact 8 kV air Floors should be wood concrete or ceramic tile If floors are covered with synthetic material then the relative humidity should be at least 30 Electrical Fast Transient Burst IEC 61000 4 4 2 kV for power supply lines 1 kV for input output lines 2 kV for power supply lines 1 kV for input output lines Mains power quality should be that of a typical commercial or hospit...

Page 74: ...ined by an electromagnetic site survey a should be less than the compliance level in each frequency range b Interference may occur in the vicinity of equipment marked with the following symbol Radiated RF IEC 61000 4 3 3V m 80 Mhz to 2 5 GHz 3V m Note 1 At 80 MHz and 800 MHz the higher frequency range applies Note 2 These guidelines may not apply in all situations Electromagnetic propagation is af...

Page 75: ...MHz to 800 MHz 3 5 E1 P d 800 MHz to 2 5 GHz 0 01 0 117 0 117 0 233 0 1 0 369 0 369 0 738 1 1 17 1 17 2 34 10 3 69 3 69 7 38 100 11 7 11 7 23 3 For transmitters rated at a maximum output power not listed above the recommended separation distance d in metres m can be estimated using the equation applicable to the frequency of the transmitter where p is the maximum output power rating of the transmi...

Page 76: ...0005A Environment Operating Storage Temperature 15 C to 38 C 59 F to 100 F 10 C to 55 C 14 F to 131 F Relative humidity 5 to 93 maximum at 40 C non condensing 5 to 93 maximum at 40 C non condensing Atmospheric pressure 50 kPa to 106 kPa 7 252 psi to 15 374 psi 50 kPa to 106 kPa 7 252 psi to 15 374 psi Table 9 Specifications Component Specification Dimensions Width x Depth x Height 24 0 cm x 12 7 c...

Page 77: ...on NC 10 mA Single Fault Condition SFC Patient leakage current 100 μA Normal Condition NC 500 μA Single Fault Condition SFC mains on applied parts Electrical Safety Testing IEC 62353 2008 allowed values Earthbond testing Groundbond testing 300 mΩ including power cable not exceeding 3 meters Equipment leakage direct method 500 μA Patient leakage current direct method Wand BF 5000 μA Safety Features...

Page 78: ...Radio Non ionizing electromagnetic radiation Do Not Dispose Do not dispose of in trash Follow instructions for use Serial Number Serial number of the programmer Risk Of Shock Indicates the risk of electric shock Conformité Européenne Product fully complies with European Directive AIMD 90 385 EEC Fragile Handle with Care Transport and store with care Keep Dry Ship and store in a dry place Date of M...

Page 79: ...OGRAMMER Definition of package label symbols Table 12 Packaging Symbols Q TECH Programmer Wand Symbol Specification Symbol Specification Lot number Batch code Non Sterile Used to indicate the product is not sterile ...

Page 80: ...mer to the user or using facility Please contact your Cameron Health Boston Scientific office or local representative for details The warranty on the Q TECH Programmer does not extend to any product that has been tampered with altered or repaired by any person other than an employee of Cameron Health Boston Scientific organization ...

Page 81: ......

Page 82: ...mente CA 92673 USA 1 800 CARDIAC 227 3422 1 651 582 4000 www cameronhealth com Cameron Health BV World Trade Center Nieuwe Stationsstraat 10 6811 KS Arnhem The Netherlands 1 800 CARDIAC 227 3422 1 651 582 4000 www cameronhealth com PN 104749 003 en 2013 09 ...

Reviews: