20
CDs/ DVDs/USB und Infor ma -
tion en einlegen/einstecken
Einlegen von CDs/DVDs
Man kann jederzeit während eines Eingriffs eine
CD/DVD in den AIDA DVD-M einlegen oder
einen USB-Stick einstecken. Für den
AIDA DVD-M werden die Datenträger CD-R,
DVD+R und DVD-R empfohlen. Evtl. sind auch
die Datenträger DVD+RW und DVD-RW kom pa -
tibel. Die Ver wen dung dieser Produkte wird je -
doch nicht unter stützt oder empfohlen.
Hinweis:
Falls sich in der mit „USB“ gekenn-
zeichneten Buchse auf der Rückseite des Ge -
rätes ein Stecker befindet, ziehen Sie diesen aus
der Buchse heraus (der Stecker dient dazu, die
Benutzer davon abzuhalten, einen USB-Drucker
an diese Buchse anzuschließen).
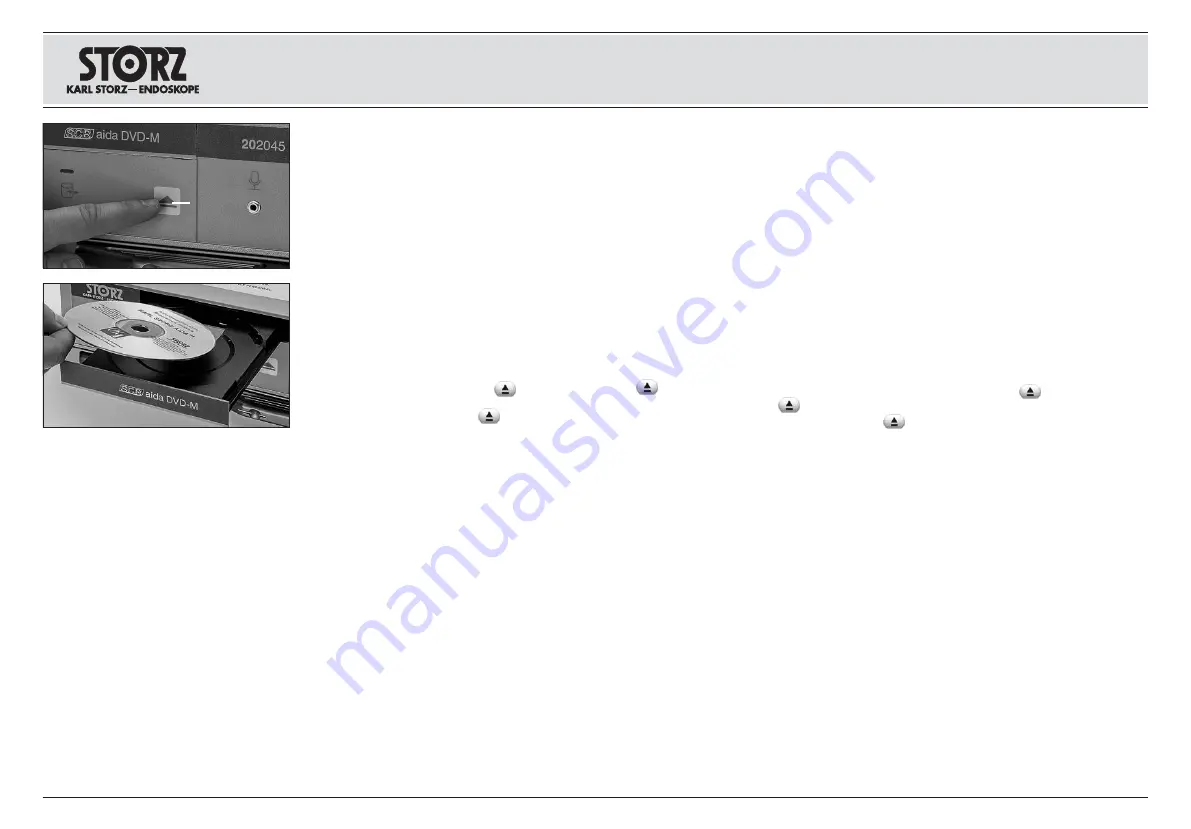
Zum Öffnen des CD/DVD-Fachs
]
antip-
pen. Eine leere CD oder DVD einlegen und
durch erneutes Antippen von
]
das Fach
schließen.Wenn das Format der eingelegten
CD/DVD nicht kompatibel ist, erscheint eine
Meldung mit weiteren Informationen.
CDs/DVDs pflegen
Nur saubere und trockene CDs/DVDs verwenden.
Die Aufnahmeseite (Unterseite) nicht berühren,
beschmutzen oder zerkratzen. Bei Bedarf die
Aufnahmeseite mit einem weichen, trockenen
Tuch reinigen. Die CDs und DVDs in einer
CD-Tasche oder Schutzhülle aufbewahren.
USB-Speichermedium einstecken
An den unteren, entsprechend gekennzeichneten
USB-Eingang auf der Rückseite des AIDA DVD-M
kann jederzeit während eines laufenden Eingriffs
ein USB-Speichermedium eingesteckt werden.
Das im Liefer umfang enthaltene USB-Ver län ge -
rungs kabel kann zum Einstecken und Ent fernen
von USB-Speichermedien von der Vor derseite
des AIDA DVD-M verwendet werden.
Hinweis:
Ein USB-Speichermedium kann nur für
den unteren USB-Anschluss auf der Rückseite
des AIDA DVD-M verwendet werden.
Disc care
Use only clean, dry discs. Do not touch, soil, or
scratch the recording surface (underside).
If necessary, clean recording side with a soft, dry
cloth. Store discs in a disc holder or sleeve for
protection.
USB Insertion
A USB device may be directly inserted into the
lower labeled USB input on the back of the
AIDA DVD-M at any time during a procedure. The
included USB extension cable may also be used
to allow for insertion and removal of USB devices
from the front of AIDA DVD-M.
Note:
A USB device always has to be connected
to the lower USB connector on the rear side of the
AIDA DVD-M.
Уход за CD/DVD
Использовать только чистые и сухие CD/ DVD.
Не трогать, не пачкать и не царапать сторону
записи (нижнюю сторону). При необходимости
вытереть сторону записи мягкой, сухой салфет-
кой. Хранить CD и DVD в кассетнице для CD или
в защитном файле.
Установка записывающего
средства USB
В верхний, соответствующим образом помечен-
ный вход USB на задней панели AIDA DVD-М в
любое время в ходе операции можно вставить
записывающее средство USB. Входящий в ком-
плект поставки удлинительный кабель USB можно
использовать для вставления и удаления записы-
вающего средства USB с передней панели AIDA
DVD-М.
Примечание:
Записывающее средство USB
можно использовать только в верхнем разъеме
USB на передней панели AIDA DVD-М.
Inserting discs, USB and
information
Disc insertion
A disc or a USB may be inserted into
AIDA DVD-M at any time during a procedure.
AIDA DVD-M recommended media include CD-
R, DVD+R and DVD–R. DVD+RW and DVD-RW
media may be compatible, but are not
supported or rec om mend ed for use with this
product.
Note:
If there is a plug covering the port labeled
USB on the back of the device, pull the plug out
of the port (The purpose of this plug is to dis-
courage useres from inserting a USB printer in
that port).
Touch
]
to open the disc drawer. Insert a
blank disc as desired and touch
]
again
to close the disc drawer. If the inserted disc is
an incompatible format, a message will appear
with further information.
Установка CD/DVD/USB и дру-
гих носителей информации
Установка CD/DVD
Во время процедуры в любое время в AIDA DVD-
М можно вставить CD/ DVD или USB. Для AIDA
DVD-М рекомендуются носители информации
CD-R, DVD+R и DVD-R. В некоторых случаях
совместимы также и носители данных DVD+RW
и DVD-RW. Однако использование этих носите-
лей не поддерживается и не рекомендуется.
Примечание:
Если в гнезде на задней панели
прибора, помеченном «USB», вставлен штекер,
его следует вытащить из гнезда (штекер служит
для того, чтобы пользователь не смог подклю-
чить к этому гнезду принтер USB).
Для того чтобы открыть дисковод CD/ DVD
следует слегка коснуться
]
. Вставить
пустой CD или DVD и вновь, слегка коснувшись
]
,
закрыть дисковод. Если формат вставлен-
ного CD/ DVD не совместим, то появится сообще-
ние с дальнейшей информацией.
Aufstellen und
Bedienhinweise
Installation and
operating instructions
Установка прибора и
управление им
]


