background image

203

F3SG-SR

User’s Manual

Chapter

4

Changing Settings with SD Manager 3

Setting with SD Manager 3

E

For more information on the Fixed Blanking, refer to 2-15. Fixed Blanking.

If using this function together with other functions, make settings taking the condition of adjacent zones into account.

For more information on zone adjacency conditions, refer to 2-19. Setting Zone Adjacency Conditions.

When changing the settings is complete, confirm the settings and write the configuration to the F3SG-SR. 
To enable the written configuration, refer to 4-2-7-3. Writing Configuration into Intelligent Tap.

When connecting the Intelligent Tap to a F3SG-SR and trying to return the F3SG-SR to [Detecting], follow step 4 of 
4-1-3-2. Connection Procedure When Using USB Connector to restart the F3SG-SR and Intelligent Tap, or click the
[Monitor]

button.

Fixed Blanking Setup Procedure (Setting by Manual)

1.

Select a Fixed Blanking zone, and enable the function (No. 1).

2.

Set up the zone.

Select [Manual] in [Setting by]. (No. 2)

Set up the bottom and top beam numbers. (No. 3)

Click the [Execute] button in [Confirm zone] to determine the Fixed Blanking zone between the bottom

and top beams configured above. (No.4)

3.

Select a Fixed Blanking Monitoring function. (No. 5)

4.

Set up the number of allowable beams. (No. 5)

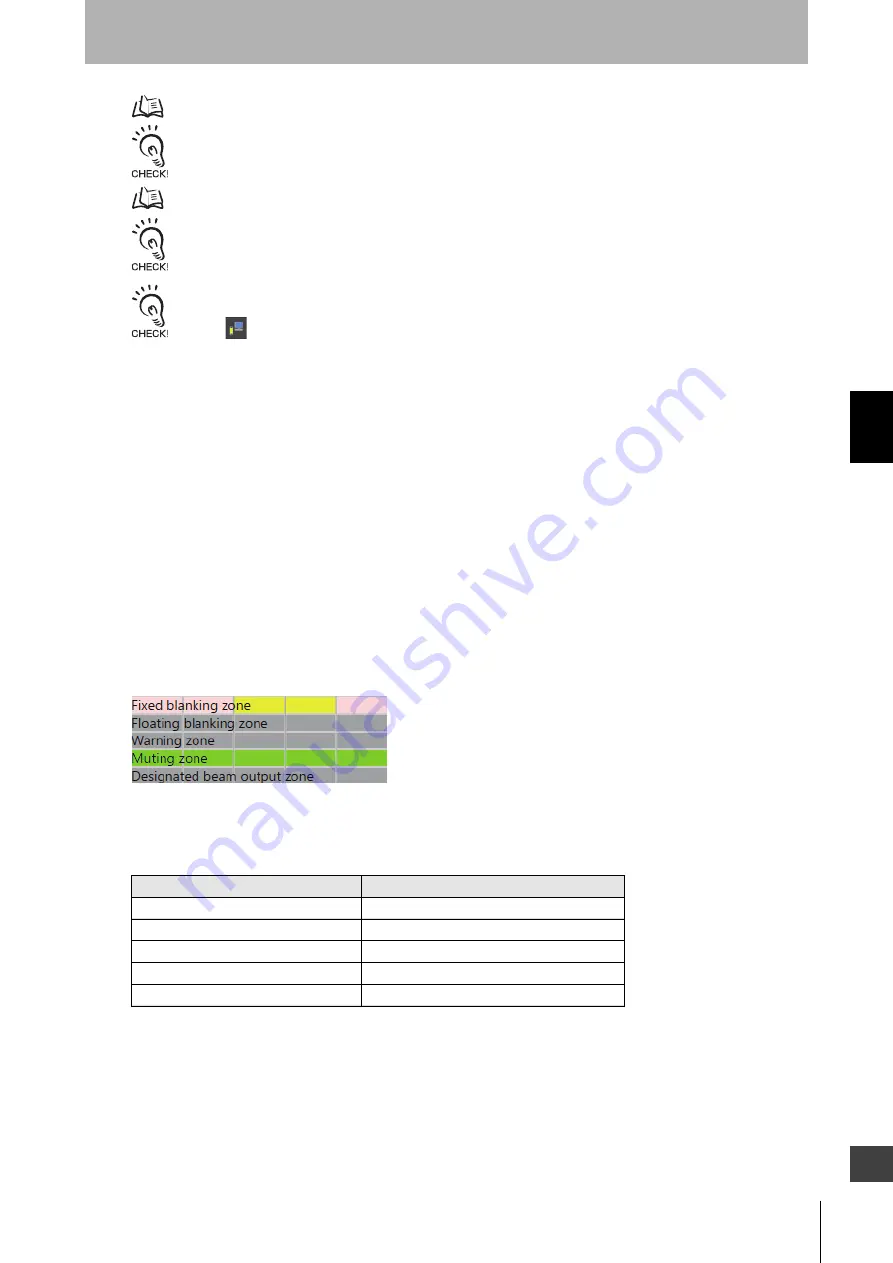
The allowable beams are configurable inside the Fixed Blanking zone. The set allowable beams will be

indicated in the chart as shown below.

In this example, one upper and two lower beams are set as allowable beams.

The table below describes the number of allowable beams configurable for a Fixed Blanking zone.

Number of allowable beams available for fixed blanking beams

5.

Click the [Write configuration] button. On the settings list which will appear, confirm that the changed

settings are correct, and click the [OK] button.

Number of fixed blanking beams

Maximum number of allowable beams

1

Setting not possible

2

1

3

2

4

3

n

n-1

Содержание F3SG-SR Series

Страница 1: ...Safety Light Curtain F3SG SR Series User s Manual Man No Z405I E3 01...

Страница 2: ...of Sharp Corporation ASUS is a trademark of ASUSTeK Computer Inc GALAXY S is a registered trademark of Samsung Electronics Co Ltd HUAWEI is either a registered trademark or a trademark of HUAWEI TECH...

Страница 3: ...OPD 4 North American standards UL61496 1 Type 4 and Type 2 ESPE UL61496 2 Type 4 and Type 2 AOPD UL508 UL1998 CAN CSA C22 2 No 14 CAN CSA C22 2 No 0 8 5 Chinese standards GB T 4584 Specification of ac...

Страница 4: ...nd use it in accordance with all other related standards laws and regulations If you have any questions consult with specialized organizations such as the body responsible for prescribing and or enfor...

Страница 5: ...combination with any electrical or electronic components circuits system assemblies or any other materials or substances or environments Any advice recommendations or information given orally or in w...

Страница 6: ...in Specifications Product specifications and accessories may be changed at any time based on improvements and other reasons It is our practice to change part numbers when published ratings or feature...

Страница 7: ...S OR OTHER INDIRECT INCIDENTAL SPECIAL OR CONSEQUENTIAL DAMAGES ARISING OUT OF USE OF THE SOFTWARE 2 OMRON SHALL HAVE NO LIABILITY FOR DEFECT OF THE SOFTWARE BASED ON MODIFICATION OR ALTERNATION TO TH...

Страница 8: ...control system by a sufficiently trained and qualified person An unqualified person may not be able to perform these operations properly which may cause a person to go undetected resulting in serious...

Страница 9: ...the hazardous part by reaching over the detection zone of a vertically mounted F3SG SR cannot be excluded the height of the detection zone and the safety distance shall be determined in consideration...

Страница 10: ...person If the Muting function is activated by the detection of a person the machine may not stop operating resulting in serious injury Muting lamps that indicate the state of the Muting and Override...

Страница 11: ...output do not ground 24 VDC line When using the NPN output do not ground 0 V line Otherwise a ground fault may turn the safety outputs ON resulting in a failure of stopping the machine Configure the s...

Страница 12: ...operation of the F3SG SR after setting with the DIP Switch on the F39 SGIT IL3 Teach in SD Manager 3 or End Cap to verify that the F3SG SR operates as intended Make sure to stop the machine until the...

Страница 13: ...cade connection perform inspections for every connected F3SG SR Otherwise the system may fail to work properly resulting in serious injury Do not try to disassemble repair or modify the product Doing...

Страница 14: ...eign material such as water oil or dust does not enter the F3SG SR F39 SGIT IL3 or the connector while the end cap and root cables of the F3SG SR or the cover of the DIP Switch on the F39 SGIT IL3 is...

Страница 15: ...device that generates high frequency noise Otherwise take sufficient blocking measures Sharing the power supply with other devices may cause the F3SG SR to be affected by noise or voltage drop It is...

Страница 16: ...Medical equipment such as a pacemaker RFID premises radio stations license required used in factory manufacturing lines Specified low power radio station Wireless LAN device When you use a PC smartph...

Страница 17: ...Aids The following symbols appear in this document to help you locate different types of information Indicates important information or advice on a function or operation of the product Indicates page...

Страница 18: ...xvi Introduction F3SG SR User s Manual...

Страница 19: ...Tap 19 1 5 3 Bluetooth Communication Unit 20 1 6 List of Models 21 1 6 1 List of Models and Response Times 21 1 6 1 1 F3SG SR 21 1 6 2 List of Models Current Consumption and Weight 24 1 6 2 1 F3SG SR...

Страница 20: ...ent Tap 50 2 9 4 Setting with SD Manager 3 50 2 10 PSDI 51 2 10 1 Overview 51 2 10 2 Factory Default Setting 53 2 10 3 Setting Change using Intelligent Tap 53 2 10 4 Setting Change using SD Manager 3...

Страница 21: ...5 3 Setting with Intelligent Tap 95 2 15 4 Setting with SD Manager 3 95 2 16 Floating Blanking 96 2 16 1 Overview 96 2 16 2 Factory Default Setting 100 2 16 3 Setting with Intelligent Tap 100 2 16 4 S...

Страница 22: ...ory Default Setting 118 2 24 3 Setting Change using Intelligent Tap 118 2 24 4 Setting Change using SD Manager 3 118 2 25 Incident Light Ambient Light 119 2 25 1 Incident Light Level Information 119 2...

Страница 23: ...4 Various Usage of Backup and Restoration 141 3 6 4 1 Plug and Work 141 3 6 4 2 Copy and Paste of Sensor Settings 141 3 6 4 3 Changing F3SG SR Configuration to Connect to Intelligent Tap 141 3 6 4 4 C...

Страница 24: ...4 Starting SD Manager 3 Offline 178 4 2 4 1 Creating New Configuration File 178 4 2 4 2 Reading Configuration from PC 179 4 2 4 3 Saving New Configuration File to PC 179 4 2 4 4 Switching Offline to...

Страница 25: ...ient Light 221 4 4 1 2 Operating Status Monitoring 222 4 4 2 Muting Statistics Information 224 4 4 3 Maintenance Information 228 4 4 3 1 Error Log Information 228 4 4 3 2 Warning Log 230 4 4 3 3 Intel...

Страница 26: ...4 Mounted with Adjustable Top Bottom Brackets F3SJ F3SN Adapter F39 LSGTB SJ and Adjustable Side Mount Brackets Intermediate Brackets F39 LSGA 265 5 2 2 Bracket 267 5 2 2 1 Side Mount Bracket Interme...

Страница 27: ...5 4 3 11 Reduced Wiring Connector System with Y Joint Plug Socket Connector 304 5 4 3 12 Easy Wiring Connector System with Reset Switch Connector 305 5 4 4 Functional Earth Connection 307 5 5 Cascade...

Страница 28: ...ing that Hazardous Parts Stop While the Machine Operates 336 7 2 Maintenance Checklists 337 7 2 1 Checklists 337 7 2 1 1 Inspection at Startup and When Changing Operators 337 7 2 1 2 Checking that Haz...

Страница 29: ...1 Model Overview 5 1 3 2 List of Key Features 7 1 4 LED Indicators on F3SG SR 8 1 5 Ratings and Specifications 12 1 5 1 F3SG SR Series 12 1 5 2 Intelligent Tap 19 1 5 3 Bluetooth Communication Unit 20...

Страница 30: ...esentative F3SG SR series Emitter 1 Receiver 1 Side Mount Bracket Intermediate Bracket F39 LSGF End Cap for switching Scan Code Selection function x 2 End cap for Scan Code B is included Instruction S...

Страница 31: ...rking on the side Receiver Marking on the side Emitter Functional earth terminal on backside Functional earth terminal The marking EMITTER is on the side of emitter And the marking RECEIVER is on the...

Страница 32: ...rance Model name Description Emitter and receiver F3SG 4SR Select a model name based on the required protective height and ESPE type The model name can be understood as follows 1 ESPE type 4 Type 4 or...

Страница 33: ...r 3 by connecting the Intelligent Tap to a PC 1 3 Wireless communication with PC smartphone or tablet by connecting the Intelligent Tap and Bluetooth Communication Unit F39 SGBT sold separately 4 IO L...

Страница 34: ...Settings backed up in Intelligent Tap are restored to multiple F3SG SR s 5 Backup F3SG SR settings are backed up to Intelligent Tap Plug and Work Settings backed up before F3SG SR faults are taken ov...

Страница 35: ...e Sensor Intelligent Tap PC Smartphone Tablet F3SG SRA F3SG SRB Wiring End Cap DIP Switch 1 SD Manager 3 SD Manager 3 Mobile APP 2 Mutual Interference Prevention X X X 3 X 4 Code A 4 p 35 PNP NPN Sele...

Страница 36: ...ons 1 4 LED Indicators on F3SG SR F3SG SR Series Shown below are indication statuses of the LED indicators on the F3SG SR when you purchased Emitter F3SG SR 14 F3SG SR 25 45 85 F3SG SR 25 45 85 Receiv...

Страница 37: ...Test Yellow External Test is being performed X X 5 Area Beam Indicator ABI 1 Green The target beams of the ABI are unblocked and the safety outputs are turned ON MUTING or OVERRIDE state In the MUTING...

Страница 38: ...on the indicator of only the sensor segment having the error is illuminated LOCKOUT state due to a replacement recommended error When in cascade connection the indicator of only the sensor segment hav...

Страница 39: ...linking Or the target beams of the ABI are blocked instantaneously X Orange Incident light level of the target beams of the ABI is 170 factory default setting 2 or less of ON threshold for 5 to 10 s I...

Страница 40: ...o 18 ms Wired synchronization 10 to 21 ms Optical synchronization 8 to 13 ms Wired synchronization 10 to 17 ms Optical synchronization 8 ms Wired synchronization 10 ms OFF to ON Optical synchronizatio...

Страница 41: ...wiring of power supply Load current 300 mA max Residual voltage 2 V max except for voltage drop due to cable extension Capacitive load 1 F max Inductive load 2 2 H max 1 2 3 Leakage current 1 mA max...

Страница 42: ...ge 0 to 3 V short circuit current approx 7 0 mA OFF voltage 1 2 Vs to Vs or open short circuit current approx 4 5 mA The Vs indicates a supply voltage value in your environment Overvoltage category IE...

Страница 43: ...ght Cable and 5 4 3 2 Root Plug Cable for Extended for more information Cable diameter 6 mm Minimum bending radius R5 mm Cascading cable Type of connection To sensors dedicated connector To cascading...

Страница 44: ...crylic resin Side Mount Bracket Intermediate Bracket F39 LSGF Zinc alloy FE plate Stainless steel Weight See 1 6 2 List of Models Current Consumption and Weight for more information Included accessori...

Страница 45: ...st for the use of the F3SG SRA in 2 segment or 3 segment cascade Refer to 1 5 1 F3SG SR Series Electrical Safety outputs OSSD 5 Not including the Cascading Cable for Extended F39 JGR3W and the Root Pl...

Страница 46: ...n when 5 and 6 are 10 m each 2 Under the maximum load conditions safety outputs 1 and 2 of 300 mA per channel and auxiliary output of 100 mA the cable extension must be 50 max of the length listed in...

Страница 47: ...3 V to Vs short circuit current approx 9 5 mA 2 OFF voltage 0 V to 1 2 Vs or open short circuit current approx 13 0 mA 2 NPN ON voltage 0 to 3 V short circuit current approx 13 0 mA OFF voltage 1 2 V...

Страница 48: ...s OD 32 bytes M sequence type TYPE_2_V Minimum cycle time 12 ms Material PBT resin Weight F39 SGIT IL3 180 g when packaged F39 LITF1 50 g when packaged Included accessories Instruction Sheet and M12 C...

Страница 49: ...23 240 8 40 140 10 50 F3SG 4SR 0280 14 F 27 280 8 40 140 10 50 F3SG 4SR 0320 14 31 320 8 40 140 10 50 F3SG 4SR 0360 14 F 35 360 8 40 140 10 50 F3SG 4SR 0400 14 39 400 8 40 140 10 50 F3SG 4SR 0440 14 F...

Страница 50: ...0 25 24 480 8 40 140 10 50 F3SG 4SR 0520 25 F 26 520 8 40 140 10 50 F3SG 4SR 0560 25 28 560 8 40 140 10 50 F3SG 4SR 0600 25 F 30 600 8 40 140 10 50 F3SG 4SR 0640 25 32 640 8 40 140 10 50 F3SG 4SR 0680...

Страница 51: ...Refer to 2 3 Mutual Interference Prevention for more information Model Number of beams Protective height mm Response time Optical synchronization ms Response time Wired synchronization ms ON to OFF OF...

Страница 52: ...0520 14 F 51 520 96 131 1 3 2 2 F3SG 4SRB0520 14 F 51 520 81 103 1 3 2 2 F3SG 4SRA0560 14 55 560 99 133 1 4 2 3 F3SG SRB0560 14 55 560 82 104 1 4 2 3 F3SG 4SRA0600 14 F 59 600 103 136 1 5 2 5 F3SG 4SR...

Страница 53: ...76 117 0 9 1 8 F3SG 4SRB0360 25 F 18 360 65 98 0 9 1 8 F3SG 4SRA0400 25 20 400 79 119 1 1 9 F3SG SRB0400 25 20 400 66 98 1 1 9 F3SG 4SRA0440 25 F 22 440 82 121 1 1 2 F3SG 4SRB0440 25 F 22 440 67 98 1...

Страница 54: ...4 3 5 4 6 F3SG SRB1360 25 68 1360 90 106 3 5 4 6 F3SG 4SRA1440 25 72 1440 149 179 3 7 4 8 F3SG SRB1440 25 72 1440 92 106 3 7 4 8 F3SG 4SRA1520 25 76 1520 154 183 3 9 5 3 F3SG SRB1520 25 76 1520 93 107...

Страница 55: ...116 1 1 9 F3SG SRB0400 45 10 400 56 95 1 1 9 F3SG 4SRA0560 45 14 560 82 124 1 4 2 3 F3SG SRB0560 45 14 560 60 96 1 4 2 3 F3SG 4SRA0720 45 18 720 93 133 1 8 2 8 F3SG SRB0720 45 18 720 64 96 1 8 2 8 F3...

Страница 56: ...tion is activated The F3SG PG cannot be used in cascade connection The table below summarizes the relation described above Cascaded sensors in Optical Synchronization with Scan Code A The number of be...

Страница 57: ...DI 51 2 11 External Device Monitoring EDM 54 2 12 Auxiliary Output 57 2 13 Muting 61 2 14 Override 85 2 15 Fixed Blanking 90 2 16 Floating Blanking 96 2 17 Reduced Resolution 101 2 18 Warning Zone 104...

Страница 58: ...30 Chapter 2 F3SG SR User s Manual System Operation and Functions 2 28 Instantaneous Block Detection 124 2 29 Setting Recovery 125 2 30 Backup Restoration 126 2 31 IO Link 127...

Страница 59: ...y Conditions for further information YES Combination available YES C Combination available by setting with SD Manager 3 NO Combination unavailable 1 This combination requires that the Floating Blankin...

Страница 60: ...use the teach in input of fixed blanking or floating blanking by the Push SW or external wiring For details refer to 4 3 2 3 Teach in Input Considerations for enabling and disabling Muting function w...

Страница 61: ...table below In addition the indicator which has detected an error is illuminated or blinks to display the error The LOCKOUT state does not allow the protected machine to operate The primary differenc...

Страница 62: ...ager 3 or SD Manager 3 Mobile APP under this state Refer to Safety Light Curtain Configuration Tool for Model F3SG SD Manager 2 User s Manual for more information 2 2 2 Operating States of Intelligent...

Страница 63: ...er and a receiver for normal operation of the F3SG SR The optical synchronization method of F3SG SR uses a specific beam to realize synchronization The beam is hereinafter called synchronization beam...

Страница 64: ...blished Scan Code Selection The F3SG SR has two scan codes Code A and Code B These scan codes have different internal processing time The use of different scan codes allows for placement of systems in...

Страница 65: ...below Connect the replacing End Cap to the F3SG SR and tighten the fixing screws to fix the End Cap The recommended torque to tighten the Mounting Screws is 0 35 N m Do not remove the insulating rubb...

Страница 66: ...ormation on the Mutual Interference Prevention There are two ways to operate the F3SG SR in the Wired Synchronization setting 1 Connect the emitter and the receiver with the Intelligent Tap 2 Connect...

Страница 67: ...e to 0 V The F3SG SR is set to NPN when the 0V 24V line blue is connected to 24 VDC and the 24V 0V line brown to 0 V When using an Intelligent Tap wire the F39 JG A D sensor connected with CN2 of the...

Страница 68: ...uts in the OFF state and indicates the error at the same time 2 5 1 1 Self Test details The Self Test detects such error as described below Emitter Failure of emitter unit or circuit CPU failure Memor...

Страница 69: ...If the output signal does not include an OFF pulse signal due to short circuit etc the receiver diagnoses a failure in the output circuit or wiring and it enters the LOCKOUT state OSSD 1 ON OFF OSSD...

Страница 70: ...Emission stops when connecting with 0 V 0 to 3 V 24 VDC 0V Emission stops when connecting with 24 VDC S1 0V 24 VDC Emission stops when connecting with 0 V S2 S1 Test switch Connect the line to 0 V if...

Страница 71: ...connecting the Intelligent Tap to F3SG SR 2 6 4 Setting with SD Manager 3 The user can make changes to the settings of this function by the SD Manager 3 It is recommended that the Position 2 of the D...

Страница 72: ...the ON OFF states and external lines F3SG SRA F3SG SRB PNP NPN Open or apply 0 V to 1 2 Vs to the RESET line yellow for 1 s or longer and then apply a voltage of Vs 3 V to Vs again Open or apply 1 2...

Страница 73: ...and Restart Interlock Start Interlock The F3SG SR turns the safety outputs OFF at power on or recovery from power failure and keep this state until a reset signal is received This is useful when you...

Страница 74: ...0V Brown RESET EDM Yellow 0V 24V Blue 24 VDC 0V PNP S1 0V 24 VDC NPN S1 24V 0V Brown RESET EDM Yellow 0V 24V Blue S1 Lockout or interlock reset switch 24V 0V Brown RESET EDM Yellow 0V 24V Blue F3SG S...

Страница 75: ...nformation on setting this function by the Intelligent Tap 2 8 4 Setting with SD Manager 3 The user can make changes to the settings of this function by the SD Manager 3 For this function setting para...

Страница 76: ...g another reset switch pre reset switch in the hazardous zone If the Pre Reset function is enabled an operator can work in the hazardous zone and press the pre reset switch installed in the hazardous...

Страница 77: ...switch 24V 0V Brown PRE RESET Gray RESET EDM Yellow 0V 24V Blue F3SG SR receiver 24V 0V Brown PRE RESET Gray RESET EDM Yellow 0V 24V Blue F3SG SR receiver Pre reset switch Beam state Reset switch OSSD...

Страница 78: ...no limit or 1 to 9 times by one time 3 By using SD Manager 3 this parameter can be set by 1 s in a range of 8 60 s Make sure the Position 2 of the DIP Switch is set at ON DIP Switch Enabled to activa...

Страница 79: ...following two types of PSDI can be realized without using controllers Single break The press machine of manual loading and automatic unloading is restarted in this mode by blocking of the light curta...

Страница 80: ...Minimum pressing time of reset switch configurable by 100 ms in a range of 100 500 ms T2 Minimum break time 300 ms T3 Minimum pressing time of press position switch T3 T1 T4 Wait time until single br...

Страница 81: ...t switch 100 ms 100 to 500 ms in 100 ms increments T1 min T1 min T2 min Dummy break Dummy break 1 Dummy break 1 Unintended break Feeding parts Removing parts Feeding parts T3 min T4 min T2 min T3 min...

Страница 82: ...ed to the RESET line via the NC contact of the extenal relays Refer to the table below for the specified voltage The external relays or contactors must have the direct opening mechanism or be force gu...

Страница 83: ...in a range of 0 1 to 4 0 s Make sure the Position 2 of the DIP Switch is set at ON DIP Switch Enabled to activate the settings by the DIP Switch After making the setting make sure to perform the wirin...

Страница 84: ...function with SD Manager 3 under 2 1 Combination of Functions for more information It is recommended that the Position 2 of the DIP Switch be set at OFF DIP Switch Disabled After you make any change...

Страница 85: ...used to monitor the status of F3SG SR This output can be connected to a device such as an indication lamp PLC etc Usage Example Indicate that the F3SG SR is in the MUTING or OVERRIDE state Indicate t...

Страница 86: ...gs of this function by the DIP Switch on the Intelligent Tap When the Pre Reset is enabled by the Dip Switch on the Intelligent Tap the factory default setting is inverted signal of the safety outputs...

Страница 87: ...ions for enabling and disabling Muting function with SD Manager 3 under 2 1 Combination of Functions for more information Refer to 2 13 Muting for more information on settings of the Muting function 2...

Страница 88: ...als of Sequence error information Interference vibration information and Light level diagnosis information is in the ON state Designated beam output information When a designated beam is blocked or un...

Страница 89: ...y visible to workers from all the operating positions Use two independent input devices for muting inputs Failure to do so may cause the MUTING state due to a single muting sensor s failure 2 13 1 Ove...

Страница 90: ...istor type Muting lamp You may need a muting lamp depending on your application or as a result of a risk assessment analysis Before determining the use of the muting lamp check laws and regulations of...

Страница 91: ...state but it continues the normal operation with the safety function enabled For muting error indication see 8 1 3 3 Muting Sequence Error Indication The Muting error state can be released by any of...

Страница 92: ...error occurs T1max Muting input time limit value maximum 4 s Maximum time difference between muting inputs A and B If the time difference between muting inputs A and B is larger than this value a mut...

Страница 93: ...h object passes through all muting sensors before the next object arrives at the first muting sensor Also install all F3SG SRs and muting sensors so that no person is able to accidentally enter the ha...

Страница 94: ...rossover point of the muting sensors A1 and B1 is in the hazardous zone This configuration prevents the Muting function from being enabled by a person passing through the crossover point 2 MUTING star...

Страница 95: ...d for muting sensors to keep MUTING enabled is D1 L Formula 1 L m Length of a workpiece The maximum distance d1 m required for muting sensors to keep the MUTING state enabled is V x T1min d1 V x T1max...

Страница 96: ...ing a photoelectric sensor as a muting sensor Note Two wire type muting sensor cannot be used Using an NO contact type switch as a muting sensor A1 B1 Retro reflective photoelectric sensor PNP Output...

Страница 97: ...tions in the arrangement as shown below 1 Before a workpiece passes through All muting sensors are turned OFF and the safety function of the F3SG SR is enabled 2 MUTING started When the muting sensors...

Страница 98: ...G SR is enabled Installation distande The minimum distance D3 m required for muting sensors to keep MUTING enabled is D3 L Formula 3 L m Length of a workpiece The maximum distance d2 m required for mu...

Страница 99: ...hrough all muting sensors before the next workpiece arrives at the first muting sensor Wiring diagram PNP Moving direction Workpiece Workpiece Workpiece Workpiece Moving direction 24 VDC 0 V Power sup...

Страница 100: ...rrier Attach interference prevention filter provided for E3Z series as accessories Attach a slit to reduce light intensity provided for E3Z series as accessories Lower the sensitivity T1min Muting inp...

Страница 101: ...tween a muting sensor and a F3SG SR 2 13 3 Exit Only Muting Mode 2 13 3 1 Overview Turning the muting inputs A and B ON with time difference enables MUTING Difference from Standard Muting mode exists...

Страница 102: ...s Maximum time difference between muting inputs A and B If the time difference between muting inputs A and B is larger than this value a muting sequence error occurs T2 Muting time limit 60 s The dura...

Страница 103: ...F and the safety function of the F3SG SR is working 2 MUTING started When the muting sensors A1 and B1 are turned ON in this order and the MUTING state is enabled In this state the safety function of...

Страница 104: ...ion zone When the muting end wait time T4 1 s configurable passes after the F3SG SR is unblocked the MUTING state is released Installation distande Distances between the muting sensors A1 B1 and the F...

Страница 105: ...installed so that MUTING state caused by a workpiece should be ended before the next workpiece arrives at the first muting sensor Timing chart Workpiece Workpiece Workpiece Workpiece F3SG SR A1 B1 F3S...

Страница 106: ...ng input B is turned OFF from the ON state is within the range between the muting input time limit values T1min 0 1 s and T1max 4 s Order of muting inputs A and B is irrelevant PNP setting Vs 3V to Vs...

Страница 107: ...imum duration of a signal interruption allowed in muting inputs A and B T1max Muting input time limit value maximum T2 Muting time limit T3 Maximum allowable muting signal interruption T3 0 1 s max T1...

Страница 108: ...e turntable 1 Hazardous part of the machine is on the same side of a human body The safety functions of the F3SG SR is activated with the limit switch 1 being in OFF and the limit switch 2 being ON 2...

Страница 109: ...Chart Guard fence Limit switch1 NO Contact Limit switch 2 NC Contact During muting ON To muting input A ON OFF To muting input B Input time difference between muting inputs A and B must be T1max or l...

Страница 110: ...auses the Zone Measurement to start Zone measurement The Zone Measurement monitors the highest and lowest parts of a passing workpiece during the dynamic muting measurement time Tdyn 3 s Can be change...

Страница 111: ...nager 3 Setting parameters of the following functions is saved according to the states where the Muting function is enabled and disabled with the SD Manager 3 respectively After changing the Muting fu...

Страница 112: ...imum 4 s 0 2 to 60 s in 0 1 s increments or infinite T2 Muting time limit 60 s 1 to 600 s in 1 s increments or infinite T3 Maximum allowable muting signal interruption 0 1 s 0 1 to 20 s in 0 1 s incre...

Страница 113: ...hazardous zone Make sure that nobody is in the hazardous zone before activating the Override function Make sure to connect an override cancel switch to the RESET line when using the Override function...

Страница 114: ...3SG SR does not enter the OVERRIDE state when the sensor is in LOCKOUT state Override end conditions When any of the following conditions is satisfied the OVERRIDE state is released 1 A period of 600...

Страница 115: ...2 Make sure to connect an override cancel switch to the RESET line when using the Override function Otherwise the OVERRIDE state may not be released by the override cancel switch resulting in serious...

Страница 116: ...gnal must be entered within a range from 0 2 s to the override input time limit T1 initial value 1 s See the timing chart below Override end conditions When any one of the following conditions is sati...

Страница 117: ...finite may cause a failure of disabling the OVERRIDE state when there is a failure of the override input signal Conduct risk assessment analysis thoroughly before enabling this setting Refer to Chapte...

Страница 118: ...exists in the disabled zone The fixed blanking zone must include at least one zone consisting of continuous beams Up to three fixed blanking zones zone 1 to zone 3 can be set Note that you cannot set...

Страница 119: ...one is blocked Setting to this monitoring function disabled disables the blanking monitoring Allowable beams configured on both ends of fixed blanking zone are not monitored Allowable beam Allowable b...

Страница 120: ...Outside the upper beams of the blocked zone Fig 1 3 or more 2 1 beam each for outside and inside the upper beams of the blocked zone Fig 2 Beams including the top beam are blocked 1 or 2 1 Outside the...

Страница 121: ...hen allowable beam is specified mm LED indicator status When the Fixed Blanking is being enabled the CFG indicator turns on Number of blocked beams Number of allowable beams Zone with allowable beam c...

Страница 122: ...Manager 3 Refer to 2 1 Combination of Functions for more information on the use in conjunction with other functions Settings for respective zone have limitations Refer to 2 19 Setting Zone Adjacency...

Страница 123: ...commended that the Position 2 of the DIP Switch be set at OFF DIP Switch Disabled Setting the Fixed Blanking Monitoring function to Disable Monitoring may create an undetectable area where a person ca...

Страница 124: ...er of beams manually or by moving a blocking object in the detection zone For details of teach in setting see 3 7 2 Setting Floating Blanking by Teach in Floating Blanking Monitoring function The F3SG...

Страница 125: ...ystem and the function is enabled by the SD Manager 3 The function cannot be enabled when the F3SG SR is in the cascade connection The Muting is not enabled when the Temporarily Disable Monitoring by...

Страница 126: ...uts are turned OFF if 5 or more beams are blocked Fig 1 If the number of floating beams is configured as 4 beams the safety outputs are not turned OFF if 4 or less beams are blocked Fig 2 If the monit...

Страница 127: ...ctions for more information on the use in conjunction with other functions Model Number of floating beams configured Detection capability Number of blocked beams to turn safety outputs OFF F3SG SR 14...

Страница 128: ...e of a cascade connection It is recommended that the Position 2 of the DIP Switch be set at OFF DIP Switch Disabled Setting the Floating Blanking Monitoring function to Disable Monitoring may create a...

Страница 129: ...ability is changed The difference from the Floating Blanking is that the Reduced Resolution keeps the safety outputs ON even when an object is present discontinuously Refer to 2 1 Combination of Funct...

Страница 130: ...t make any changes to the settings of this function by DIP Switch on the Intelligent Tap Model Number of blocked beams configured Detection capability Number of blocked beams to turn safety outputs OF...

Страница 131: ...e the Muting function is enabled and disabled respectively After changing the Muting function from Enable to Disable or from Disable to Enable with the SD Manager 3 also check the settings of these fu...

Страница 132: ...us part by reaching over the detection zone of a vertically mounted F3SG SR cannot be excluded the height of the detection zone and the safety distance shall be determined in consideration of such a r...

Страница 133: ...connection to have the detection zone it is possible for the other F3SG SR s to have the warning zone for the all beams Fig 6 For the application as shown in Fig 6 make sure the primary sensor has th...

Страница 134: ...in conjunction with other functions Warning Zone Upper 6 beams Warning Zone Lower 4 beams Lower Upper Fig 4 Lower Upper Lower Upper All beams are warning zone All beams are detection zone Fig 7 Fig 8...

Страница 135: ...by the SD Manager 3 If you want to output the beam state of the warning zone set the output operation mode of the Auxiliary Output to Warning Zone Information It is recommended that the Position 2 of...

Страница 136: ...user can make the setting by the SD Manager 3 Zone adjacency condition Yes Possible to configure For details about setting adjacent fixed blanking zones Refer to Constraint between fixed blanking zone...

Страница 137: ...Adjacency Conditions System Operation and Functions E Even if a muting zone and a fixed blanking zone are configured as overlapped Fixed Blanking Monitoring function is effective Muting zone Fixed bl...

Страница 138: ...sic wiring diagram The F3SG SR is set to the Long Mode when the OPERATING RANGE SELECT INPUT line yellow is open When setting to the operating range by wiring the OPERATING RANGE SELECT INPUT line the...

Страница 139: ...e the Position 2 of the DIP Switch is set at ON DIP Switch Enabled to activate the settings by the DIP Switch Refer to Chapter 3 Setting with Intelligent Tap for more information on setting this funct...

Страница 140: ...ry default setting see 1 6 1 List of Models and Response Times 2 21 3 Setting with Intelligent Tap The user cannot make any changes to the settings of this function by the Intelligent Tap 2 21 4 Setti...

Страница 141: ...re above if even one of the beams in beam group 1 is blocked the ABI indicators of that group are illuminated in red When all the beams in that group are unblocked the ABI indicators are turned OFF Af...

Страница 142: ...are usable as a guide light for the operator or a muting lamp Output Information F3SG SR s state can be displayed by the ABI indicators The information assigned is equal to the information assigned t...

Страница 143: ...mation assigned to the auxiliary output For the details of the information assigned to the auxiliary output refer to Section 2 12 Auxiliary Output It is recommended that the Position 2 of the DIP Swit...

Страница 144: ...e beam state can be provided as an auxiliary output or Area Beam Indicator ABI Operation Example Designated beam state Dark ON 2 23 2 Factory Default Setting Designated Beam Output is disabled 2 23 3...

Страница 145: ...y output or Area Beam Indicator ABI as designated beam output information It is recommended that the Position 2 of the DIP Switch be set at OFF DIP Switch Disabled Refer to Chapter 4 Setting with SD M...

Страница 146: ...ght level diagnosis information upper limit Area Beam Indicator Stable state information and Light level diagnosis information upper limit IO Link Process Data Light level diagnosis information upper...

Страница 147: ...ch segment can be retrieved 2 25 2 Ambient Light Level Information 2 25 2 1 Overview The user can use the SD Manager 3 or SD Manager Mobile APP to read incident light level of ambient light from a pho...

Страница 148: ...r 2 User s Manual for more information on setting this function by the SD Manager 3 2 26 2 Error Log The user can view details of errors occurred in the past The error information is recorded in the F...

Страница 149: ...Manager 3 2 26 5 Load Switching Frequency The user can view the number of switching operations of the load connected to the F3SG SR The load switching frequency information is recorded in the F3SG SR...

Страница 150: ...or Log Accumulated power on time of the Intelligent Tap to view on a PC screen The Maintenance Information function indicates the following information Error Log The user can view details of errors oc...

Страница 151: ...Monitoring EDM Override input signal AUX Red Linked to Auxiliary output signal MUTE A Gray Linked to Muting input A Pre Reset PSDI input MUTE B Pink Linked to Muting input B Sensor Information Scan c...

Страница 152: ...y 0 5 to 1 5 If the response time is changed by the Response Time Adjustment function the detection time changes according to the change Presence of vibration The presence of vibration is recorded at...

Страница 153: ...ou can use the SD Manager 3 to recover the F3SG SR setting to the default factory setting It is recommended that the Position 2 of the DIP Switch be set at OFF DIP Switch Disabled Refer to Chapter 4 S...

Страница 154: ...ntelligent Tap Backup This is the function to save the configuration of F3SG SR in the Intelligent Tap Restoration This is the function to write the configuration saved in the Intelligent Tap into F3S...

Страница 155: ...or safety applications Failure to do so may result in serious injury when the F3SG SR fails By using the Intelligent Tap as an IO Link device sensor s configuration and monitoring information can be p...

Страница 156: ...128 Chapter 2 IO Link F3SG SR User s Manual System Operation and Functions...

Страница 157: ...unctions 135 3 6 2 Performing Backup 136 3 6 3 Performing Restoration 138 3 6 4 Various Usage of Backup and Restoration 141 3 6 4 1 Plug and Work 141 3 6 4 2 Copy and Paste of Sensor Settings 141 3 6...

Страница 158: ...performs its normal operation 4 Operate according to the usage below Setting with DIP Switch Turn the power off and operate referring to the following chapter s 3 5 DIP Switch on Intelligent Tap and...

Страница 159: ...nnection Patterns of F3SG SR Intelligent Tap and Each Device For IO Link master details see the manual of the IO Link to connect F3SG SR Receiver F3SG SR Emitter Black cable F39 JGR3K D Intelligent Ta...

Страница 160: ...PSDI Gray 3 3 COM MUTE B Pink 4 4 COM OSSD 1 Black 5 5 OSSD 1 OSSD 2 White 6 6 OSSD 2 0V 24V Blue 7 7 0V AUX Red 8 8 AUX The wire colors are those of the F39 JG A D to be connected to the CN2 Male CN...

Страница 161: ...F3SG SR is in the LOCKOUT state Or the Intelligent Tap is waiting for Push Switch operation in the Backup or the Intelligent Tap and F3SG SR are waiting for restart in the Backup Or communication erro...

Страница 162: ...en any of Positions 3 to 8 is set at ON Position Function Setting Description 1 Lock Unlock Unlock Lock factory default setting 2 DIP Switch Enable Disable DIP Switch Disabled factory default setting...

Страница 163: ...hen performing the Restoration the sensor configuration saved in the Intelligent Tap must be the same as the actual sensor configuration If the sensor configuration of other than the number of beams i...

Страница 164: ...connect the Intelligent Tap to the F3SG SR Backup Power OFF Connect Intelligent Tap to F3SG SR Set all DIP Switches at OFF Power ON Intelligent Tap IN indicator blinks slowly Press and hold Push Switc...

Страница 165: ...te the Push Switch nor restart the device after the end of the Backup The Backup saves the F3SG SR s setup information in the Intelligent Tap which is automatically restarted and performs its normal o...

Страница 166: ...e F3SG SR To prevent such an accident it is recommended that you set the DIP Switch Position 2 at OFF before performing the Restoration when you use the settings backed up from the F3SG SR or make set...

Страница 167: ...Restoration copying settings from Intelligent Tap to F3SG SR Restoration successful Turn OFF power and disconnect Intelligent Tap from F3SG SR End Intelligent Tap OUT indicator blinks fast Intelligent...

Страница 168: ...the same perform the Backup of the connected F3SG SR and then perform the Restoration again After the Restoration is performed verify that the F3SG SR operates with intended settings before using the...

Страница 169: ...nnected F3SG SR first 3 6 4 4 Changing F3SG SR s Settings with Intelligent Tap DIP Switch To change the F3SG SR s settings only by setting the DIP Switch on the Intelligent Tap without using the SD Ma...

Страница 170: ...1 Connect Intelligent Tap to F3SG SR Connect the Intelligent Tap to the F3SG SR 2 Beam Alignment Perform the beam alignment for the F3SG SR In the case of the Optical Synchronization install the F3SG...

Страница 171: ...n mode the CFG indicator of the F3SG SR blinks The mode transition to Teach in mode does not occur if the setting of the DIP Switch is configured as Unlock DIP Switch Disabled or Fixed Blanking Disabl...

Страница 172: ...cted When completing the Teach in setting power off the F3SG SR and set the DIP Switch Position 1 at OFF Unlock Then restart the F3SG SR There are two ways to restart Power cycling Pressing and holdin...

Страница 173: ...ly has the Fixed Blanking setting The Teach in result for Fixed Blanking and Floating Blanking cannot be saved together When the Teach in is ferformed for Floating Blanking the result of the Teach in...

Страница 174: ...g the Teach in may result in an unintended setting or a failure of the Teach in The factory default setting of the Teach in Input is Push Switch When selecting Push Switch or external wiring select Te...

Страница 175: ...thin 1 s or turn the muting input A ON for within 1 s automatically configures the Floating Blanking setting based on the scan result 1 The determined setting is processed for valid invalid judgment p...

Страница 176: ...f restarting the F3SG SR with the DIP Switch Position 1 set at ON Lock the configured zone will be invalid In this case try the steps again from 4 After the restarting the F3SG SR waits for the Backup...

Страница 177: ...nking Floating Blanking Setting with Intelligent Tap E Blanked Beams 4 beams Blanked Beams 5 beams Floating Blanking Disabled Secondary sensor Channel 2 Secondary sensor Channel 2 Primary sensor Chann...

Страница 178: ...rmed and the edited setup data may be overwritten by the sensor setup data in the connected unit Even when the DIP Switch Position 1 is set at ON Lock you can edit the configuration by the SD Manager...

Страница 179: ...et31 Offset30 Offset29 Offset28 Offset27 Offset26 Offset25 Offset24 Power supply voltage Upper 8bit Byte 1 PD1 Bit7 Bit7 Bit5 Bit4 Bit3 Bit2 Bit1 Bit0 Offset23 Offset22 Offset21 Offset20 Offset19 Offs...

Страница 180: ...of ON threshold for 10 s or longer Light level diagnosis information Channel 3 1 bit 1 When the 2nd secondary sensor in cascaded connection is unblocked and light intensity is within a range from 100...

Страница 181: ...t level diagnosis information Channel 2 9 bit Light level diagnosis information Channel 1 8 bit Sequence error information 7 bit Sensor or Intelligent Tap lockout information 6 bit Intelligent Tap Loc...

Страница 182: ...SLC is not connected 5 Firmware Version R 5 bytes Firmware Version XX XX 5characters 0 if SLC is not connected 68 Secondary sensor 1 Emitter 1 Supplier R 17 bytes OMRON Corporation 0 if SLC is not con...

Страница 183: ...error status R 1 byte 1 Muting setting is active and sequence error occurs 2 The other 10 Safety output status R 1 byte 1 ON 0 OFF 11 Blanking bream unblocked information R 1 byte 1 When Fixed Blanki...

Страница 184: ...for inquiry Latest 4 records can be got Please use the data for your inquiry 0 if SLC is not connected 84 Primary sensor Emitter 0 Error code R 32 bytes 8 bytes x 4 Error code data is output in 8 byt...

Страница 185: ...ed 169 4 2 Basic Operation of SD Manager 3 170 4 2 1 How to Install Uninstall SD Manager 3 170 4 2 1 1 Downloading SD Manager 3 170 4 2 1 2 Installing SD Manager 3 170 4 2 1 3 How to Uninstall SD Mana...

Страница 186: ...O Settings 191 4 3 2 1 Interlock External Device Monitoring EDM PSDI 191 4 3 2 2 Reset Input Time 192 4 3 2 3 Teach in Input 193 4 3 2 4 External Test Input 194 4 3 3 Auxiliary Output Lamp Setting 195...

Страница 187: ...obile APP 235 4 5 1 1 Installing SD Manager 3 Mobile APP 235 4 5 1 2 Uninstalling SD Manager 3 Mobile APP 235 4 5 2 How to Update SD Manager 3 Mobile APP 235 4 5 3 Pairing Connection Verification 235...

Страница 188: ...he machine until the test is complete Unintended settings may cause a person to go undetected resulting in serious injury 4 1 Overview and Specifications 4 1 1 Overview of Configuration Tool The user...

Страница 189: ...t or 64 bit edition Windows 10 32 bit or 64 bit edition Language Japanese English CPU 1 GHz or higher Memory capacity 1 GB or higher for 32 bit OS edition 2 GB or higher for 64 bit OS edition Operatin...

Страница 190: ...nt Tap and each device are as follows Communication tool Windows PC Android smartphone Windows tablet USB cable Yes No No Bluetooth communication unit Yes Connecting method to F3SG SR Con guration Too...

Страница 191: ...ange selection It is unable to configure the following functions using SD Manager 3 External test operating range selection lamp area beam indicator ABI and vibration detection It is unable to monitor...

Страница 192: ...nt Tap is illuminated in red or green 4 To restart the Intelligent Tap unplug the USB connector from the Intelligent Tap and plug it again If the Intelligent Tap is connected with F3SG SR turn ON the...

Страница 193: ...ation unit with the Intelligent Tap as follows For the details of the Bluetooth communication unit refer to F3SG SR Series Supported Bluetooth Communication Unit F39 SGBT Manual The configuration chan...

Страница 194: ...e to connect to the Bluetooth Communication Unit These must be paired in advance Once the Bluetooth Communication Unit and a Bluetooth device are paired it is not necessary to pair them again The foll...

Страница 195: ...al number and model name of the F3SG SR are displayed For the F3SG SR in cascade connection the serial number and model name of the primary sensor are displayed When pairing with more than one device...

Страница 196: ...ces and click Devices and Printers below Related Settings 3 When the screen below is displayed right click the icon of a target device to check a COM port number and then click Properties If there are...

Страница 197: ...in the case the Optical Synchronization is enabled as the emitter is not connected to the Intelligent Tap LED indicator blinking patterns For the access levels refer to 4 2 5 1 Logging In When connect...

Страница 198: ...1 1 Downloading SD Manager 3 Download SDManager3_Setup exe from the website and save it to a desired location on a PC For detail refer to your local Omron website 4 2 1 2 Installing SD Manager 3 1 Con...

Страница 199: ...5 Read the software license agreement If accepting select I accept the terms of the license agreement and click Next 6 Click Next When changing the location to install click Change and select a desire...

Страница 200: ...p exe file or Control Panel The following is an example when using a PC that runs on Windows 10 Pro 1 Double click on SDManager3_Setup exe Confirm Remove is selected in the window shown below and clic...

Страница 201: ...3 is complete the driver of the Intelligent Tap is also completed 4 2 2 How to Update SD Manager 3 To update an SD Manager 3 installed in a PC to a new version follow the steps below 1 Uninstall SD Ma...

Страница 202: ...ectable Bluetooth Communication Unit perform the 2 Auto scan step first select a COM port of a target device in the 1 Select COM port step and then press the 4 OK button Refer to How to check a COM po...

Страница 203: ...ting state of the Intelligent Tap F3SG SR operating states Operating The F3SG SR keeps normal operation Setting state It is possible to read configuration from the F3SG SR The safety outputs of the F3...

Страница 204: ...his button switches the safety outputs to the OFF state and the operating state to Setting state Write configuration Writes the configuration data into the Intelligent Tap Configuration List Shows a l...

Страница 205: ...e windows Click the Pin button on the System Information Menu or Tool Message window The window is hidden a Show Hide Tab is displayed on the left side of the screen To display the window again click...

Страница 206: ...wing dialog is displayed No Function Description 1 Cascading Select the number of cascaded sensors 2 Sensor and Mos For F3SG SR select the sensor model and detection capability 3 Number of beams Selec...

Страница 207: ...uration file with extension sdm3 saved on your PC 4 2 4 3 Saving New Configuration File to PC On the tool menu click the Save button or the Save As button to save the file in an arbitrary location on...

Страница 208: ...Reading and changing configuration information is available When an Intelligent Tap is connected with F3SG SR if logging in the F3SG SR shifts to the setting state and the safety output enters the OF...

Страница 209: ...vel Select the operator level and click OK When connecting the Intelligent Tap to F3SG SR and when login succeeds the Operating state indication in the top right corner of the Top page is changed from...

Страница 210: ...button from the Account menu on the tool bar or click Access level is changed from the administrator level to the operator level It is not possible to log out using the operator level To bring F3SG SR...

Страница 211: ...igent Tap according to procedure 4 of 4 1 3 2 Connection Procedure When Using USB Connector The new password is enabled after the Intelligent Tap is restarted 4 2 6 3 Forgot the Password If you forget...

Страница 212: ...2 Select the Clear Password button from the Account menu at the screen top of SD Manager 3 Or click the Clear Password button directly from the tool menu 3 Fill in the clear password window with the...

Страница 213: ...4 3 Changing Settings with SD Manager 3 When the F3SG SR is in the Detecting state a dialog to confirm if it is OK to change mode is displayed When OK is selected the F3SG SR enters the Setting state...

Страница 214: ...3SG SR When clicking the Write button on the configuration list window F3SG SR Not Connected Configuration data can be written to the Intelligent Tap To write the configuration data written to the Int...

Страница 215: ...directly from the tool menu and select the configuration file with extension sdm3 saved in an arbitrary location Click the Write button to write the configuration F3SG SR Not Connected Configuration...

Страница 216: ...ing with SD Manager 3 4 2 8 Viewing Current Configuration The current configuration list can be confirmed by clicking the Configuration List button The configuration list can be confirmed even if posi...

Страница 217: ...values entered in the screen To calculate on the actually connected F3SG SR execute Retrieve information saved in F3SG to update the numerical values No Function Description 1 Types of safety distanc...

Страница 218: ...refer to 4 2 7 1 Reading Configuration from Intelligent Tap To reflect each function setting described later to the Intelligent Tap refer to 4 2 7 3 Writing Configuration into Intelligent Tap When co...

Страница 219: ...n of Functions For more information on external relay monitoring refer to 2 11 External Device Monitoring EDM For more information on start interlock and restart interlock refer to to 2 8 Interlock No...

Страница 220: ...eset For more information on PSDI refer to 2 10 PSDI When changing the settings is complete confirm the settings and write the configuration to the F3SG SR To enable the written configuration refer to...

Страница 221: ...o enable the written configuration refer to 4 2 7 3 Writing Configuration into Intelligent Tap When connecting the Intelligent Tap to a F3SG SR and trying to return the F3SG SR to Detecting follow ste...

Страница 222: ...the F3SG SR To enable the written configuration refer to 4 2 7 3 Writing Configuration into Intelligent Tap When connecting the Intelligent Tap to a F3SG SR and trying to return the F3SG SR to Detect...

Страница 223: ...ing chart in 2 12 Auxiliary Output No Function name Description Initial value Configurable value or numerical range Muting enabled 2 Muting enabled 1 Muting disabled 2 1 Output operation mode of auxil...

Страница 224: ...om 100 to 170 of ON threshold for 10 s or longer Warning zone information When warning zone is blocked Blanking bream unblocked information When Fixed Blanking or Floating Blanking beams are unblocked...

Страница 225: ...Top page The setting screen below is displayed Select Designated beam output information for the output operation mode of the auxiliary output In the following example the designated beam output infor...

Страница 226: ...the F3SG SR and Intelligent Tap or click the Monitor button No Function name Description Initial value Configurable item 1 Designated Beam Output Select Enable or Disable for the Designated Beam Outpu...

Страница 227: ...ear confirm that the changed settings are correct and click the OK button Designated Beam Output Zone Setup Procedure Select a setup method No 2 Setting by Manual No 3 Select a zone No and set up the...

Страница 228: ...lock Unblock Information Disable Block Unblock Information Input signal linkage Output information 2 Output operation mode of ABI Select the information signal output by ABI Red Safety output informat...

Страница 229: ...e green low For more information on area beam indicator ABI refer to 2 22 Area Beam Indicator ABI When changing the settings is complete confirm the settings and write the configuration to the F3SG SR...

Страница 230: ...gs received from the F3SG SR click Recover status at readout Disable Disable Enable 2 Setting by Select manual setting using SD Manager 3 or setting by teach in Manual Manual Teach in 3 Zone setting T...

Страница 231: ...Setup Procedure Setting by Manual 1 Select a Fixed Blanking zone and enable the function No 1 2 Set up the zone Select Manual in Setting by No 2 Set up the bottom and top beam numbers No 3 Click the...

Страница 232: ...5 4 Set up the number of allowable beams No 5 The allowable beams are configurable inside the Fixed Blanking zone The set allowable beams will be indicated in the chart as shown below In this example...

Страница 233: ...g Setting Select Enable or Disable for the Floating Blanking function Disable Disable Enable 2 Zone Adjustment Automatically adjusts a floating blanking zone setting when the setting is not correct 3...

Страница 234: ...and Intelligent Tap or click the Monitor button Floating Blanking Setup Procedure 1 Enable the Floating Blanking function No 1 2 Set up the Floating Blanking function No 3 3 Set up the number of float...

Страница 235: ...ual setting using SD Manger 3 or setting by teach in Manual Manual Teach in 5 Zone setting Select a desired zone number To configure zone settings specify desired bottom and top beam numbers from the...

Страница 236: ...Writing Configuration into Intelligent Tap When connecting the Intelligent Tap to a F3SG SR and trying to return the F3SG SR to Detecting follow step 4 of 4 1 3 2 Connection Procedure When Using USB C...

Страница 237: ...n Confirm zone to determine the muting zone between the bottom and top beams configured above No 6 Setting by Teach in Selecting Teach in switches the state to the Teach in mode Block the F3SG SR in t...

Страница 238: ...ion 0 1 s 0 1 to 20 s in 0 1 s increments Exit only muting T1min Muting input time limit Min value 0 1 s 0 1 to 3 9 s in 0 1 s increments T1max Muting input time limit Max value 4 s 0 2 to 600 s in 0...

Страница 239: ...nstallation Position Check button No 2 6 3 Enter Input Information according to the setup state No 3 6 4 Click Evaluation to confirm the integrity of the entered condition No 5 The result is displayed...

Страница 240: ...t Interlock Restart Interlock Auxiliary Output When changing the settings is complete confirm the settings and write the configuration to the F3SG SR To enable the written configuration refer to 4 2 7...

Страница 241: ...check the settings of these functions again Affected functions External Device Monitoring EDM Start Interlock Restart Interlock Auxiliary Output When changing the settings is complete confirm the sett...

Страница 242: ...ing to return the F3SG SR to Detecting follow step 4 of 4 1 3 2 Connection Procedure When Using USB Connector to restart the F3SG SR and Intelligent Tap or click the Monitor button No Function name De...

Страница 243: ...nabled from the upper end Enable from lower The warning zone is enabled from the bottom end Disable The warning zone is disabled Setup Procedure of the Zone 2 1 Select a setup method No 2 Manual setti...

Страница 244: ...he configuration to the F3SG SR To enable the written configuration refer to 4 2 7 3 Writing Configuration into Intelligent Tap When connecting the Intelligent Tap to a F3SG SR and trying to return th...

Страница 245: ...safety distance calculation refer to 5 1 2 Safety Distance When changing the settings is complete confirm the settings and write the configuration to the F3SG SR To enable the written configuration r...

Страница 246: ...ea Beam Indicator Stable state information and Light level diagnosis information upper limit IO Link Process Data Light level diagnosis information upper limit When changing the settings is complete c...

Страница 247: ...gs is complete confirm the settings and write the configuration to the F3SG SR To enable the written configuration refer to 4 2 7 3 Writing Configuration into Intelligent Tap When connecting the Intel...

Страница 248: ...ettings To bring all the cascaded channels back to the factory default settings execute setting initialization for each channel With F3SG SR connected updating the backup settings of F3SG SR saved in...

Страница 249: ...level to be monitored and chart or list view 2 No of beams to be displayed Select the number of F3SG SR beams to be displayed 3 Show hide held peak and bottom hold Shows the maximum and minimum value...

Страница 250: ...ions can be assigned Fixed blanking zone Floating blanking zone or Reduced resolution zone Warning zone Muting zone Designated beam output zone 7 Select unit of horizontal axis Switch the unit of the...

Страница 251: ...input MUTE B Pink Linked with MUTE B input Sensor Scan code Displays Scan Code configured EDM Displays EDM configuration Interlock Pre Reset PSDI Displays Interlock Pre Reset PSDI mode configured Fixe...

Страница 252: ...the safety outputs to the OFF state and the operating state to Setting state 3 Open analysis data Opens a cvs file saved by the operation No 4 4 Save analysis data Saves data displayed in the analysi...

Страница 253: ...necessary Logs can be saved as a csv file by selecting Retrieve log and Save analysis data It is necessary to perform the muting at least five times in order to obtain assumed data 2 Connect SD Manag...

Страница 254: ...1 Min A D Min A D Max T1 Max Is judgment in chart 7 red No Yes Is the range of A D between T1 Min and T1 Max No Optimizing muting setting parameters Is judgment in chart 7 yellow No Yes Yes Judgment i...

Страница 255: ...e there is a big difference between T1 Max and A D Max and between T1 Min and A D Min shown in the chart below 8 When setup is completed execute writing into F3SG SR The deviation of T1 Min and Max fr...

Страница 256: ...tions described in this section 4 4 3 1 Error Log Information This function can be used only when the F3SG SR is connected to the Intelligent Tap and a PC On the Top page click the icon below Alternat...

Страница 257: ...lect a desired sensor segment from the Target sensor button in the top right corner of the screen No Function Description 1 Error Log Information Receiver Shows error logs including error codes error...

Страница 258: ...50 past warnings can be recorded Up to last five logs are displayed without logging in When the F3SG SR is in a cascade connection select a desired sensor segment from the Target sensor button in the...

Страница 259: ...for Intelligent Tap for more information on the error codes and descriptions of the Intelligent Tap Refer to 2 26 7 Intelligent Tap Log for more information on the accumulated power on time Logs of pa...

Страница 260: ...30 000 to 1 000 000 h in 1 h increments Disable 2 Emitter power on time Shows power on time threshold power on time and accumulated power on time for the emitter Only power on time threshold is confi...

Страница 261: ...d and load switching frequency threshold to the F3SG SR is also possible with the operator level The power on time information is recorded in the F3SG SR main unit every 15 minutes When the F3SG SR is...

Страница 262: ...ion for more information on the Instantaneous Block Detection function When the F3SG SR is in a cascade connection select a desired sensor segment from the Target sensor button in the top right corner...

Страница 263: ...o Update SD Manager 3 Mobile APP Version Upgrade in Smartphone Download the new SD Manager 3 Mobile APP from the following website and install it URL https www fa omron co jp f3sg srpg_tool Version Up...

Страница 264: ...3 Mobile APP that the communication with the F3SG SR is established Verification results Smartphones and Windows tablets verified by OMRON are listed in the table below Note The verification conducte...

Страница 265: ...tart SD Manager 3 Mobile APP tap the SD Manager 3 Mobile APP icon added to the home screen when the APP is installed The SD Manager 3 Mobile APP starts and the screen below is displayed If the device...

Страница 266: ...og message is displayed In addition a pop up message saying Not connected with the sensor is displayed when tapping each icon If pairing is has not been done yet refer to 4 5 3 Pairing Connection Veri...

Страница 267: ...G SR keeps normal operation Setting state It is possible to read configuration from the F3SG SR The safety outputs of the F3SG SR are in the OFF state Lockout state The F3SG SR is in the LOCKOUT State...

Страница 268: ...SR User s Manual Setting with SD Manager 3 4 5 4 3 Version Information The version of SD Manager 3 can be confirmed by the following method 1 Select About from the Menu button 2 The pop up screen bel...

Страница 269: ...tting with SD Manager 3 E 4 5 4 4 Shutting Down To shut down SD Manager 3 kill the task according to the specification of the smartphone tablet or execute the method below 1 Select Exit from the Menu...

Страница 270: ...ation When setting the display the maximum and minimum values of incident light are displayed with a water color and pink lines respectively 4 Zone display Displays the function assigned to the beam E...

Страница 271: ...n The screen below is displayed No Function name Description 1 Status switching As the monitoring target select either sensor status information or sensor I O information 2 Sensor status display Displ...

Страница 272: ...creen 2 On the status monitoring screen tap Sensor I O information from the Status Switching button 3 The screen below is displayed No Function name Description 1 Sensor I O information display Displa...

Страница 273: ...re information on the SETTING state Tapping an icon of another function returns the F3SG SR to the Detecting state No Function name Description 1 Device switching Switches the device monitored 2 Devic...

Страница 274: ...g each error warning log on the maintenance information screen the screen moves to the maintenance information details screen and the following screen is displayed No Function name Description 1 Error...

Страница 275: ...stable Side Mount Brackets Intermediate Brackets F39 LSGA 261 5 2 1 3 Mounted with Adjustable Top Bottom Brackets F3SJ F3SN Adapter F39 LSGTB SJ and Side Mount Brackets Intermediate Brackets F39 LSGF...

Страница 276: ...39 LSGF 280 5 3 4 4 Mounting with Adjustable Top Bottom Brackets F3SJ F3SN Adapter F39 LSGTB SJ and Adjustable Side Mount Brackets Intermediate Brackets F39 LSGA 284 5 3 5 Beam Alignment Procedure 289...

Страница 277: ...249 F3SG SR User s Manual Chapter 5 Wiring and Installation E 5 4 4 Functional Earth Connection 307 5 5 Cascade Connection 308 5 5 1 Overview 308 5 5 2 Connection Procedure 310...

Страница 278: ...ed startup Do not use this sensor for machines that cannot be stopped quickly by electrical control For example do not use it for a pressing machine that uses full rotation clutch Otherwise the machin...

Страница 279: ...hile working a person is inside the sensor s detection zone Safety distance reflects the possible access to the hazardous zone by reaching over the detection zone It is possible to reach the hazardous...

Страница 280: ...of the machine has not changed 5 1 2 1 Safety Distance Formulas according to ISO 13855 EN ISO 13855 Detection Zone Orthogonal to Direction of Approach S K x T C Formula 1 S Safety distance K Approach...

Страница 281: ...Orthogonal to Direction of Approach The greater value resulting from this comparison shall be applied S K T Cro Formula 5 S Safety distance K Approach speed to the detection zone T Total response time...

Страница 282: ...ty of 40 mm max the safety distance S is 942 8 mm since this is larger than S 116 mm calculated in the calculation example of n Detection Zone Orthogonal to Direction of Approach For the system with a...

Страница 283: ...hrough under a detection zone if H exceeds 300 mm 200 mm for other purpose than industrial use into risk assessment Calculation example When Tm 0 05 s Ts 0 008 s and d 14 mm S 1 600 mm s x 0 05 s 0 00...

Страница 284: ...tor s physical ability Ts Machine s stopping time s Tr Response time of the F3SG SR from ON to OFF s Tc Machine control circuit s maximum response time required to activate its brake s Tbm Additional...

Страница 285: ...below F3SG SR Type 4 ESPE 5 1 3 1 F3SG SR Type 2 ESPE Distance between an emitter and a receiver operating range L Allowable installation distance D 0 3 to less than 3 m 0 13 m 3 m or more L 2 x tan5...

Страница 286: ...re allows for placement of up to 2 sets of the F3SG SR in close proximity and in line with each other The distinctive coding of the beams provide for unique operation of a system while in view of anot...

Страница 287: ...ts used Beam alignment cannot be performed with Side Mount Brackets 250 max 250 max F 10 P D 250 max F 250 max C 5 7 5 7 Screw M5 or M6 50 38 5 7 34 4 6 3 d i a C Protective height 32 46 7 Side Mont B...

Страница 288: ...nt Brackets 6 3 dia Side Mont Bracket F39 LSGF Side Mont Bracket F39 LSGF 250 max 250 max F 10 P D 250 max F 250 max C 8 2 8 2 Screw M5 or M6 38 50 8 2 19 4 46 7 C Protective height 32 2 M5 or M6 2 M5...

Страница 289: ...alignment after fixing the bracket to a wall surface The angle adjustment range of the Adjustable Side Mount Brackets is 15 250 max 250 max F 10 P D 56 5 250 max F 250 max C 56 5 4 56 5 Screw M5 or M...

Страница 290: ...surface The angle adjustment range of the Adjustable Side Mount Brackets is 15 250 max 250 max F 10 P D 56 5 23 5 250 max F 250 max C 56 5 56 5 Screw M5 or M6 38 6 3 73 50 10 46 7 C Protective height...

Страница 291: ...ont Bracket F39 LSGF Adjustable Top Bottom Bracket F39 LSGTB SJ P 10 N2 D C Protective height G H I F 9 dia 19 32 46 7 5 8 1 7 N1 19 4 M5 C F G 5 7 2 M5 or M6 19 Screw for Adjustable Top Bottom Bracke...

Страница 292: ...1 3 2 D C Protective height 10 32 P N2 F N1 19 5 8 1 7 38 50 Adjustable Top Bottom Bracket F39 LSGTB SJ Side Mont Bracket F39 LSGF I H G 34 4 8 2 Adjustable Top Bottom Bracket F39 LSGTB SJ 9 dia 6 3 d...

Страница 293: ...ount Brackets is 15 Screw for Adjustable Top Bottom Bracket M8 1 73 20 56 5 6 3 4 50 C 56 5 F 4 H 2 M8 2 M5 or M6 19 56 5 19 2 M5 or M6 C F 4 G 4 M5 Screw for Adjustable Top Bottom Bracket M5 1 19 46...

Страница 294: ...ble Top Bottom Bracket M5 1 46 7 2 M5 or M6 C F 56 5 4 2 H 2 M8 19 19 56 5 4 2 F C G 4 M5 2 M5 or M6 3 2 32 F C Protective height N1 N2 10 P D 5 8 6 3 1 7 9 dia 4 2 56 5 G H 19 38 73 10 50 I 4 2 H Adj...

Страница 295: ...Bracket F39 LSGA sold separately 5 2 2 3 Adjustable Top Bottom Bracket F3SJ F3SN Adapter F39 LSGTB SJ sold separately 13 5 7 14 7 30 7 34 4 13 8 2 30 7 6 5 41 37 5 12 6 3 d i a 6 3 dia Material Zinc...

Страница 296: ...dapter F39 LSGTB RE sold separately 5 2 2 5 Adjustable Top Bottom Bracket MS4800 F3SR Adapter F39 LSGTB MS sold separately R4 1 R3 3 4 6 47 7 12 3 2 147 2 9 5 32 39 2 15 20 22 2 Material High rolled s...

Страница 297: ...ligent Tap Bracket F39 LITF1 sold separately 87 2 M4 30 CN2 CN3 CN1 CN4 17 5 40 23 4 16 M12 IP67 connector M12 IP67 connector M12 IP67 connector 75 11 9 41 87 4 5 M12 IP67 connector 4 5 40 23 4 17 5 9...

Страница 298: ...Manual Wiring and Installation Assembly Dimensions Intelligent Tap Intelligent Tap Bracket Intelligent Tap F39 SGIT IL3 Intelligent Tap Bracket F39 LITF1 Material PBT resin Body parts Unit mm 75 40 39...

Страница 299: ...F39 SGBT sold separately Assembly Dimensions Intelligent Tap Bluetooth Communication Unit Intelligent Tap Bracket sold separately Material PBT resin Body parts Unit mm 31 9 40 7 19 7 Unit mm 75 40 7...

Страница 300: ...User s Manual Wiring and Installation 5 2 6 Spatter Protection Cover Spatter Protection Cover F39 HSG sold separately Assembly Dimensions Material PC resin Transparent cover ABS resin Side wall Unit m...

Страница 301: ...itter and receiver The Side Mount Brackets Intermediate Brackets are included with the sensor Mounting with Adjustable Side Mount Brackets Intermediate Brackets F39 LSGA The number of brackets require...

Страница 302: ...nd receiver face in parallel to each other as shown below The detection surfaces of the emitter and receiver not in parallel to each other or misaligned may fail to operate properly Proper orientation...

Страница 303: ...tation of the beams to tilt with respect to the floor resulting in misalignment of the beams of the emitter and receiver Mount the emitter and receiver on a level surface by checking the lean by a lev...

Страница 304: ...the wall before attaching the brackets to the sensor Fig 1 Screws to mount the brackets to the wall are not included 2 Fully loosen the Mounting Screws hexagon socket head cap screw M4 22 Fit the Brac...

Страница 305: ...failure 5 3 4 2 Mounting with Adjustable Side Mount Brackets Intermediate Brackets F39 LSGA 1 Securely tighten the screws to fix the Adjustable Side Mount Bracket to the mounting position of the wall...

Страница 306: ...to tighten the Mounting Screws is 3 0 N m Then loosen the Alignment Screws hexagon socket head cap screws M4 22 Fig 3 Tightening screws with a torque that considerably exceeds the recommended torque...

Страница 307: ...he case the Wired Synchronization is enabled Only the ABI indicators of the receiver are illuminated in the case the Optical Synchronization is enabled It is recommended to use the Light Level Monitor...

Страница 308: ...e Top Bottom Bracket F3SJ F3SN Adapter F39 LSGTBSJ 1 Loosen the Alignment Screws hexagon socket head cap screw M4 7 of the Top Bottom Bracket 3 and change the angle of the Top Bottom Bracket 3 accordi...

Страница 309: ...s 3 0 N m Fig 2 Tightening screws with a torque that considerably exceeds the recommended torque may cause failure 3 Securely tighten screws to fix the Side Mount Bracket to the mounting position of t...

Страница 310: ...he Mounting Screw to fix the Side Mount Bracket to the sensor housing The recommended torque to tighten the Mounting Screw of the Side Mount Bracket is 3 0 N m Fig 6 Tightening screws with a torque th...

Страница 311: ...recommended torque to tighten the Alignment Screw is 3 0 N m Fig 8 Tightening screws with a torque that considerably exceeds the recommended torque may cause failure Fig 7 Using one M8 screw Backside...

Страница 312: ...gnment Screws hexagon socket head cap screw M4 7 of the Top Bottom Bracket 3 and change the angle of the Top Bottom Bracket 3 according to its mounting direction Then loosen the Mounting Screws low he...

Страница 313: ...ig 2 Tightening screws with a torque that considerably exceeds the recommended torque may cause failure 3 Securely tighten screws to fix the Adjustable Side Mount Bracket to the mounting position of t...

Страница 314: ...to the sensor housing The recommended torque to tighten the Mounting Screw of the Adjustable Side Mount Bracket is 3 0 N m Then loosen the Alignment Screw hexagon socket head cap screw M4 22 of the Ad...

Страница 315: ...o the wall are not included 7 Power the emitter and receiver on to perform beam alignment Move the emitter and receiver from side to side Fig 8 to check the state of the beams For more information on...

Страница 316: ...green will not be illuminated if the blanking function is used and there is a blocking object in the detection zone Perform beam alignment according to the step No 7 after setting the blanking functio...

Страница 317: ...on The ABI indicators green will not be illuminated if the blanking function is used and there is a blocking object in the detection zone Perform beam alignment again to illuminate the ABI indicators...

Страница 318: ...d to Dark ON When using the PNP output do not ground 24 VDC line When using the NPN output do not ground 0 V line Otherwise a ground fault may turn the safety outputs ON resulting in a failure of stop...

Страница 319: ...ectrical equipment safety of the country or region where the F3SG SR is used For example in EU the power supply must comply with the EMC Directive and the Low Voltage Directive Note To prevent a fire...

Страница 320: ...JG L sold separately to the emitter side Root Plug Cable for Extended 3 Connect a black Root Straight Cable for Receiver F39 JG C D sold separately or Root Plug Cable for Extended for Receiver F39 JG...

Страница 321: ...2 M2 5 screw Connector L 16 4 Oil resistant PVC insulated round cable dia 6 minimum bending radius R5 8 wire Cross section of conductor 0 3 mm2 insulator diameter dia 1 1 mm AWG24 Brown 24V 0V Blue 0V...

Страница 322: ...7 300 16 4 Oil resistant PVC insulated round cable dia 6 minimum bending radius R5 8 wire Cross section of conductor 0 2 mm2 insulator diameter dia 1 1 mm Male Brown 24V 0V 2 Blue 0V 24V 7 Black OSSD...

Страница 323: ...AWG22 dia 14 9 M12 IP67 connector Unit mm L 40 7 Female Connected to root cable or Extended Plug Socket Cable Brown 24V 0V 2 Blue 0V 24V 7 Black OSSD 1 5 White OSSD 2 6 Yellow RESET EDM 1 Red AUX 8 Gr...

Страница 324: ...39 JG10B L F39 JG10B D 10 m F39 JG20B L F39 JG20B D 20 m M12 IP67 connector Insulated vinyl round cable dia 6 6 minimum bending radius R36 8 wire 4 pair Cross section of conductor 0 32 mm2 insulator d...

Страница 325: ...r cable Gray Receiver cable Black Length F39 JGR3W F39 JGR3W L F39 JGR3W D 0 3 m Unit mm 14 9 dia Oil resistant PVC insulated round cable dia 6 minimum bending radius R5 5 wire Cross section of conduc...

Страница 326: ...del name Emitter cable Gray Receiver cable Black Length F39 JGR12L F39 JGR12L L F39 JGR12L D 12 cm Unit mm 2 M2 5 screw Oil resistant PVC insulated round cable dia 6 minimum bending radius R5 5 wire C...

Страница 327: ...ns on the functions related to wiring when using Conversion Cables F3SJ B A Conversion Cable for Emitter F39 JGR3K SJ L sold separately Internal wiring diagram Unit mm Connector M12 IP67 connector 8 w...

Страница 328: ...le dia 6 minimum bending radius R5 Cross section of conductor 0 2 mm2 insulator diameter dia 1 1 mm Unit mm Connected to connector of F3SJ A B F3SR B or F3SN receiver cable F3SJ A B F3SR F3SN 1 2 3 4...

Страница 329: ...wiring diagram F3SG RE Conversion Cable for Receiver F39 JGR3K RE D sold separately Internal wiring diagram Emitter cable Gray Receiver cable Black Length F39 JGR3K RE L F39 JGR3K RE D 0 3 m Connecto...

Страница 330: ...tely Internal wiring diagram MS48 Conversion Cable for Receiver F39 JGR3K MS D sold separately Internal wiring diagram Connector M12 IP67 connector 5 wire Oil resistant PVC insulated round cable dia 6...

Страница 331: ...a cable that satisfies the following specifications 1 Emitter 5 wire Receiver 8 wire 2 0 3 mm2 or larger conductor resistance 0 058 ohms m max 3 Mute A and Mute B lines and 24V 0V and 0V 24V lines mus...

Страница 332: ...o emitter M12 IP67 connector 8 wire M12 IP67 connector 5 wire M12 IP67 connector 8 wire Insulated vinyl round cable dia 6 minimum bending radius R36 To receiver Plug marked with blue circle Connect to...

Страница 333: ...ch side Plug marked with blue circle Connect to control panel side Plug marked with open circle Connect to reset switch side 17 6 45 5 4 6 d i a 35 0 15 0 40 7 500 M12 IP67 connector 8 wire Insulated...

Страница 334: ...parately Internal wiring diagram Model Length XS5F D421 C80 F 1 m XS5F D421 D80 F 2 m XS5F D421 E80 F 3 m XS5F D421 G80 F 5 m XS5F D421 J80 F 10 m XS5F D421 L80 F 20 m 50 5 30 14 9 dia 40 7 L Cable le...

Страница 335: ...of the environment When you connect the F3SG SR with the functional earth connect an earth cable to the functional earth terminals as shown below The size of the screws of the terminals is M3 Make sur...

Страница 336: ...of the safety outputs turn OFF Number of connections Up to 3 sets Total number of beams Up to 255 beams Response time Varies according to the number of beams of cascaded F3SG SR segments 1 6 3 Calcula...

Страница 337: ...an emitter and receiver They will enter the LOCKOUT state Do not face different models of emitters and receivers toward each other They will enter the LOCKOUT state or will be unable to detect objects...

Страница 338: ...e down side When attaching a cable or cap securely fasten the screws M2 5 recommended torque 0 35 N m Failure to do so may cause the cable cap to come loose leading to deterioration of the protective...

Страница 339: ...recommended torque 0 35 N m Failure to do so may cause the cable cap to come loose leading to deterioration of the protective functions Attaching detaching of the cap and the Cascading Cable may cause...

Страница 340: ...312 Chapter 5 Cascade Connection F3SG SR User s Manual Wiring and Installation...

Страница 341: ...ith EDM 319 6 2 1 5 Manual Reset Mode with EDM and Y Joint Plug Socket Connector 320 6 2 1 6 Manual Reset Mode with Intelligent Tap 321 6 2 1 7 Manual Reset Mode with Reset Switch Connector 322 6 2 1...

Страница 342: ...White COM Blue Brown Yellow White OSSD 2 Pink MUTE B COM Gray Black OSSD 1 Red AUX Blue 3 4 3 Muting input circuit A Reset input circuit Muting input circuit B RESET EDM 0V 24V 5 Yellow OPERATING RANG...

Страница 343: ...connected to 0 V Light emission stops when connected to 24 VDC Emitter main circuit 24 VDC 0 VDC Short circuit current Approx 5 0 mA Short Emitter main circuit 24 VDC 0 VDC 5 V Short circuit current A...

Страница 344: ...4V Blue 0V 24V Blue AUX Red MUTE B Pink MUTE A Gray F39 JG C L F39 JG C D Timing chart 24 VDC Wiring for NPN 1 7 24 VDC IN1 Safety controller 5 6 IN2 RESET EDM Yellow 4 Receiver Emitter 1 Reverse the...

Страница 345: ...r to 2 6 External Test for more information if External Test is used 3 Connect the line to 24V 0V brown of the receiver via a lockout reset switch NC contact if Lockout Reset is used 4 Refer to 6 3 Co...

Страница 346: ...verse the polarity of the power supply when using in the NPN system 2 Connect the line to 0 VDC if Operating Range Selection is used in Short Mode 3 Refer to 2 6 External Test for more information if...

Страница 347: ...ing Range Selection is used in Short Mode 3 This is the case for a PELV circuit 4 Set the function with the DIP Switches on the Intelligent Tap or the SD Manager 3 restore the settings to the F3SG SR...

Страница 348: ...Receiver Emitter 1 Reverse the polarity of the power supply when using in the NPN system Select a PLC of PNP or NPN type according to the system of your application 2 When connecting to the PLC the o...

Страница 349: ...ay RESET EDM Yellow Safety controller 3 4 1 Reverse the polarity of the power supply when using in the NPN system Select a PLC and a safety controller of PNP or NPN type according to the system of you...

Страница 350: ...nable Restart interlock Enable Operating Range Selection Long Open the OPERATING RANGE SELECT INPUT line of the emitter or connect the line to 24 VDC Long 6 Operating Range Selection Long mode 6 Non M...

Страница 351: ...ected to the common terminal of the power supply 6 This is the case for a PELV circuit 7 Set the function with the DIP Switches on the Intelligent Tap or the SD Manager 3 restore the settings to the F...

Страница 352: ...used Connect the TEST line of the emitter to 24V 0V via a test switch NO contact 7 N A External test signal inversion Disable Optical Synchronization Do not connect the COM and COM lines of the of em...

Страница 353: ...verse the polarity of the power supply when using in the NPN system Select a PLC of PNP or NPN type according to the system of your application 2 When connecting to the PLC the output mode must be cha...

Страница 354: ...KM2 M Cam S3 Receiver Emitter 1 Reverse the polarity of the power supply when using in the NPN system Select a PLC of PNP or NPN type according to the system of your application 2 Open or connect the...

Страница 355: ...Muting Installation Example1 2 9 Exit Only Muting Mode N A Muting Enable Muting mode Exit Only Muting 9 External Test used Connect the TEST line of the emitter to 24V 0V of the emitter via a test swi...

Страница 356: ...ection Long factory default setting 7 Operating Range Selection Long mode 6 Standard Muting Mode When not using the Intelligent Tap or the SD Manager 3 perform wiring according to the wiring diagram N...

Страница 357: ...line when using the override function Otherwise the override state may not be released by the override cancel switch resulting in serious injury 4 When connecting to the PLC the output mode must be c...

Страница 358: ...to 6 3 Connectable Safety Control Units for more information 4 The safety controller and the F3SG SR must share the power supply or be connected to the common terminal of the power supply 5 This is t...

Страница 359: ...the F3SG SR can be connected to the IO Link Master unit listed in the table below Connectable to units supporting IO Link Version 1 1 Connectable safety control units PNP output G9SA 301 G9SA 321 T G...

Страница 360: ...332 Chapter 6 Connectable Safety Control Units F3SG SR User s Manual Input Output Circuit and Applications...

Страница 361: ...ON 334 7 1 1 3 Operation Check While the Machine Is Stopped 335 7 1 1 4 Checking that Hazardous Parts Stop While the Machine Operates 336 7 2 Maintenance Checklists 337 7 2 1 Checklists 337 7 2 1 1 I...

Страница 362: ...ance has been calculated with larger object resolution when the Floating Blanking or Reduced Resolution function is used Calculated distance S mm The actual distance is equal to or greater than the ca...

Страница 363: ...supply must not be grounded When using NPN output 0 VDC line of the power supply must not be grounded Wiring must not be bent cracked nor damaged 7 1 1 3 Operation Check While the Machine Is Stopped T...

Страница 364: ...indicator to green When the Muting function is used minimum muting time limit required must be set When the Muting function s operation mode is Exit Only Muting mode minimum muting end wait time requ...

Страница 365: ...w or Spatter Protection Cover F39 HSG sold separately of the F3SG SR When PNP is selected the OSSD indicator turns red when the TEST line is short circuited to 9 V to Vs When NPN is selected the OSSD...

Страница 366: ...connector cap or bracket must be loose 7 2 1 2 Checking that Hazardous Parts Stop While the Machine Operates The hazardous parts are movable when nothing is in the detection zone The hazardous parts s...

Страница 367: ...that the MUTING state should not occur when a human body enters a hazardous zone of a machine When the Muting function setting is changed a muting sensor must consist of 2 independent devices When the...

Страница 368: ...340 Chapter 7 Maintenance Checklists F3SG SR User s Manual Checklists...

Страница 369: ...8 1 3 Warning 349 8 1 3 1 Description 349 8 1 2 2 Troubleshooting 344 8 1 3 3 Muting Sequence Error Indication 350 8 1 3 4 Interlock Sequence Error Indication 351 8 1 3 5 PSDI Sequence Error Indicati...

Страница 370: ...5 Scan code Lockout Operating range Test Area Beam Indicator ABI 1 Top beam state 2 Bottom beam state 2 1 2 3 4 5 6 7 Scan code Lockout ON OFF Maintenance PNP NPN mode Configuration Sequence Area Beam...

Страница 371: ...ning logs by the SD Manager 3 or the SD Manager 3 Mobile APP 8 1 2 LOCKOUT State 8 1 2 1 Description If the F3SG SR detects any failure it keeps the safety outputs in the OFF state and transitions to...

Страница 372: ...ue to power supply voltage or noise Communication error External device monitoring error Error other than those above Intelligent Tap error Safety Output error BTM 1 2 E or ERR Blinking once E or ERR...

Страница 373: ...ommended to replace the F3SG SR Intelligent Tap error X An error due to noise may have occurred in the internal circuit of the Intelligent Tap Check the noise level in the environment The internal cir...

Страница 374: ...r sensor error X X 38 Other sensor being cascaded caused an error Check the indicator of the sensor DIP Switch setting error X X E7 E8 A DIP Switch on the Intelligent Tap setting may have been changed...

Страница 375: ...noise do not share the same power supply with other devices and use a separate power supply exclusively for the safety components The inductive noise tends to be induced especially if the power suppl...

Страница 376: ...he RESET line may not be properly wired Check the wiring with the relay 2 11 External Device Monitoring EDM The relay response time may be exceeding the allowable delay time Change the allowable delay...

Страница 377: ...again 3 7 Teach in Fix Blanking Floating Blanking Muting sequence error X X 2C 2D 2F Muting input may have been applied in the incorrect order Check the pattern of illumination of the LED indicator t...

Страница 378: ...e 5 3 5 Beam Alignment Procedure Low communications quality 3 X F0 Retries of communications may have been generated due to noise Check the noise level in the proximity of the communication lines Retr...

Страница 379: ...ing sequence may have started after muting was released but before the initial muting condition was established Check that if a next workpiece has not entered before the current workpiece passes throu...

Страница 380: ...with the light curtain blocked Check the condition of the light curtains and PSDI input wiring PSDI input may have turned OFF before the light curtain blocked twice Check the condition of the light c...

Страница 381: ...3 SD Manager 3 Mobile APP Communication error X X 1D The communication lines or other lines may be short circuited or broken Check the cables for cascading or extension cables If the wiring is extend...

Страница 382: ...circuit of the Intelligent Tap may be defective Replace the Intelligent Tap Communication error in Restoration X X 1F The communication lines or other lines may be short circuited or broken Check the...

Страница 383: ...Backup and Restoration procedures Power supply voltage error or other errors X X A3 The muting inputs A and B are kept in the OFF state when the LOCKOUT state occurs due to the power supply voltage er...

Страница 384: ...or SD Manager 3 supports SPP Serial Port Profile Check if a COM port is properly configured Check the noise level in the environment Check if there is any device that uses 2 4 GHz band Check if there...

Страница 385: ...adjustment range is 22 5 Side mounting and backside mounting possible Use this bracket when replacing an existing F3SJ or F3SN Safety Light Curtain with F3SG SR A set of 2 brackets Appearance Model Ap...

Страница 386: ...G3C D 3 m To sensor dedicated connector To external open ended type 8 wires F39 JG7C D 7 m F39 JG10C D 10 m Appearance Model Cable length Remarks F39 JGR3K L 0 3 m To sensor dedicated connector To ext...

Страница 387: ...SJ L To sensor dedicated connector 1 To wires for F3SJ B A M12 connector type 8 pin For receiver F39 JGR3K SJ D To sensor dedicated connector 1 To wires for F3SJ B A M12 connector type 8 pin Used to c...

Страница 388: ...1 Bracket to mount the Intelligent Tap on a DIN track Material PBT resin Body parts Appearance Model Application Remarks XS5F D521 DJ0 IL 2 m M12 connector 5 pin 5 wires Used to connect an Intelligent...

Страница 389: ...flective NPN output 2 m E3Z R86 Retroreflective PNP output 2 m E39 R1S Retroreflective Reflectors 2 m Appearance Model Application Remarks F39 PTG You can attach this to F3SG SR The laser light assist...

Страница 390: ...Safety output relay NO contact x 3 Auxiliary output relay NC contact x 1 An F39 JG C Root Straight Cable or the combination of an F39 JGR3K Root Plug Cable for Extended and an F39 J GA Single Ended C...

Страница 391: ...P N10S Safety output solid state source output PNP x 4 Test output solid state source output PNP x 4 Standard output solid state source output PNP x4 An F39 JG C Root Straight Cable or the combination...

Страница 392: ...1 Appearance Model Output Remarks GI SMD1624 Safety output solid state source output PNP x 4 Test output solid state source output PNP x 12 An F39 JG C Root Straight Cable or the combination of an F39...

Страница 393: ...ctive aperture angle EAA Range of angles in which the F3SG SR can operate Excess power on time information Information to be signaled to the Auxiliary output or Lamp when the power on time exceeds the...

Страница 394: ...y outputs in the ON state even if the F3SG SR is blocked Muting end wait time Time difference from when the F3SG SR is unblocked until the Muting state is cancelled Muting input time limit value maxim...

Страница 395: ...t Reset Function to release the INTERLOCK state or LOCKOUT state Response time adjustment Function to change the response time so that the Safety outputs can hardly be turned OFF due to accidental int...

Страница 396: ...gnal must be assigned to an output destination U Upper beam s Beams located toward the terminal of the F3SG SR V Vs Power supply voltage value in your usage environment W Warning zone function Functio...

Страница 397: ...tory Appendix E 8 4 Revision History A manual revision code appears as a suffix to the manual number at the bottom of the front and back covers of this manual Revision symbol Revision date Revisions 0...

Страница 398: ...370 Chapter 8 Revision History F3SG SR User s Manual Appendix...

Страница 399: ...TERS Chicago IL USA 847 843 7900 800 556 6766 automation omron com Controllers I O Machine Automation Controllers MAC Motion Controllers Programmable Logic Controllers PLC Temperature Controllers Remo...

Отзывы: