


Upgrading Your Server 9-65
5.
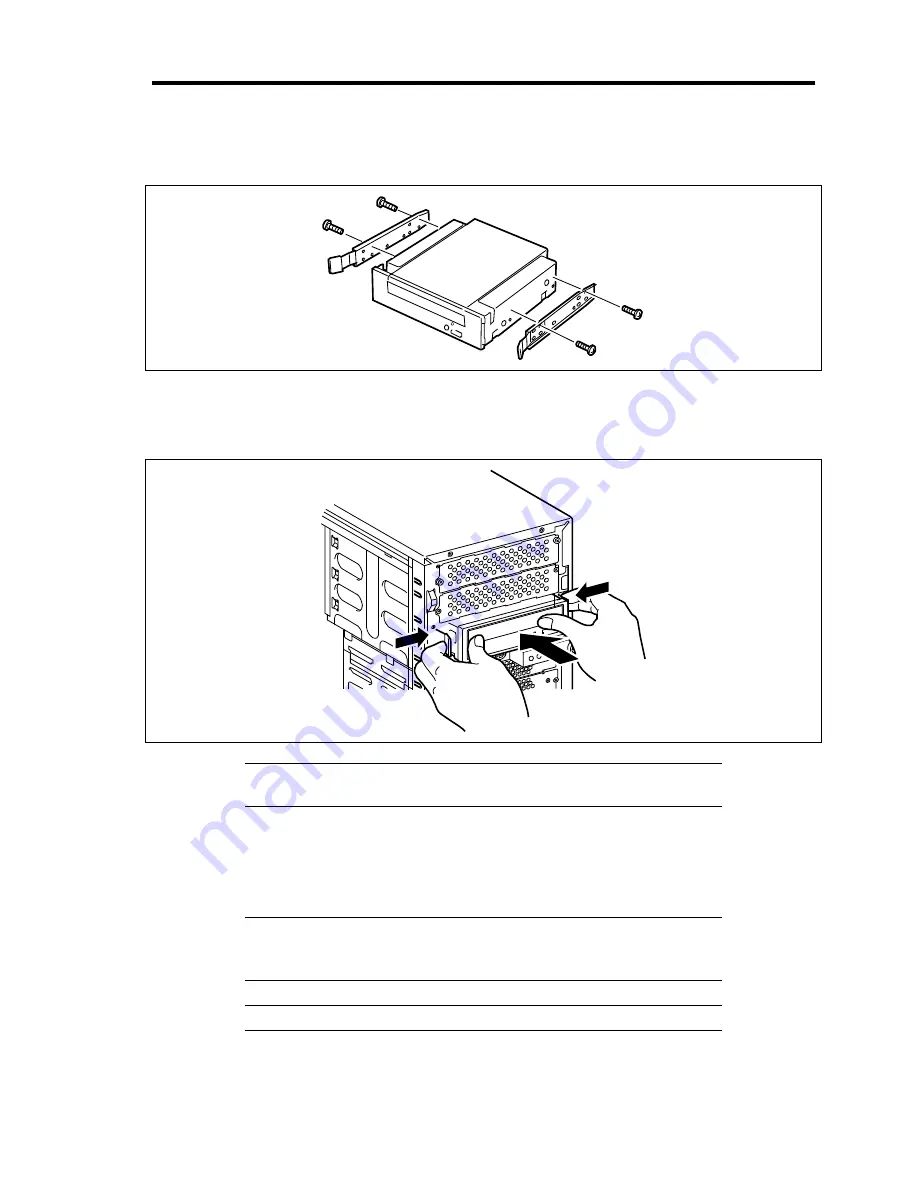
Remove the rails and screws from the factory-installed optical disk drive. Then, install
them to the optional DVD SuperMULTI drive.
6.
Slowly insert the optional DVD SuperMULTI drive back in its place with the release tabs
on both sides of the drive pushed.
Push the drive until a click occurs to lock it.
NOTE:
Install the optional DVD SuperMULTI drive carefully so that
the internal cables are not caught with the drive.
7.
Connect the interface and power cables to the optional DVD SuperMULTI drive from one
side of the server.
See Chapter 10 for details.
IMPORTANT:
Bent connector pin or incomplete connection may
cause a malfunction to occur. Provide the connection securely watching
the optional DVD SuperMULTI drive and cable connectors.
NOTE:
Make sure that the cable is not caught.
8.
Install the components you have removed in earlier step.
Содержание N8100-1668F
Страница 60: ...2 28 General Description This page is intentionally left blank ...
Страница 146: ...5 8 Installing the Operating System with Express Setup Flow of Setup ...
Страница 173: ...Installing the Operating System with Express Setup 5 35 Flow of Setup ...
Страница 242: ...5 104 Installing the Operating System with Express Setup This page is intentionally left blank ...
Страница 251: ...Installing and Using Utilities 6 9 4 Click Parameter File Creator Parameter File Creator will appear ...
Страница 255: ...Installing and Using Utilities 6 13 Windows Server 2003 ...
Страница 282: ...7 14 Maintenance This page is intentionally left blank ...
Страница 287: ...Troubleshooting 8 5 With Redundant Power Supply Installed REAR LINK ACT lamp Speed lamp Speed lamp LINK ACT lamp ...
Страница 288: ...8 6 Troubleshooting With Non Redundant Power Supply Installed REAR Speed lamp LINK ACT lamp Speed lamp LINK ACT lamp ...
Страница 339: ...Troubleshooting 8 57 When you use a remote console 6 Each tool is selected and it starts ...
Страница 400: ...9 56 Upgrading Your Server 11 Bring down the lever to secure the CPU 12 Remove the protective cover from the heat sink ...
Страница 422: ...9 78 Upgrading Your Server This page is intentionally left blank ...
Страница 440: ...C 2 IRQ This page is intentionally left blank ...
Страница 464: ...D 24 Installing Windows Server 2008 R2 4 Activate Windows The Windows activation is complete ...
Страница 495: ...Installing Windows Server 2008 E 29 4 Activate Windows The Windows activation is complete ...
Страница 558: ...H 2 Using a Client Computer Which Has a CD Drive This page is intentionally left blank ...
Страница 568: ...I 10 Accessing Power and Performance Data This page is intentionally left blank ...
Страница 572: ...J 4 Product Configuration Record Table This page is intentionally left blank ...


