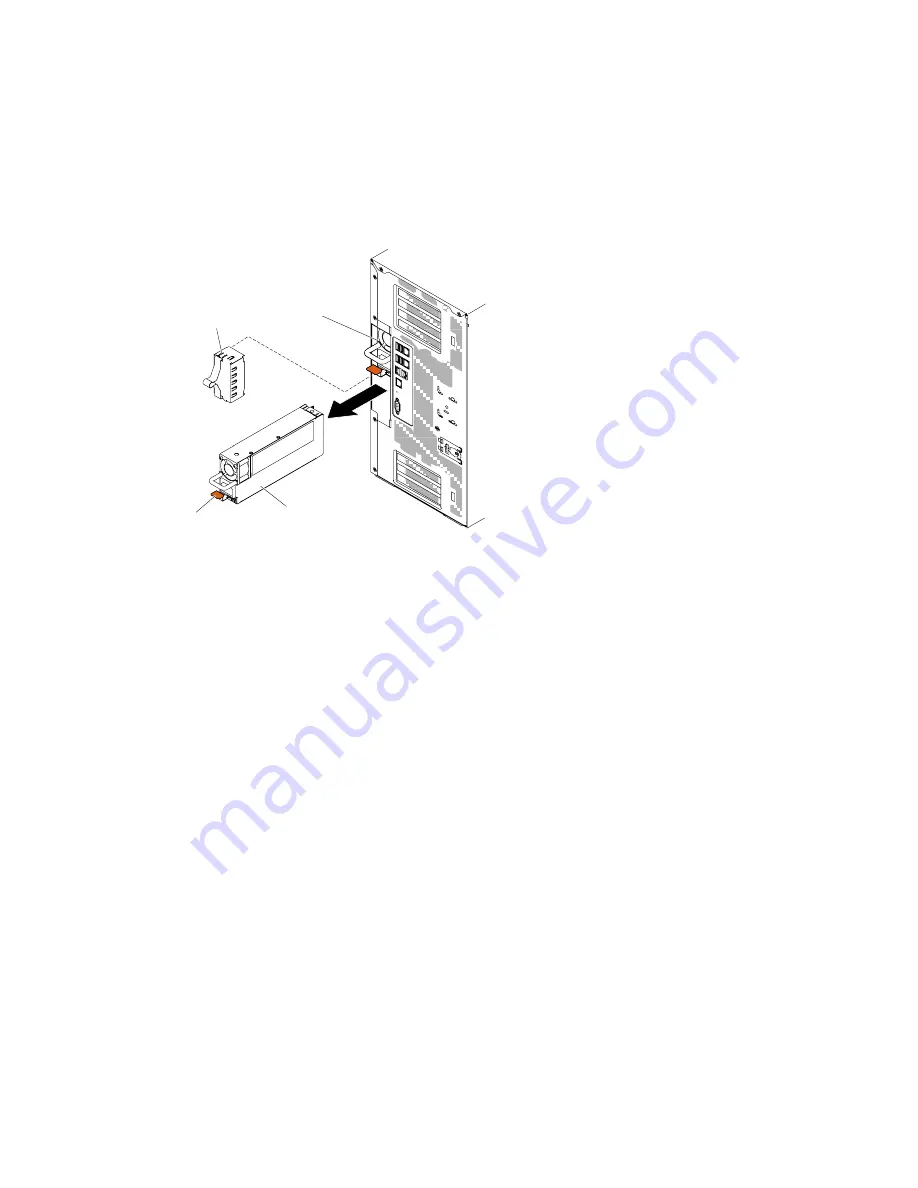
2. You must install the fan cage assembly before removing or installing the power supply.
Step 1.
Disconnect the power cord from the connector on the back of the power supply that you are
removing.
Step 2.
Press down the release latch of the hot-swap power supply and pull it out from the rear side of
the server.
0
0
0
0
00
0000
0
0
000
Hot-swap
power-supply
filler panel
Release
latch
Power supply 2
Power supply 1
Figure 165. Hot-swap power supply removal
If you are instructed to return the server component or optional device, follow all packaging instructions,
and use any packaging materials for shipping that are supplied to you.
Installing a hot-swap power supply
Use this information to install a hot-swap power supply.
The following notes describe the type of ac power supply that the server supports and other information that
you must consider when you install a power supply:
• Make sure that the devices that you are installing are supported. For a list of supported optional devices
for the server, see http://www.lenovo.com/ serverproven/.
• Before you install an additional power supply or replace a power supply with one of
a different wattage, you may use the Power Configurator utility to determine current
system power consumption. For more information and to download the utility, go to
http://www.ibm.com/systems/bladecenter/resources/powerconfig.html.
• The server comes with one hot-swap 12-volt output power supply that connects to power supply bay 1.
The input voltage is 110 V ac or 220 V ac auto-sensing.
• Power supplies in the server must be with the same power rating or wattage to ensure that the server
will operate correctly.
• Power supply 1 is the default/primary power supply. If power supply 1 fails, you must replace the power
supply with the same wattage immediately.
• You can order an optional power supply for redundancy.
Removing and replacing components
245
Содержание System x3500 M5 Type 5464
Страница 1: ...System x3500 M5 Installation and Service Guide Machine Type 5464 ...
Страница 6: ...iv System x3500 M5 Installation and Service Guide ...
Страница 16: ...xiv System x3500 M5 Installation and Service Guide ...
Страница 140: ...124 System x3500 M5 Installation and Service Guide ...
Страница 194: ...178 System x3500 M5 Installation and Service Guide ...
Страница 1056: ...1040 System x3500 M5 Installation and Service Guide ...
Страница 1214: ...1198 System x3500 M5 Installation and Service Guide ...
Страница 1218: ...1202 System x3500 M5 Installation and Service Guide ...
Страница 1225: ...People s Republic of China Class A electronic emission statement Taiwan Class A compliance statement Appendix E Notices 1209 ...
Страница 1226: ...Taiwan BSMI RoHS declaration 1210 System x3500 M5 Installation and Service Guide ...
Страница 1235: ......
Страница 1236: ......


