5-39
Operation on the Machine > Handling Destination
Handling Destination
This section explains how to select and confirm the destination.
Specifying Destination
Select the destination using either of the following methods except entering address directly:
• Choosing from the Address Book
• Choosing from the External Address Book
• For details on the External Address Book, refer to the following:
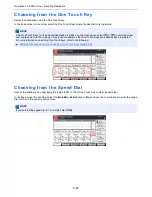
• Choosing from One Touch key
• Choosing from the Speed Dial
• Choosing from the FAX
Choosing from the Address Book
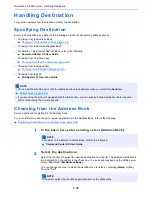
Select a destination registered in the Address Book.
For more information about how to register destinations in the Address Book, refer to the following:
Registering Destinations in the Address Book (page 3-22)
1
In the basic screen for sending, select [Address Book].
2
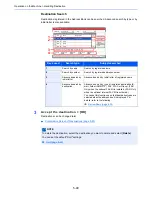
Select the destinations.
Select the checkbox to select the desired destination from the list. The selected destinations
are indicated by a checkmark in the check box. To use an address book on the LDAP server,
select "Addr Book" [
Ext Address Book
].
You can change the order in which the destinations are listed by selecting [
Name
] or [
No.
]
from the "Sort".
Choosing from the Address Book (page 5-39)
Command Center RX User Guide
Choosing from the One Touch Key (page 5-41)
Choosing from the Speed Dial (page 5-41)
FAX System 10 Operation Guide
NOTE
• You can set the machine up so that the address book screen appears when you select the [
Send
] key.
Default Screen (page 8-28)
• If you are using the products equipped with the fax function, you can specify the fax destination. Enter the other
party number using the numeric keypad.
NOTE
For details on the External Address Book, refer to the following:
Command Center RX User Guide
NOTE
To deselect, select the checkbox again and remove the checkmark.
Содержание TASKalfa 356ci
Страница 1: ...OPERATION GUIDE q PRINT q COPY q SCAN q FAX TASKalfa 356ci TASKalfa 406ci ...
Страница 461: ...10 20 Troubleshooting Regular Maintenance 3 Empty the Punch Waste Box 4 Install the Punch Waste Box 5 Close the cover ...
Страница 463: ...10 22 Troubleshooting Regular Maintenance 4 Install the Punch Waste Box 5 Close the cover ...
Страница 498: ...10 57 Troubleshooting Clearing Paper Jams 4 Remove any jammed paper 5 Push Right Cover 2 and Cassette 3 back in ...
Страница 504: ...10 63 Troubleshooting Clearing Paper Jams 8 Remove any jammed paper 9 Push Right Cover 1 ...
Страница 564: ......


