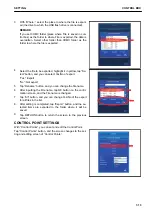
CONTROL POINT SETTING CONTENTS
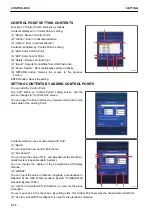
Function of “Control Points” setting is as follows.
Contents displayed in “Control Points” setting
(1) “Name”: Name of Control Point
(2) “H.Error”: Error in horizontal direction
(3) “V.Error”: Error in vertical direction
Contents controlled by “Control Points” setting
(4) “Add”: Adds Control Point.
(5) “Edit”: Edits Control Point.
(6) “Delete”: Deletes Control Point.
(7) “Import”: Imports Control files from USB flash drive.
(8) “Coord. System”: Sets coordinates system at jobsite.
(9) RETURN button: Returns the screen to the previous
screen.
ENTER button: Saves the setting.
SETTING CONTENTS BY ADDING CONTROL POINTS
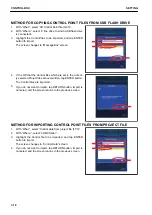
You can add the Control Point.
Tap “Add” button on “Control Points” setting screen, and the
screen changes to “Control Point” screen.
You can input the Point obtained by measurement and Coordi-
nates data of the existing Point.
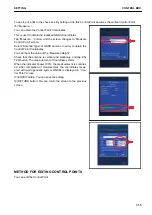
Contents which can be set and edited with “Add”
(1) “Name”:
You can input the new Control Point name.
(2) “Site Coords”:
You can input the value of N, E, and Elevation at the World Ge-
odetic System (Japan Geodetic System).
You can change the display of the Coordinates with Display
Options.
(3) “WGS84”:
You can input the value of latitude, longitude, and elevation of
Ellipsoid at the USA World Geodetic System “WGS84(World
Geodetic System 1984)”.
(4) “Use for horizontal GPS localization” is used for the plane
correction.
To use it, put a tick in the check box. By putting a tick, this Control Point becomes the horizontal Control Point.
(5) “Use for vertical GPS localization” is used for the elevation correction.
CONTROL BOX
SETTING
7-14
Содержание A31001
Страница 12: ...LOCATION OF SAFETY LABELS Options are shown with marks in the figure SAFETY LABELS SAFETY 2 4...
Страница 103: ...MAINTENANCE Please read and make sure that you understand the SAFETY section before reading this section 4 1...
Страница 106: ......
Страница 107: ...SPECIFICATIONS 5 1...
Страница 110: ......
Страница 111: ...ATTACHMENTS AND OPTIONS Please read and make sure that you understand the SAFETY section before reading this section 6 1...
Страница 116: ......
Страница 117: ...SETTING 7 1...
Страница 311: ...EXECUTIONS 8 1...
Страница 376: ...PC360LCi 11 PC390LCi 11 HYDRAULIC EXCAVATOR Form No CEAM032703...


