GE
P
ART
N
UMBER
FN091065, R
EVISION
2
VS5 N
AND
VS6 N
S
ERVICE
M
ANUAL
8-244
Section 8-8 - Software Loading
P R E L I M I N A R Y
NOTE:
The total RAID 1 capacity is half the physical capacity of the two drives.
5) Connect the power cord from the power supply to the mains AC outlet.
6) Switch ON the power.
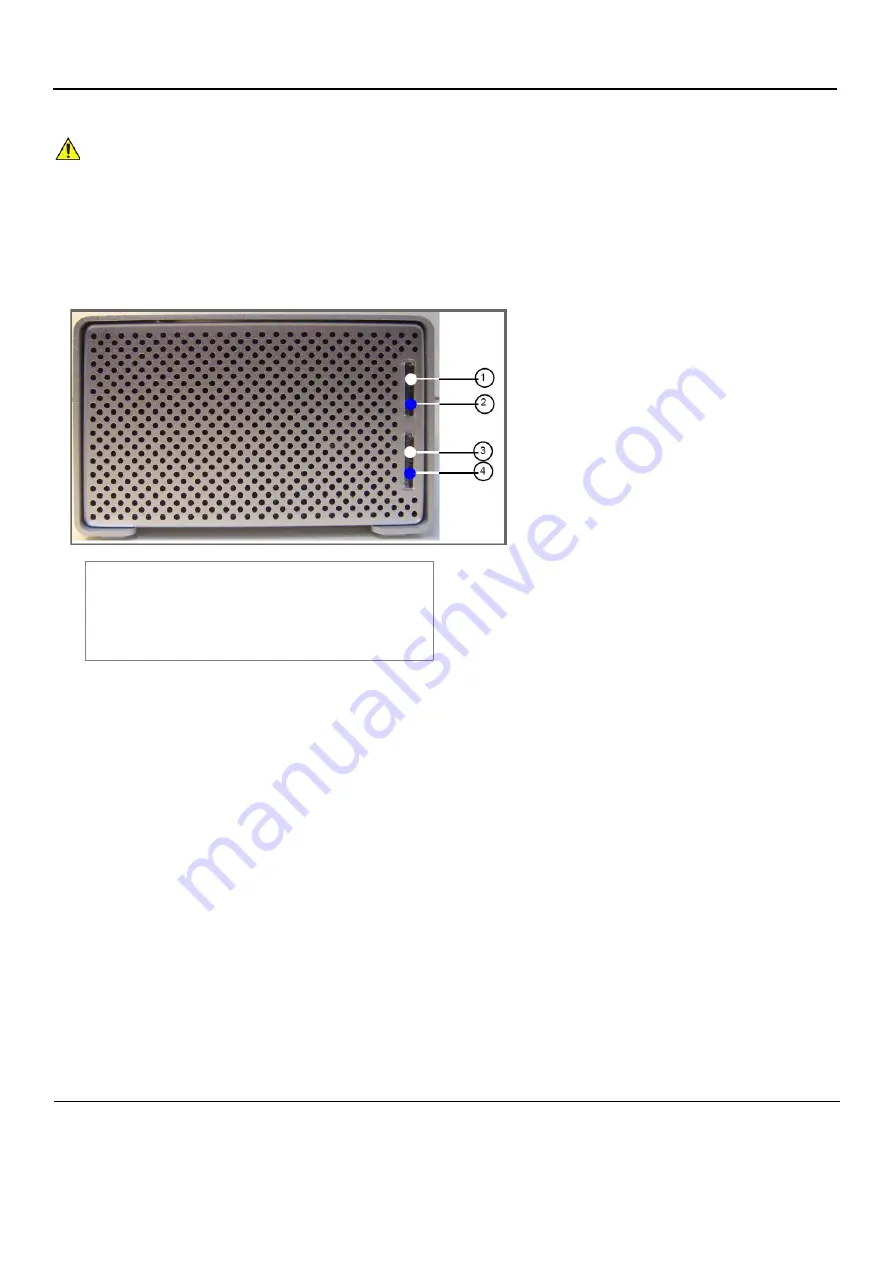
7) Study the status light indicators and verify that they function as described in
Figure 8-278 External USB Hard Disk - Status Light Indicators
8-9-4-6
Changing the Volume Name
NOTE:
It is important that the External USB Hard Disk has a unique volume name. The site should choose a
naming convention to use for marking this Hard Drive and any future hard drives, in case more than one
drive will be needed in the future.
NOTE:
Only connect one USB storage device (like this External USB Hard Disk) to the
Vivid S5 N / Vivid S6 N
scanner at a time.
Follow these steps to set the Volume Name:
1) Connect the USB cable from the External USB Hard Disk
to a laptop or PC.
2) Power up the External USB Hard Disk.
3) Under My Computer, after a while, the disk will show as a new drive, named
Removable Disk
- refer to
. (It will be allocated the next available drive letter.)
CAUTION
CHANGING THE VOLUME CONFIGURATION WILL ERASE ALL EXISTING DATA!
IF THE DRIVE CONTAINS FILES YOU WANT TO SAVE, MOVE THEM TO ANOTHER DRIVE
BEFORE CHANGING THE SWITCH SETTINGS.
1. HDD1 connection/power indicator
Glows white when the hard disk is connected and
the drive is powered up. Blinks when building a
mirrored RAID if HDD1 is the target disk.
2. HDD1 status indicator
Displays the status of the hard disk.
See the status indicator color/state chart below.
3. HDD2 connection/power indicator
Glows white when the hard disk is connected and
the drive is powered up. Blinks when building a
mirrored RAID if HDD2 is the target disk.
4. HDD2 status indicator
Displays the status of the hard disk. See the status
indicator color/state chart below.
Status Indicator Color and State:
• Flashing blue
- Hard drive is being accessed
• Solid blue
- Array is being rebuilt
• Red
- Disk failure
Содержание Vivid S5 N
Страница 2: ......
Страница 4: ...GE PART NUMBER FN091065 REVISION 2 VS5 N AND VS6 N SERVICE MANUAL ii P R E L I M I N A R Y ...
Страница 5: ...GE PART NUMBER FN091065 REVISION 2 VS5 N AND VS6 N SERVICE MANUAL iii P R E L I M I N A R Y ...
Страница 6: ...GE PART NUMBER FN091065 REVISION 2 VS5 N AND VS6 N SERVICE MANUAL iv P R E L I M I N A R Y ...
Страница 7: ...GE PART NUMBER FN091065 REVISION 2 VS5 N AND VS6 N SERVICE MANUAL v P R E L I M I N A R Y ...
Страница 8: ...GE PART NUMBER FN091065 REVISION 2 VS5 N AND VS6 N SERVICE MANUAL vi P R E L I M I N A R Y ...
Страница 9: ...GE PART NUMBER FN091065 REVISION 2 VS5 N AND VS6 N SERVICE MANUAL vii P R E L I M I N A R Y ...
Страница 10: ...GE PART NUMBER FN091065 REVISION 2 VS5 N AND VS6 N SERVICE MANUAL viii P R E L I M I N A R Y ...
Страница 11: ...GE PART NUMBER FN091065 REVISION 2 VS5 N AND VS6 N SERVICE MANUAL ix P R E L I M I N A R Y ...
Страница 12: ...GE PART NUMBER FN091065 REVISION 2 VS5 N AND VS6 N SERVICE MANUAL x P R E L I M I N A R Y ...
Страница 13: ...GE PART NUMBER FN091065 REVISION 2 VS5 N AND VS6 N SERVICE MANUAL xi P R E L I M I N A R Y ...
Страница 14: ...GE PART NUMBER FN091065 REVISION 2 VS5 N AND VS6 N SERVICE MANUAL xii P R E L I M I N A R Y ...
Страница 833: ......
Страница 834: ... 2013 and 2015 General Electric Company GE Vingmed Ultrasound AS P O Box 141 NO 3191 HORTEN NORWAY www gehealthcare com ...


