background image

Operator’s Manual: ThermoJet 


Chapter 5: Display Screens 

© SP Industries, Inc.  


                                                            200-31974-999  Rev. 009 

44 

 
E. Command Set Option Screen-

 From the Utilities Screen (Fig. 16), select the “Command Set 

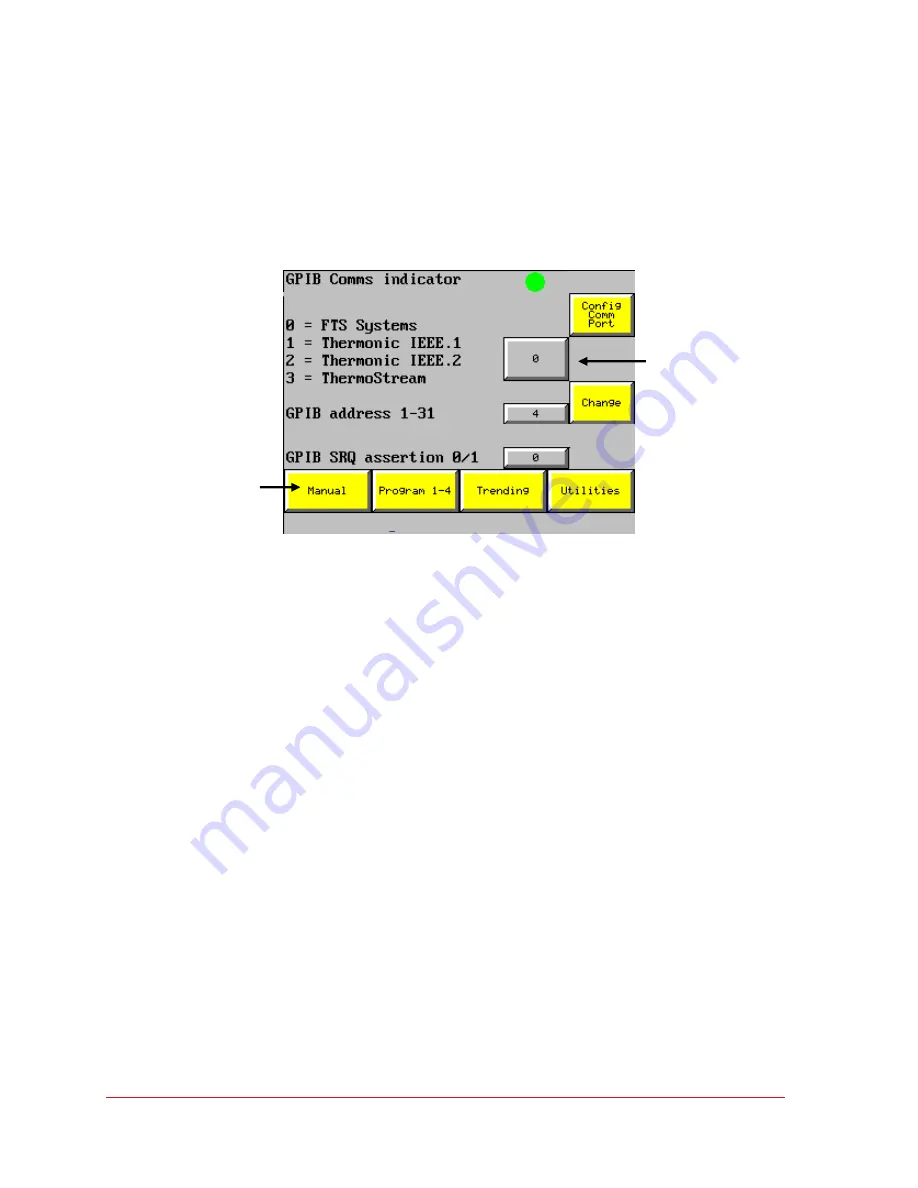
Option” button and the screen depicted below will open. The command set option screen is used 
to inform the processor which commands to respond to, or listen for. Enter the appropriate 
number in the option entry field. Every effort has been made to accommodate programs written 
for temperature forcing systems similar to the ThermoJet, however modifications may be required 
to the ThermoJet command set and/or existing programs to affect the system interface.  


Figure 31 – Command Set Option Screen 


GPIB Indicator –

 When the “Change” button is pressed the indicator should change in color 

from green to red or red to green. If the indicator does not change color there is a 
communication problem between the ThermoJet and the internal GPIB board.  


Command Set options –

 Using the numeric entry enter the command set which suits your 

application.  


*GPIB address –

 Using the numeric entry enter the GPIB address to be used for the THJ80. 


SRQ Assertion – 

0 - Assert power on SRQ on system start up 


1 - No power on SRQ on system start up  


Configure Communication Port -

 Go to Configure Communication Port Screen. 


Change Button –

 When the change button is pressed it will update the internal GPIB with 

the appropriate address, command set, and SRQ information. At that time the GPIB indicator 
should change color from green to red, or red to green.  


*

Before connecting the ThermoJet to the GPIB bus ensure that the address is correct. Do not 

connect the IEEE port on the rear of the system until the address has been changed to an 
appropriate address. Failure to do so can cause the GPIB bus to crash and / or stop 
communicating with other devices. 
 

Option entry 
 button 

Main menu buttons 

Command Set Option Screen 

Содержание ThermoJet THJ80

Страница 1: ...orcing System Operator s Manual TM FTS 3538 Main Street Stone Ridge NY 12484 800 824 0400 or 845 687 0071 Fax 845 687 7481 info ftssystems com www SPindustries com SP Service 877 548 4666 or 845 687 5...

Страница 2: ...ith SP Industries Inc that you are using the most current version of this document SP Industries Inc is free to modify any of its products and services in any manner and at any time notwithstanding th...

Страница 3: ...Temperature Calibration Operation NLTC 22 Manual Mode Features 25 Program Mode Features 28 Trend Display Features 30 Utilities Display Features 31 Alarm Features 51 Base Unit Controls 52 System Opera...

Страница 4: ...d Screen 41 Figure 28 Air Flow Calibration Screen 42 Figure 29 Compressor Maintenance Screen 42 Figure 30 Password Screen 43 Figure 31 Command Set Option Screen 44 Figure 32 Configure Communication Po...

Страница 5: ...if a recommendation marked with this symbol is not heeded Electric Shock Danger Use appropriate caution to avoid injury or death Burn Danger Potentially hot surface Use appropriate caution Do not sto...

Страница 6: ...SP Industries Inc 200 31974 999 Rev 009 6 BLANK PAGE...

Страница 7: ...its products without notice System Description The THJ80 is a mechanically refrigerated system designed to provide high volume high velocity temperature controlled airflow to an enclosed thermally is...

Страница 8: ...vents ambient air entrainment creating a well defined repeatable heat transfer environment The shroud is usually lowered on to the test fixture with the airflow centered on the DUT Silicone sponge ins...

Страница 9: ...silicone sponge seal to isolate DUT from ambient environment Caster mounted for easy maneuverability Compact design that minimizes floor space requirements System Specifications Temperature range 80 C...

Страница 10: ...SSK245 Silicone rubber shroud kit non conductive 2 pc used with 4 5 and 5 5 thermal cap CSSK235 Silicone rubber shroud kit conductive 2 pc used with 3 5 thermal cap CSSK245 Silicone rubber shroud kit...

Страница 11: ...emperature extremes The required insulation thickness will depend on the application and on the fixture s temperature sensitivity Various thermocouple gauges and lengths can be provided to properly in...

Страница 12: ...t pull or put any stress on the flexible air delivery assembly It is recommended that all packaging material be retained in case it is necessary to return the item to FTS for any reason NOTE Notify th...

Страница 13: ...n 1 208V 230V 60Hz 200V 50 Hz Option 2 220V 230V 50 Hz A step down transformer is Included with this option Check the electrical data plate in the lower rear corner of the right side to confirm your s...

Страница 14: ...plug quick connect fitting and a 1 2 NPT female coupler are provided to connect the air supply to the base unit s rear panel Additional quick connect fittings or lines may be purchased through the FTS...

Страница 15: ...n shipped completely assembled The holding arm if ordered will require some adjustment to position it in accordance with your other test equipment Figure 3 THJ80 ThermoJet w Motorized Arm option Inter...

Страница 16: ...ns The connector panel Item 1 provides connectors for the external DUT Type K thermocouple and the computer interface cables The alumel leg of the thermocouple plug is slightly smaller than the chrome...

Страница 17: ...cant Dryer internally mounted and premature equipment failure The drain line exiting the machine may be re routed to an alternate drain site at the operator s discretion If this option is chosen the o...

Страница 18: ...station by releasing the two thumbscrews To operate the machine remotely replace the connecting cable with the optional 20 cable Optional Motorized Arm Operation NOTE For safety purposes the arm contr...

Страница 19: ...course adjustment of the height of the shroud contact area to the level of the work surface either through the motor control for whole arm toggle or manually raising and lowering the probe head at th...

Страница 20: ...to the EMO button Emergency Mechanical Off The EMO button is located on the top left corner of the base unit Lifting this EMO button will enable the main power to the touch screen compressors heater s...

Страница 21: ...tion and air flow The PLC and the touch screen will remain active but the touch screen will go blank Normal Startup Touch any part of the blank touch screen and press Restart when prompted The system...

Страница 22: ...n toggle button located on the bottom right corner to allow raising and lowering the head before starting the NLTC process For optimal system performance the recommended NLTC procedure is to 1 Place s...

Страница 23: ...he heater output for the specified SCFM 6 The temperature will then increment to the next setpoint 15 75 125 175 225 7 Repeat steps 5 and 6 until temperature setpoint 225 C 8 When temperature setpoint...

Страница 24: ...restarted before starting normal operations 4 The completed indicator will not appear on the NLTC screen if the cancel button is pressed 5 If a low main air pressure alarm occurs during the NLTC the s...

Страница 25: ...splayed The control mode is set on the Control Status Screen and can be accessed via the Utilities Screen The air flow can be set by highlighting the appropriate data field and entering the desired va...

Страница 26: ...ure Setpoint achieved and previously set soak time expired Defrost System undergoing defrost sequence Auto Tuning System undergoing DUT auto tuning sequence Initializing During first 35 seconds of sys...

Страница 27: ...er to turn OFF the THJ80 properly it is recommended that the system be in IDLE mode controlling under the nozzle thermocouple If Yes is chosen the Shutdown screen Fig 12 displays and the system will d...

Страница 28: ...999 To enter the values for a step highlight the appropriate data field and use the pop up keypad The Run button starts the program from the beginning When pressed it changes to Stop The Stop button t...

Страница 29: ...To load a program press the load button next to the filename Saving will save the current program step parameters under the filename entered in the text field Once a filename is stored it will appear...

Страница 30: ...xis to the right or left and to view the trend data at any point along the time line Moves the graph back one page Moves the graph to the beginning of data collection Moves the graph forward one page...

Страница 31: ...mperature Window Selection 6 Max Air Flow Limit 7 Soak time selection C Set Up Screen 1 Nozzle Limit Temperature Calibration 2 About Screen 3 Date and Time Screen 4 Compressor Status Screen 5 Heater O...

Страница 32: ...e minimum allowable air temperature must always be less than the desired setpoint In general the wider the allowable temperature range the better the resulting loop performance and temperature transit...

Страница 33: ...er DUT thermal masses Proportional band makes the controller output proportional to the difference between set temperature and actual temperature controller output set temp actual temp 100 proportiona...

Страница 34: ...n stopped for one of the following reasons Open DUT Thermocouple The selected maximum air temperature is less than the upper process temperature Auto tuning has timed out The process temperature may b...

Страница 35: ...rom zero to the soak time value UP or start at the soak time value and decrement until it equals zero DOWN 6 Window sets the At Temperature window in degrees Celsius 7 Max Air Flow the air flow value...

Страница 36: ...System Maintenance Screen 7 Alarm History An brief explanation of these screens follows Figure 20 Set Up Screen 1 Nozzle Limit Temperature Calibration NLTC Please refer to page 22 for full description...

Страница 37: ...d when software is upgraded Figure 21 About Screen 3 Date And Time Screen From the Set Up screen Fig 20 select the Date and Time button and the screen depicted below will open This screen allows the o...

Страница 38: ...er warms up to 15 C or greater the low stage compressor will turn off Once the heat exchanger temperature reaches 85 C the system can achieve its full operating range Figure 23 Compressor Status Scree...

Страница 39: ...differ from the systems Current Air Flow Edit Heater Values Brings you to the Edit Heater Values Screen Enter Air Flow Value the value entered to this field will be the values which are displayed whe...

Страница 40: ...8 to 39 then press the edit values button The new value will be written once the button is released Conversely while controlling in DUT mode the Max Air Temp is set to 125 C but the system slightly ov...

Страница 41: ...the Forgot Password Air Flow Calibration Compressor Maintenance screens and the System Restart button for the FTS service technician NOTE The Maintenance and subsequent screens require the FTS technic...

Страница 42: ...res the measured flow to the expected flow If a discrepancy exists the service technician adjusts the valve position stepper motor until the two values agree and then press OK to save the new operatin...

Страница 43: ...The system ships with the default passwords LEVEL 2 and LEVEL 3 To enter a password type the password in the Password Entry field and press Enter To switch to a lower security level one of the two pa...

Страница 44: ...ge color there is a communication problem between the ThermoJet and the internal GPIB board Command Set options Using the numeric entry enter the command set which suits your application GPIB address...

Страница 45: ...Stop bits Parity and Baud Rates are updated Data Bits Specify the number of data bits to transmit 7 or 8 Stop Bits Specify the number of bits used to indicate the end of a byte 1 or 2 Parity Specify t...

Страница 46: ...se the ThermoJet communication must be set to GPIB The Serial parameters will be grayed out so they cannot be edited and the communication port will automatically be configured with the correct serial...

Страница 47: ...include degraded low temperature performance and or degraded air flow Figure 34 Defrost Screen To run the Defrost function 1 Before starting the defrost cycle terminate any test program that may be u...

Страница 48: ...n displays a Warning screen When acknowledged by pressing YES the Temperature Calibration Screen 1 Fig 35 displays From here the nozzle and DUT thermocouples can be field calibrated Before calibration...

Страница 49: ...achieved Remember that this is a temperature setpoint change so the nozzle or DUT temperature may lag behind the changing temperature setpoint When in DUT mode the DUT temperature will lag behind the...

Страница 50: ...ies Screen Fig 16 selecting the Temperature Calibration 2 button displays the Start screen below Before calibration the system should be in Nozzle control mode and be controlling in Idle mode Calibrat...

Страница 51: ...al screen The Acknowledge button will NOT appear if the alarm is still present A differential pressure switch located in the heat exchanger monitors the pressure at the inlet and outlet of the heat ex...

Страница 52: ...ators need to be accessed Access to the base unit internals is not needed during normal operations NOTE The base unit contains no user serviceable components Contact your authorized FTS service repres...

Страница 53: ...positioning the ThermoJet head shroud to interface with test fixtures A Type K thermocouple located in the exit nozzle supplies a control signal to the System Controller This temperature is the main p...

Страница 54: ...et is equipped with a low inlet pressure and a low air flow interlock to prevent system damage by operating it under improper conditions The inlet pressure interlock notifies the user of the alarm The...

Страница 55: ...thods Control of the ThermoJet can be separated into three distinct methods Manual Program Computer Manual Operation In the Manual Mode the operator works primarily with the three preset temperature s...

Страница 56: ...nd their associated functions Temp Accesses the keypad to set a setpoint temperature between 85 C to 225 C Rate Accesses a keypad that allows the user to set the ramp rate between 0 and 999 C min Ente...

Страница 57: ...nct programs Save the current program Press Load Save When the Load Save screen is displayed enter the 12 character alphanumeric file name into the data field and press Save The Save button will be hi...

Страница 58: ...and the maximum air temperature are used as upper and lower temperature setpoint warnings If a temperature setpoint is less than the minimum temperature setpoint or greater than the maximum temperatu...

Страница 59: ...o connect the rear panel to the remote computer If this cable is misplaced a standard straight thru cable can be a viable replacement or contact FTS service and we can ship one to you immediately Trou...

Страница 60: ...Chapter 8 Remote Computer Operation SP Industries Inc 200 31974 999 Rev 009 60 NOTE When sending commands using the GPIB communications After every command insert a r This indicates end of string E g...

Страница 61: ...1 Open folder labeled 3 3 1 2 Double click the Setup exe icon 3 FTS recommends that you install the program in the proper Destination Directory C Program Files National Instruments 4 Click Next 5 Dir...

Страница 62: ...d Remember that the communication parameters Communication Port Set Up must be Data bits 8 Stop bits 1 Parity None Baud Rate 19200 If the parameters are not set the program will not communicate and yo...

Страница 63: ...n and the system will return to Idle mode 4 Soak Timer Indicates the time the system is at temperature 5 Air Temp Indicates the temperature of the nozzle 6 DUT Temp Indicates the temperature of the De...

Страница 64: ...ure rate and soak fields 2 Load Program Once steps 1 8 are configured correctly this button will load the program to the THJ80 3 Run Program Run the program which is loaded in steps 1 8 4 Save to File...

Страница 65: ...hich the system status will change from Transitioning to soaking or At temperature 6 Ramp Time Manual Mode ramp rate only 0 or 999 ballistic 1 998 ramp rates in degrees C 7 Soak Time System status to...

Страница 66: ...tioning 2 Step 1 soaking 3 Step 2 transitioning 4 Step 2 Soaking 15 Step 8 transitioning 16 Step 8 soaking RS0 Request manual mode status SEE NOTE RS1 Request program mode status SEE NOTE RS2 Request...

Страница 67: ...ndicate system is under remote control SU Changes touchscreen back to manual mode screen RS0 Returns a semi colon delimited string STsoaktime TAvalue TDvalue AFvalue ME 0 10 SP1value SP2value SP3value...

Страница 68: ...ess Yes to continue to the Air Temperature Calibration screen 3 A message Wait until the nozzle temperature is stabilized at 25 C before removing the nozzle TC appears 4 Once the nozzle temperature is...

Страница 69: ...Operator s Manual ThermoJet Chapter 10 THJ80 Command Set SP Industries Inc 200 31974 999 Rev 009 69 Figure 49 Air Calibration Warning Screen Figure 50 Temperature Calibration Screen 1 1...

Страница 70: ...Operator s Manual ThermoJet Chapter 10 THJ80 Command Set SP Industries Inc 200 31974 999 Rev 009 70 Figure 51 Calibration Exit Warning Figure 52 DUT Temperature Calibration Screen...

Страница 71: ...utton from either of these screens will return the user to the Utilities screen Air Temperature Calibration 2 The objective of this procedure is to make the calibrated nozzle temperature equal to the...

Страница 72: ...e 53 Temperature Calibration 2 Screen Figure 54 Temperature Calibration 2 Running Screen Temperature Calibration 2 Running Screen OPERATOR SPECIFIED SETPOINT Temperature Calibration 2 Start Screen Ope...

Страница 73: ...Operator s Manual ThermoJet Chapter 10 THJ80 Command Set SP Industries Inc 200 31974 999 Rev 009 73 Figure 55 Temperature Calibration 2 Completed Screen Temperature Calibration 2 Completed Screen...

Страница 74: ...red may require special purpose tools performed by operator performed by trained specialist preventative in nature reactive in nature Who should perform the maintenance Although we understand that eac...

Страница 75: ...tes or is not within specifications 20 Hours Every 1 Month Ambient above 72 F or Air dirty with pressure below 90 psig or dew point above 10 C or Ambient air dusty or with humidity above 50 or System...

Страница 76: ...cuum dust from expanded metal screen on rear of base unit cabinet 5 Remove rear and side panels from base unit cabinet 6 Using the compressed air source blow air from the rear of the cabinet through t...

Страница 77: ...rld from our home office located at the FTS manufacturing facility in Stone ridge NY In addition to factory support personnel we have a worldwide network of qualified service organizations ready to ac...

Страница 78: ...eplaced at FTS discretion free of charges by FTS at Stone Ridge N Y On site labor if repairs require that FTS personnel travel to the equipment Necessary parts and reasonable labor charges if FTS agre...

Страница 79: ...r FTS equipment You will be provided with a PM checklist and a certificate of calibration which is traceable to N I S T The purchase of this plan also provides discounted parts and labor rate for addi...

Страница 80: ...mber without freight prepaid or with an expired RA number This number is valid for 30 days if your RA number expires you must request a new number Before working on systems that are not under warranty...

Страница 81: ...SP Industries Inc 200 31974 999 Rev 009 81...

Страница 82: ...09B 123 00156 000 DL260CPU 122 00009 000 D2 12TR PC 1095 F2 04THM 123 00036 000 F2 02DA 2 PC 1094 D2 08ND3 ELECTRICAL BOX PARTS PART NO WHERE USED 122 00011 000 24VDC POWER SUPPLY PE 0518 SOLID STAGE...

Страница 83: ...TIC PARTS PART NO WHERE USED 104 30158 000 AIRFLOW SWITCH 136 30690 000 AIR DRYER 101 31542 000 STEPPER VALVE PC 0079 PRESSURE DIFFERENTIAL PE 1253 PURGE VALVE 103 30218 000 ELEMENT REPLACEMENT 5 MICR...

Страница 84: ...Y THE MANUFACTURER AND HAS A TRACEABLE RELATIONSHIP TO THE NATIONAL INSTITUTE OF STANDARDS AND TECHNOLOGY NIST CALIBRATION RECORDS OF THE DEVICES USED ON EQUIPMENT USED BY SP INDUSTRIES ARE KEPT ON FI...

Отзывы: