FE350 ENGINE
Crankshaft and Counterbalance
2001 Pioneer 900 Gasoline Vehicle Maintenance and Service Manual Page 13-37
13
Link Rod Inspection
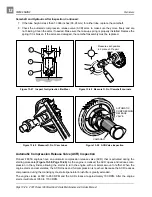
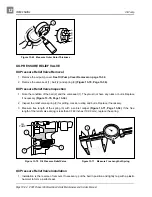
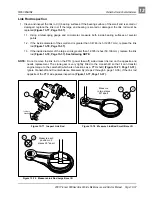
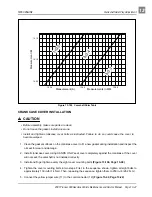
1. Clean and inspect the link rod (1) bearing surfaces. If the bearing surface of the small end is scored or
damaged, replace the link rod. If the large end bearing is scored or damaged, the link rod must be
replaced (Figure 13-77, Page 13-37).
1.1. Using a telescoping gauge and micrometer, measure both inside bearing surfaces at several
points.
1.2. If the inside diameter of the small end is greater than 0.4746 inch (12.057 mm), replace the link
rod (Figure 13-78, Page 13-37).
1.3. If the inside diameter of the large end is greater than 1.9726 inches (50.106 mm), replace the link
rod (Figure 13-79, Page 13-37). See following NOTE.
NOTE: Do not remove the link rod on the PTO (power take-off) side unless link rod on the opposite end
needs replacement. The crank-gear is very tightly fitted to the crankshaft so that it can transfer
engine torque to the camshaft (which also functions as a PTO shaft) (Figure 13-77, Page 13-37).
Ignore Crankshaft and Counterbalance Disassembly (steps 2 through 6, page 13-36), if the link rod
opposite of the PTO side passes inspection (Figure 13-77, Page 13-37).
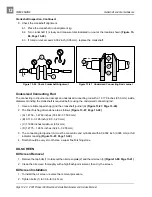
Figure 13-77 Inspect Link Rod
Figure 13-78 Measure Link Rod Small Bore I.D.
Figure 13-79 Measure Link Rod Large Bore I.D
1
TYPICAL 4
PLACES
A
A
2
1
Measure
in two places
90
°
apart.
A
A
2
1
Measure each
position in 2
places 90
°
apart.
Содержание Pioneer 900
Страница 1: ......
Страница 2: ......
Страница 22: ...3...
Страница 88: ...7...
Страница 92: ...8...
Страница 100: ...9...
Страница 108: ...10...
Страница 188: ...12...
Страница 268: ...14...
Страница 272: ...15...
Страница 316: ...16...
Страница 332: ...17...
Страница 341: ......
Страница 342: ......
Страница 343: ......

