background image

Configuration Files

218

C.7  Procedures for Importing and Exporting Customer User Tables

C.7.1 Overview

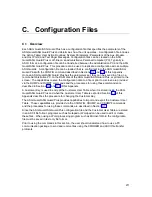
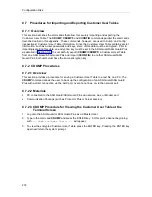
This section describes the commands that allow for securely importing and exporting the
Customer User Table. The CDUMPCDUMPF and CCONFIG commands parallel the commands
described earlier in this appendix.  These commands, however, are used to ‘dump’ and ‘config’
(respectively) Customer User Table information.  Since the Customer User Table contains secret
information, such as a user passwords and keys, some of this data must be encrypted.  Prior to
importing/exporting this data, an encryption key must be set in the ASG Guard/ASG Guard Plus
as detailed in Section C.6. To successfully export (CDUMP/CDUMPF) a Customer User Table
from one ASG Guard/ASG Guard Plus and import (CCONFIG) to another ASG Guard/ASG
Guard Plus, both units must have the same encryption key.

C.7.2 CDUMP Procedures

C.7.2.1 Overview

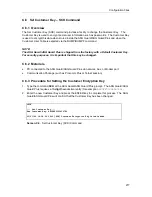
This section provides a procedure for saving a Customer User Table to a text file on a PC. The
CDUMP command allows the user to back up the configuration of an ASG Guard/ASG Guard
Plus with a direct connection via the AUX port, over phone lines, or via the network port.

C.7.2.2 Materials


PC connected to the ASG Guard/ASG Guard Plus via network, Aux, or Modem port.


Communication Package (such as Procomm Plus or Telnet session)

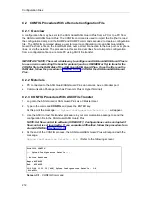
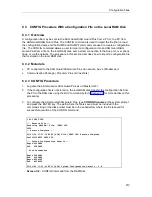
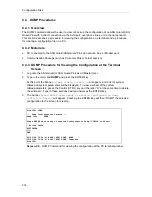
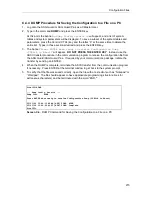
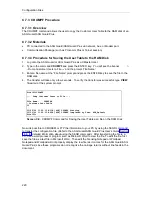
C.7.2.3 CDUMP Procedure for Viewing the Customer User Table at the

Terminal Screen

1.

Log onto the ASG Guard or ASG Guard Plus as a CMaster User.

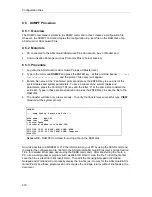
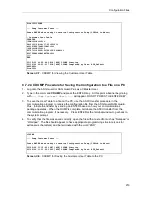
2.  Type in the command CDUMP and press the ENTER key.  At this point a banner beginning

with 

--- Dump Customer Users --- 

will appear.

3.  To view the encrypted Customer User Table, press the ENTER key. Pressing the ENTER key

again will return the system prompt.

Содержание Lucent Technologies Access Security Gateway Guard

Страница 1: ...Access Security Gateway Guard and Access Security Gateway Guard Plus User s Guide 585 212 011 Comcode 108366030 Issue 1 March 1999 ...

Страница 2: ...re registered trademarks of Lucent Technologies Disclaimer Intellectual property related to this product including trademarks and registered to AT T Corporation has been transferred to Lucent Technologies Incorporated Any references within this text to American Telephone and Telegraph Corporation or AT T should be interpreted as references to Lucent Technologies Incorporated The exception is cross...

Страница 3: ... 7 2 6 Security Management 8 2 6 1 Access Classes 8 2 6 2 User Database 8 2 7 Alarm Management 9 2 8 Logs 10 2 9 Network Capabilities 10 2 10 Editing Modes 12 2 10 1 TTY Mode 12 2 10 2 VT 100 Mode 12 2 11 Using the Editing Keys 13 2 12 Entering Commands 14 2 12 1 Entering Selecting Parameters 15 3 Physical Connections and Installation 17 3 1 What This Chapter Contains 17 3 2 LED Displays and Physi...

Страница 4: ...rt Parameters 41 5 3 1 Display Modem Port Parameters DM Command 41 5 3 2 Set Modem Port Parameters SM Command 43 5 4 Verify the Settings 47 6 Modifying the User Database 49 6 1 What This Chapter Contains 49 6 2 Overview 49 6 3 Display the User Maintenance Functions Menu 50 6 4 Command Summary 51 6 5 Add a User AU Command 52 6 5 1 ASG Key Authentication Method 54 6 5 1 1 Encryption Key Source 55 6 ...

Страница 5: ... RAM Disk Organization 73 7 4 1 Host Port Buffer Naming 73 7 4 2 Buffer File Naming Conventions 73 7 5 Set the RAM disk Protection Parameters 75 7 6 Buffering Data Received by a Host Port 77 7 6 1 Automatic Buffering 77 7 6 2 Manual Buffering 79 7 6 3 Displaying the Status of a Buffer 79 7 6 4 Sending Buffer Files to the Administration PC 80 7 6 5 Using a Direct or Dial up Connection 80 7 6 6 Usin...

Страница 6: ...m Event GE Command 101 8 7 3 Delete Alarm Event XE Command 103 8 8 Internal Alarms and Events 104 8 9 Action Routines 107 9 System Functions 109 9 1 What This Chapter Contains 109 9 2 Overview 109 9 3 Systems Functions Menu 109 9 4 System Parameter Functions 111 9 4 1 Set System Parameters SSP Command 111 9 4 1 1 Site information 111 9 4 1 2 Scheduling Parameters 113 9 4 1 3 Modem Action Routine P...

Страница 7: ...mmand 122 10 4 4 Display Contact Inputs DCC Commands 122 10 4 5 Set Relays SRLY Command 123 10 4 6 Reset Relays RRLY Command 123 10 5 The Environmental Manager 124 10 5 1 The Environmental Interface of the ASG Guard Plus 124 10 5 2 The Environmental Interface of the ASG Guard 126 10 6 Relays on the ASG Guard 128 10 7 Defining Threshold Limits SSA Command 128 10 8 Analog Sensors 130 10 8 1 48 Volt ...

Страница 8: ...Functions 147 12 3 Overview of Telnet Support by ASG Guard ASG Guard Plus 148 12 4 Overview of SNMP Support by ASG Guard ASG Guard Plus 148 12 4 1 MIBs 148 12 4 2 ASG Guard ASG Guard Plus MIB 149 12 4 3 Delivery of SNMP Traps 150 12 4 3 1 SNMP Traps Via Ethernet Network 150 12 4 3 2 SNMP Traps Via PPP 150 12 5 Overview of FTP Support by ASG Guard ASG Guard Plus 150 12 6 Overview of PPP Support by ...

Страница 9: ... PPP through a ASG Guard ASG Guard Plus 166 13 Log Functions 167 13 1 What This Chapter Contains 167 13 2 Overview 167 13 3 The Log Functions Menu 168 13 3 1 Access History AH Command 168 13 3 2 Log History LH Command 170 13 3 3 Failure History FH Command 172 13 3 4 Display Error Log DER Command 174 13 3 5 Clear Log History CLH Command 175 13 3 6 Clear Error Log CER Command 175 14 Events and Actio...

Страница 10: ...t 185 14 3 26 PPPREQ Internal Event 185 14 3 27 RTSLOW n and RTSHIGH n Internal Events 186 14 3 28 S HIGH S LOW or S OK Internal Event 186 14 3 29 TEMPHIGH 187 14 3 30 TEMPLOW Internal Events 187 14 3 31 TEMPOK Internal Events 187 14 3 32 WEEKLY Internal Event 188 14 4 ACTION ROUTINES 189 14 4 1 AUXCC Action Routine 189 14 4 2 CANCEL Action Routine 189 14 4 3 CLKAHEAD and CLKBACK Action Routines 1...

Страница 11: ...ne 200 14 4 18 SETRELAY Action Routine 201 14 4 19 SNMPTRAP 202 Appendix A ASG Key User s Guide 203 Appendix B Port Default Settings 207 Appendix C Configuration Files 211 Appendix D Troubleshooting 223 Appendix E Internal Battery Replacement 225 Appendix F Glossary of Command References 241 Index 247 ...

Страница 12: ...x Page intentionally left blank ...

Страница 13: ...ters to set up modem ports are described These include baud rate and parity modem control strings and other port settings Chapter 6 Modifying the User Database Explains how to add delete and change information in the user database Chapter 7 File Buffering Describes how the ASG Guard ASG Guard Plus buffers data from host ports and how to manage these files Chapter 8 The Action and Event Tables Expl...

Страница 14: ...Action Routines Describes each Internal Event and standard Action Routine Examples are also included Appendix A ASG Key User s Guide Describes how to use the ASG Key Appendix B Port Default Settings Describes the default Port settings for the ASG Guard ASG Guard Plus Appendix C Configuration Files Describes the configuration file of the ASG Guard ASG Guard Plus Appendix D Troubleshooting Provides ...

Страница 15: ... an authorized user Authentication methods supported by the ASG Guard ASG Guard Plus include Password Callback ASG Key and Pager Master user A user with highest level of privileges A master user may add and delete other users including other users with master level privileges System prompt The system prompt is the greater than symbol and includes the site name ASG Guard ASG Guard Plus commands are...

Страница 16: ...onents 16 or 28 Host Ports Asynchronous DCE Ports DB9 two 33 3 Mhz Internal PCMCIA Modems one 10Base T Ethernet Port eight Contact Closure Inputs three 0 5 VDC Analog Inputs one Temperature Sensor Temperature Probe required one 48 Volt Battery Monitoring Input one 32 MB Ram Disk 2 4 3 ASG Guard Front Panel The LEDs Aux port connector and Key Switch are located on the front panel of the ASG Guard F...

Страница 17: ...in this chapter 2 4 4 ASG Guard Rear Panel Figure 2 2 shows the rear panel connectors of the ASG Guard Figure 2 2 ASG Guard Rear Panel Connectors 2 4 5 ASG Guard Plus Front Panel The LEDs Aux port connector System Initialization Tag SIT and Key Switch are located on the front panel of the ASG Guard Plus Figure 2 3 shows the front panel connectors of the ASG Guard Plus AC 48VDC BATTERY PW R FAIL PU...

Страница 18: ...he ASG Guard ASG Guard Plus on and off The key can be removed in either the on or off position The ASG Guard Plus cannot be turned on or off without a key LEDs The LEDs display status messages When the unit is operating properly the pulse LED will flash The meaning of each LED is explained in LED Meanings later in this chapter 2 4 6 ASG Guard Plus Rear Panel Figure 2 4 shows the rear panel connect...

Страница 19: ...nt at the site Allows connection via a local terminal dial up modem and Ethernet A dial up modem can also be used for PPP connections allowing remote access to network connected devices Alarm Processing When attached to a maintenance port of a host device the ASG Guard ASG Guard Plus can process alarm messages and other ASCII based data streams Alarm messages can be delivered via modem or network ...

Страница 20: ...level user can access all hosts ports and has access to the file commands used to manage data buffering can make changes in how ASG Guard ASG Guard Plus responds to alarms and change the port configuration of the unit Sysop 1 The Sysop 1 level user can view pending alarms but cannot change it Data buffering commands are not available to the Sysop 1 user The Sysop 1 user can access all hosts Host 1...

Страница 21: ... necessary resources become available for example the modem becomes free Action Routines are scripted functions that can perform a wide range of tasks associated with particular or general alarms Certain Action Routines are included with the system while others can be created and loaded into the ASG Guard ASG Guard Plus in order to customize the alarm processing mechanisms and interface Action Rou...

Страница 22: ... FTP for buffer and file delivery and SNMP for TRAP delivery to network management stations In addition ASG Guard ASG Guard Plus will route traffic between its network interfaces allowing it to act as a secure remote access server for maintenance applications To administer information inside the ASG Guard ASG Guard Plus you must establish a SYSOP session This can be done at the locally connected t...

Страница 23: ...enter the command letter assigned to that menu at the prompt NOTE All commands may be entered at the system prompt The menu does not have to be displayed first u USER MAINTENANCE FUNCTIONS CMaster User Maintenance Functions LU List Users DU Display User Record AU Add User CU Change User XU Delete User Other Menus S System A Alarm Event L Log F File P Port Session Figure 2 7 Screen Components MENU ...

Страница 24: ...s emulating a VT 100 terminal you can execute SYSOP commands in VT 100 mode In this mode all of the prompts will be displayed on the screen at once along with the data to be edited The cursor will initially appear at the beginning of the first field At this point the arrow keys can be used to move from line to line performing edits in any order Pressing the ENTER key with the cursor on the last li...

Страница 25: ...n arrow keys Move cursor to the right CTRL R Move Cursor to the Left CTRL L Delete the character at the cursor CTRL D Toggle overstrike on or off default is off CTRL O Delete text to the End of Line EOL CTRL X Move the cursor to the beginning of the line CTRL B Move the cursor to the end of the line CTRL E Backspace and delete Backspace key Restart field clears all new data and returns previous da...

Страница 26: ...ser Some commands require that certain parameters be specified For example when you type SSP to set system parameters type SSP and press the ENTER key the Set System Parameters screen is displayed site123 ssp Set System Parameters 1 Site Information 2 Scheduling Params 3 Modem Action Routine Params Select Group 1 Screen 2 1 Set System Parameters Screen Some commands allow you to include additional...

Страница 27: ...s you with several options If the option displayed is not appropriate scroll through the list by pressing the SPACEBAR When the selection you want appears in the field press the ENTER key to select that item In the Add User screen for example the system initially displays ASG Key in the Primary Authentication Method parameter field To select Password Callback press the SPACE BAR once to display Pa...

Страница 28: ...ASG Guard Overview 16 Page intentionally left blank ...

Страница 29: ...rd and ASG Guard Plus Table 3 1 LED Meanings GROUP LED FUNCTION Power AC Power is being supplied to the unit 48VDC Power is being supplied to the unit from a 48V DC source Battery Internal battery is installed and charging Power Fail Main power has failed and the battery backup is supplying power to the unit System Pulse t Flashes to indicate that the system is operating correctly green red Alarm ...

Страница 30: ...2 RX DTR Host 3 RX DTR The lower LED DTR indicates that a device is connected to the port Host 4 RX DTR Modem Modem 1 RX CD Upper LED RX indicates that data is currently being transferred Modem 2 RX CD Lower LED CD indicates that the modem is ready to receive data Ethernet RX TX Indicate the reception and transmission of network data ...

Страница 31: ... are configured as Data Communications Equipment DCE ports To connect a data communications device DCE to an ASG Guard ASG Guard Plus host port you must use a null host cable 2 3 4 5 6 7 8 20 2 3 4 5 6 7 8 20 Figure 3 1 Null Host 25 Pin to 25 Pin Cable Diagram Figure 3 2 Null Host 9 Pin to 9 Pin Cable Diagram ...

Страница 32: ...th RJ11 connectors one for each modem Network cable with an AUI or 10base T connector Null modem cables adapters as required if connecting a DCE device to the Host port 3 3 2 Requirements for Network Applications For network applications you will also need to assign the ASG Guard ASG Guard Plus an IP address Default addresses are provided but you should obtain addresses that are appropriate for yo...

Страница 33: ...d ASG Guard Plus host port you must use a null modem cable adapter a Connect one end of a standard RS 232C serial cable to the maintenance port of the host or PBX b Connect the other end to the first HOST connector on ASG Guard ASG Guard Plus c Follow a similar procedure to connect each resource to a host port 4 Connect analog telephone line s to the appropriate RJ11 connector s on the ASG Guard A...

Страница 34: ...lights immediately and the System and Ports LEDs light to indicate the power up sequence After about 30 seconds the LEDs will flash three times Thirty seconds later initialization will be complete and the appropriate LEDs should remain lit to indicate the status of the ASG Guard ASG Guard Plus The system status LED labeled pulse heart icon will continue to flash periodically indicating that the sy...

Страница 35: ... 47 50 40C0 Modem 2 NOT INSTALLED 10 07 98 15 47 53 4ADD AUX User AUX_Default Connected to Sysop 10 07 98 15 47 56 41C9 H Host 1 Idle 10 07 98 15 47 57 1789 H Host 2 Idle 10 07 98 15 47 58 D55E H Host 3 Idle 10 07 98 15 48 00 AB5B H Host 4 Idle 10 07 98 15 48 07 A7A7 M1 Modem Idle Ser Screen 3 1 AUX Port Information Screen For more information regarding the front panel and the associated LEDs refe...

Страница 36: ...Physical Connections 24 Page intentionally left blank ...

Страница 37: ... the features of the ASG Guard ASG Guard Plus and can add and delete users from the User Database A default system allows Master level access via the local terminal AUX Port which can be disabled later See Section 2 6 for more information on the User Database and access classes 4 2 Add the First User Profile The AU Add User command allows you to add an authorized user to the ASG Guard ASG Guard Pl...

Страница 38: ...ccess all ASG Guard ASG Guard Plus commands including modification of the user database NOTE The first user entered should be a master level user A CMaster user should be maintained in all systems at all times When entering subsequent user profiles display the Access Classes by pressing the SPACE BAR Press the ENTER key to select a class Block Access Initially No appears on the screen Press the SP...

Страница 39: ...select you will be prompted for further information after you complete the main portion of this screen Password Callback contains three options passthru regular callback and variable callback Passthru option requires only that the user enter the correct ID and password to access the ASG Guard ASG Guard Plus and the equipment it protects Regular callback requires the user to have a specific phone n...

Страница 40: ... and Pager NOTE Depending on the authentication method selected prompts for further information will appear after you complete the main portion of this screen Auto Execute Command Optional Enter a command that will be executed automatically after the user has been authenticated by the system This is available only to Sysop users not Host users For example if you enter LH the log history will be di...

Страница 41: ...us dials the caller back using the number in its database for that user If Regular Callback is selected you are prompted to enter a phone number NOTE Enter the phone number as the system needs to dial it For example if the ASG Guard ASG Guard Plus has to dial 9 to get an outside line or if the number is in a different area code and the ASG Guard ASG Guard Plus has to dial a 1 first enter those num...

Страница 42: ...he information on the screen The information displayed in the Enter These Digits as Key1 or Key2 field is to be entered in to the ASG Key when you initialize the ASG Key Be sure to note this information carefully If you make an error in transcribing the information for the ASG Key use the Change User command to redo the procedure Follow the instructions supplied with the ASG Key to initialize the ...

Страница 43: ...o use the same ASG Key with this system ASG Key Details Encryption Key Source Fixed Fixed Key 14 hex or 20 octal 003FA876DE45CD Enter These Digits as Key1 or Key2 0443 2126 3422 1505 3160 Test Challenge 1234567 Reply 040 2181 Press ENTER to Continue site123 10 14 93 10 49 25 M User CHRIS Added O K Screen 4 6 ASG Key Details Screen To select the encryption key source press the ENTER key when the ap...

Страница 44: ...hh 08 01 02 00 03 E9 IP Address nnn nnn nnn nnn 192 9 200 2 PPP Address nnn nnn nnn nnn 192 9 200 3 Default Gateway nnn nnn nnn nnn To start the network type STARTNET 07 17 96 15 55 36 A Set Network Params O K Screen 4 7 Set Network Params Screen For a detailed explanation of Group 1 Network Initialization Params refer to Section 12 4 For a detailed explanation of Group 2 SNMP Manager Params refer...

Страница 45: ...uard ASG Guard Plus includes default values for these parameters The default settings are listed in Appendix C site123 sa Set AUX Port Params Restore Factory Defaults No Baud Rate 9600 Char Length Parity 8 None Terminal Emulation TTY Default Access Class CMaster Output While Port Idle Log Data Sysop Idle Timer None Host Session Idle Timer None Host Session Disconnect on Ctrl A Yes Screen 4 8 Set A...

Страница 46: ...oice is displayed Default Access Class In addition to the user profiles created with the AU Add User command the ASG Guard ASG Guard Plus can be configured to permit access through the AUX port without authentication The Default Access Class defines the type of access granted when a user establishes an AUX port session as the default user Options include None CMaster Sysop1 Sysop2 and Host n where...

Страница 47: ...in 10 min and 20 min Press the SPACE BAR until the desired choice is displayed Host Session Disconnect on Ctrl A Initially Yes appears on the screen Press the SPACE BAR to toggle to No 4 5 Initiate Security on the AUX Port After the initial setup you may keep the terminal connected to the Aux Port for system administration purposes If the terminal is left connected security can be implemented by s...

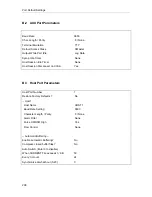
Страница 48: ...or host port communications then select the desired port Alternatively you can enter SH n where n is the port number as show in the following example The parameters affect how host events are received Changes to host port parameters become effective immediately upon completion of the command ASGGUARD1 sh 1 Set Host Port Params Restore Factory Defaults No Host 0 Host Name DEFINITY Baud Rate Setting...

Страница 49: ...ed Baud Rate Setting Speed at which the host communicates with the ASG Guard ASG Guard Plus Press the SPACE BAR until the desired choice is displayed 300 bps 9600 bps 1200 bps 19200 bps 2400 bps 38 4 Kbps 4800 bps 57 6 Kbps Character Length Parity The character length and parity characteristics of the Host Port connecting to the host device should match the host device value Press the SPACE BAR un...

Страница 50: ... buffer files automatically when they are closed Press the ENTER key when the appropriate selection is displayed Data is typically compressed at a ratio of 4 1 The ratio however varies with the type of data Auto Switch enter 0 to disable When CURRENT File exceeds n KB Enter the file size in KB at which the buffer should be switched Every n hours Enter the number of hours between the switching of b...

Страница 51: ...field Modem Used for Alarm Delivery This prompt has three options First Available Modem 1 and Modem 2 First Available option will use either Modem 1 or Modem 2 whichever one is available The Modem 1 or Modem 2 option will only attempt to use these phone lines to deliver alarms from the host device ...

Страница 52: ...Connect a terminal to the AUX port of the ASG Guard ASG Guard Plus 2 Using communications software in your computer set the AUX port of ASG Guard ASG Guard Plus to 9600 bps 3 Power up the ASG Guard Plus The LED s light in sequence as each area of software is checked When the start up check is complete the LED s will flash 3 times then the pulse heartbeat LED lights 4 At the same time the pulse LED...

Страница 53: ... ASG Guard Plus to dial out Each unit is shipped with factory defaults for the modems installed in ASG Guard ASG Guard Plus 5 3 Modem Port Parameters 5 3 1 Display Modem Port Parameters DM Command The DM Display Modem port parameters command enables you to view the parameters of the specified modem port Type DM at the system prompt to display the modem port parameters You will be prompted to enter...

Страница 54: ...lay Modem Port Params Screen The ASG Guard Plus has the option to add four 4 additional external modems by changing host ports 13 16 into modem ports At the system prompt type SSP and at the command line Number of Expansion Ports reassigned to Modems type 4 and press the ENTER key site123 SSP Set System Parameters 1 Site Information 2 Scheduling Params 3 Modem Action Routine Params Select Group 1 ...

Страница 55: ...o MSG for Pager Message Modem ATDT Pager ATDT MSG Screen 5 3 Set Modem Parameters Screen Field Function Modem Number Select the modem whose settings you wish to change Restore Factory Defaults Initially No appears on the screen Press the SPACE BAR to toggle to Yes Select Yes to restore the settings with which the ASG Guard ASG Guard Plus was shipped Select No to keep the current settings The facto...

Страница 56: ... the speed with a CONNECT message In these instances the speed must be derived some other way Usually an Auto Baud routine is used to sense the speed of the incoming data Sometimes it is preferable to force the incoming session at a particular speed CONNECT n sets the speed of the session to the speed in the CONNECT message If CONNECT n is chosen and no CONNECT message is sent to the ASG Guard ASG...

Страница 57: ...he maximum duration of inactivity time during a Host session before the call is terminated and the modem is reset Press the SPACE BAR until the desired choice is displayed When your choice appears in the field press the ENTER key to make your selection and advance to the next parameter Available selections are 1 min 5 min 10 min 20 min none Host Session Disconnect on Ctrl A Initially Yes appears o...

Страница 58: ...ituted for the characters Dial Strings Pager This command string specifies the dial string used by the modem to deliver a message to the pager Example ATDT MSG The default pager number from the System Parameter table will be substituted for the characters and the default pager message will be substituted for MSG Press the ENTER key to confirm your entry NOTE The character represents a carriage ret...

Страница 59: ...settings 2 Check that the ASG Guard ASG Guard Plus can dial out Add an Action Item PHONHOME that is issued when a particular event is generated Generate the event by using the GE command See Chapter 8 for more information on Action Tables and Action Items Have the ASG Guard ASG Guard Plus dial a PC running a terminal emulation program If the connection is successful the date time site name alarm a...

Страница 60: ...Modem Port Setup 48 Page intentionally left blank ...

Страница 61: ...ies the Lucent customer users is called the Customer User Table The User Database residing in the ASG Guard ASG Guard Plus contains information about each user including the users name access class and authentication method The information included in the database is listed below The user database can hold information for 75 users Each record in the database contains the following information abou...

Страница 62: ...press the ENTER key All commands associated with maintaining the Customer User Table are shown on this menu site123 u USER MAINTENANCE FUNCTIONS CMaster User Maintenance Functions LU List Users DU Display User Record AU Add User CU Change User XU Delete User SCK Set Customer Key LLU List Lucent Users DLU Display Lucent User Record BLU Block Unblock Lucent User BLA Block Unblock Lucent Asdmin Other...

Страница 63: ... CMaster LU List Users Displays list of all users in the Customer User Table Sysop 2 CMaster XU Delete User Deletes a user and removes all records associated with that user from the ASG Guard ASG Guard Plus Customer User Table CMaster SCK Set Customer Key Sets an encryption key that is used to encrypt secret user information such as passwords when this information is stored in the ASG Guard ASG Gu...

Страница 64: ...may also type the user name as part of the command For example AU CHRIS or AU at the User Name prompt then CHRIS The Add User screen appears after you enter a user name and press the ENTER key This assumes you are using VT100 terminal emulation See section 11 5 to turn VT100 terminal emulation on off Site123 AU Add User User Name CHRIS Access Class Host One Block Access No Sessions Allowed blank u...

Страница 65: ... events to or remove events from the Event Table The Sysop 2 user can implement all commands associated with the Action and Alarm Functions Menu A Sysop 2 user cannot make any changes to the user database CMaster In addition to all Sysop 2 access privileges the Master level of access allows the user to implement all ASG Guard ASG Guard Plus commands including modification of the user database Sele...

Страница 66: ... complete the main portion of this screen Auto Execute Command Optional Enter a command to automatically execute after that user has been authenticated by the system For example if you enter LH the log history will be displayed in reverse order after the user authenticates This option is available only to users who sign on as a Sysop 1 level or higher Comments Enter up to 40 alphanumeric character...

Страница 67: ...ryption key When this source is selected the ASG Guard ASG Guard Plus generates the key value and displays the information on the screen The information displayed in the Enter These Digits as Key1 or Key2 field is to be entered in to the ASG Key when you initialize the ASG Key Be sure to note this information carefully If you make an error entering the information for the ASG Key redo the procedur...

Страница 68: ...567 into your ASG Key per the instructions provided with the ASG Key If the Reply on your ASG Key matches the one on the screen you have successfully added this user 6 5 1 4 Encryption Key Source Fixed The Fixed selection allows you to enter either 14 hex or 20 octal numbers as your source The ASG Guard ASG Guard Plus prompts you for the required information Hex values include the digits 0 to 9 an...

Страница 69: ...Three options are available Regular Callback Passthru and Variable Callback Each option is discussed in subsequent paragraphs When the access option you desire appears on the screen press the ENTER key to make your selection 6 5 2 1 Access Option Regular Callback Regular Callback requires the user to have a specific phone number listed in the ASG Guard ASG Guard Plus user database in addition to t...

Страница 70: ...nd corresponding password After dialing in to the ASG Guard ASG Guard Plus and entering the correct user name and password the user enters a phone number for the ASG Guard ASG Guard Plus to call back The ASG Guard ASG Guard Plus disconnects and the user hangs up The ASG Guard ASG Guard Plus then calls the user back at the phone number provided Password Callback Details Enter Password Verify Passwo...

Страница 71: ... Plus After entering the password correctly the user is allowed access Connected to Site Ser 6400434 ASG Guard User Authentication Please Enter User ID TOM Pager Authentication Enter Password Screen 6 12 Pager Authentication Screen NOTE To maintain security be sure to protect ASG Key and Pager seed values and passwords This information is the key to security on the ASG Guard ASG Guard Plus ...

Страница 72: ...User name Access class Acc Class Whether user access is specifically blocked Blk Expiration date Exp Date Number of sessions allowed Ses Exp Primary authentication method Auth Mode s Secondary authentication method Auth Mode s You cannot change information by using the LU command To change information use the Change User CU command site123 LU List Users User Name Acc Class Blk Exp Date Ses Exp Aut...

Страница 73: ... Date If a date appears in this field the user will not be allowed access to the ASG Guard ASG Guard Plus after this date Ses Exp If a number appears in this field the user will not be allowed access to the ASG Guard ASG Guard Plus system after he or she has successfully accessed the system the number of times displayed This field is blank if the user s expiration date or number of sessions allowe...

Страница 74: ... appear after you enter a user name and press the ENTER key site123 XU Delete User User Name CHRIS Access Class Host One Block Access No Sessions Allowed blank unlimited User Expiration Date Primary Authentication Method ASG Key Secondary Authentication Method None Auto Execute Command Comments Acc 0 Fail 0 Last 0 Dur 00 00 Type More to Come Press ENTER Ctrl A to quit ASG Key Details Encryption Ke...

Страница 75: ...nformation screen for that user will be displayed The Acc field displays the number of times the user has accessed the system The Fail field displays the number of failed access attempts The Last field displays the date and time of the last successful access Dur and Type displays the length of time of the last session and the session type respectively For a description of the fields in the Display...

Страница 76: ...ethod you will need to enter required information for the selected method For complete information on each parameter refer to Section 6 5 Add User NOTE If you abort the Change User process the user profile will be deleted site123 CU TOM Change User User Name TOM Access Class Sysop 2 Block Access No Sessions Allowed blank unlimited User Expiration Date Primary Authentication Method ASG Key Secondar...

Страница 77: ...ser from accessing the ASG Guard ASG Guard Plus Sessions Allowed Enter a number from 1 to 999 and press the ENTER key to specify the number of successful sessions allowed for that user To allow unlimited sessions press the ENTER key only do not enter a number User Expiration Date Enter a date in month day year mm dd yy format and press the ENTER key after which the user will not be allowed to acce...

Страница 78: ...racters on each of the three Comments lines After you have entered comments in each Comments 1 field press the ENTER key Authentication Methods Each authentication method requires additional information to be entered into the system The prompts for this information appear when you press the ENTER key after the last Comments Line NOTE If you do not wish to change this parameter press the ENTER key ...

Страница 79: ...CK at the Guard prompt ASG SCK Set Customer Key New Customer Key Screen 6 18 Set Customer Key Screen The Guard requires a 16 hexadecimal entry that is ABCDEF0123456789 After entering the new Customer Key press the ENTER key to complete this process The Guard will confirm that the Customer Key has been changed This Customer Key must be replicated in all ASG Guards for successful distribution of Use...

Страница 80: ...ucent User BLU Command The Block Unblock Lucent User command is the only command that allows a Customer Master User to change a Lucent User This command will Block a Lucent User from gaining access to the ASG Guard This is a complete blockage from any access to the Guard To perform this command type BLU followed by the User I D Ser 98100221 blu Block Unblock Lucent User User Name Adam Block Access...

Страница 81: ...and type BLA at the ASG Guard prompt The Guard will prompt the user Block Lucent Administration Yes No Use the SPACE BAR to toggle between Yes and No The value Yes will remove administration rights of the Customer Users from Lucent The value No will give Lucent Master Users access to the AU CU and XU commands Ser 98100221 BLA Block Unblock Lucent Admin Block Lucent Administration Yes 12 07 1998 21...

Страница 82: ...Modifying the User Database 70 Page intentionally left blank ...

Страница 83: ...Guard ASG Guard Plus RAMdisk The file may be sent to the administration PC for later review or importation into another software package The ASG Guard ASG Guard Plus offers the option of automatic or manual data buffering from a host port If automatic buffering is enabled the system will switch buffer files according to preset parameters If automatic buffering is not enabled the administrator must...

Страница 84: ...em prompt and press the ENTER key Site123 F FILE MAINTENANCE FUNCTIONS CMaster Disk File Maintenance Functions SDP Set Disk Params DDP Display Disk Params DIR List Directory CD Change Directory MD Make Directory RD Remove Directory COPY Copy File MOVE Move File DEL Delete File REN Rename File COMP Compress file UCOMP Uncompress file SEND Send File VIEW View File RCV Receive File Buffer Functions O...

Страница 85: ...eted automatically after a preset number of days or when space available on RAMdisk reaches a critical level 3 The LOGFILES is a directory which contains files that are generated each day by the ASG Guard ASG Guard Plus to maintain a record of that day s activities These files are of two types Event files which list the alarms that were processed during one day and Log files which contain a copy o...

Страница 86: ... 2 p m 14 The A indicates that this is the first file collected in that hour Example 2 HG980709 08D In this example data is collected from host port 16 H on the 9th day of July 07 in 1998 96 at 8 a m 08 The D indicates that this is the fourth file collected in that hour When a buffer is closed the CURRENT x file is renamed using the convention described above and left in the appropriate host port ...

Страница 87: ...entage and the directories from which files are to be deleted you will have to monitor the disk and delete files when necessary The ASG Guard ASG Guard Plus has default values which may or may not fit your application Failure to raise the free space above the critical level causes a DISKCRIT event to be generated The event DISKCRIT can be included in your Action Table along with the specified acti...

Страница 88: ... Free Enter the percentage of disk space that must be free When this percentage is reached files will be deleted in the order specified by the entry for the Directories to Purge prompt Directory Purge sequence While Disk is Critical SENTFILES LOGFILES TEST 4 5 6 Enter the names of the directories that will be purged in sequence When disk space is critical files will be deleted from the first direc...

Страница 89: ...nabled for a particular port data is collected in a buffer file for a preset length of time or until the file reaches a specified size To enable automatic buffering enter the SH Set Host command NOTE To disable automatic buffering use the CLBUF close buffer command Site123 SH Set Host Port Params Hosts 1 HOST1 2 HOST2 3 HOST3 4 HOST4 Host Port Number 1 Restore Factory Defaults No Host 0 Host Name ...

Страница 90: ...ata Auto Switch enter 0 to disable When CURRENT File exceeds n KB Enter the file size in KB at which the buffer should be switched Note that the CURRENT x file is renamed using the convention described in this section Enter 0 to disable this feature Every n hours Enter the number of hours between the switching of buffers Synchronize at what hour 0 23 Indicate the hour at which the buffer should be...

Страница 91: ...ich the buffers will be switched if automatic buffering is enabled 7 6 3 Displaying the Status of a Buffer You can check the status of a buffer by using the BST command The ASG Guard ASG Guard Plus displays information including the date that the current buffer file was opened the size and the time at which the buffer will be switched and the list of closed buffer files that are ready to be transf...

Страница 92: ... parameters are enclosed within square brackets NOTE To send files using File Transfer Protocol FTP see Section 7 6 6 and Section 12 11 7 6 5 Using a Direct or Dial up Connection To send buffer files from a specified host port follow the steps listed below 1 Issue the SEBUF or SEND command SEND sends one file SEBUF sends all the closed buffer files in the selected host port directory one at a time...

Страница 93: ...Files to Another Device The ASG Guard ASG Guard Plus supports FTP Client Send commands Before you can send a file via FTP the following must have been done 1 A PPP link or Ethernet connection must be established 2 Parameters must be set in the Set Network Parameters screen After specifying the parameters you may issue the SEBUF or SEND command with the appropriate parameters 7 6 6 1 Specify the FT...

Страница 94: ...ce type Select the type of FTP service None or Client Only Press the SPACE BAR until the desired choice is displayed Server 1 Default IP address nnn nnn nnn nnn Enter the IP address of the server The files transmitted by FTP are sent to this address automatically unless otherwise specified by the user Consult your Network administrator for FTP system requirements User name Enter the name used to l...

Страница 95: ...ll the buffer files from the specified host port Notation used As in ASCII and XMODEM protocols the required parameters are enclosed within angle brackets optional parameters are enclosed within square brackets Command SEND or SEBUF Syntax SEND or SEBUF filename F server uses the IP address user name and password for the specified server 1or 2 These parameters have been stored in the FTP parameter...

Страница 96: ... A ASCII X XMODEM F FTP Examples 1 To receive via XMODEM a file named NEW CFG into the subdirectory HOST1 type the following at the command line RCV HOST1 NEW CFG X 2 To receive the file NEW CFG using ASCII protocol into the current directory of the ASG Guard ASG Guard Plus type the following at the command line RCV NEW CFG A 3 To receive the file NEW CFG using the FTP protocol into the current di...

Страница 97: ...and DEL H19809 10 will delete all buffer files received by HOST1 from 10AM to 10 59AM throughout the month of September 1998 In another case the command DEL H3981005 A will delete the first file received each hour by HOST3 on October 5 1998 See section 7 4 2 for Buffer Filenaming details To display all the File Maintenance functions type F at the system prompt Site123 F Disk File Maintenance Funct...

Страница 98: ...ed directory An error is displayed if the specified directory is not empty RD directoryname Example RD NEWDIR COPY Copies the specified file to a specified location The destination directory must exist before the file can be copied COPY source directory filename destination directory filename Examples COPY sentfiles H4961212 2A newdir H4961212 2A To copy a file from the current directory to a new ...

Страница 99: ...the current directory on the ASG Guard ASG Guard Plus using XMODEM ASCII or FTP transfer See Section 7 8 for more information REN Renames the specified file REN filename new filename Example REN H4961212 2A DAYONE The file H4961212 2A is renamed as DAYONE SEND Sends the specified file using either XMODEM ASCII or FTP transfer protocol VIEW Displays the contents of the specified file one page at a ...

Страница 100: ...ity that calculates an 8 character hexadecimal checksum of a file Syntax CSUM filename Example C CSUM UPDATE CFG Calculate the checksum of the file UPDATE CFG 75C2E91A 8 digit hex checksum is printed to screen C 7 11 2 ZPAD EXE When a file is transmitted with the XMODEM protocol up to 127 extra characters may be appended to it Therefore a checksum calculated on the file before it is transmitted wi...

Страница 101: ...atch is found the associated actions are automatically executed Actions taken can include paging delivery to an alarm catcher and canceling alarms If the requested action cannot be taken at that time or is scheduled for another time the event and requested action are listed in the Event Table The Event Table lists all pending actions When the action is processed it is removed from the Event Table ...

Страница 102: ...c can be listed in the Action Table along with a specified action 2 Alarms or events can be generated by the ASG Guard ASG Guard Plus by a host user or by a Sysop Events generated by the ASG Guard ASG Guard Plus are called internal events All internal events start with a period Internal events are listed in Chapter 14 3 Alarms generated by the Environmental Manager This enables the ASG Guard ASG G...

Страница 103: ... for a record describing a range of alarms that includes the alarm it received For example if it received an alarm ERR004 it might match this to ERR000 005 as it appears in the Action Table Such ranges can be entered into the Action Table to cover a multiple of alarm types 3 Finally if there is no match using the first two criteria it searches for a match to the mnemonic up to the first digit That...

Страница 104: ... your Action Table you should determine which alarm conditions to monitor and decide what action should be taken for each alarm condition A worksheet is provided to assist you in planning which alarm status messages should be monitored by the ASG Guard ASG Guard Plus and what actions should be taken by the ASG Guard ASG Guard Plus when they are received To help guide you we have also provided an e...

Страница 105: ...ed is assigned to the alarm INI000 One of the actions to be performed by DOLIST is CANCEL which has been given the parameter SYS000 When a successful system reload occurs the ASG Guard ASG Guard Plus will CANCEL the alert to the maintenance center ASG Guard ASG Guard Plus will however create a log entry stating that the INI000 event occurred 3 Test the Action Routine Use the GE command to generate...

Страница 106: ...Action and Event Tables 94 ACTION TABLE WORKSHEET Alarm Message or Internal Event Action Routine Routine Parameters ...

Страница 107: ...Event Functions LE List Alarms Events GE Generate Alarm Event XE Delete Alarm Event Other Menus S System U User L Log F File P Port Session Screen 8 2 Action Item Functions Screen By entering the command mnemonic at the system prompt and pressing the ENTER key the information screen for that command is displayed 8 6 1 Adding an item to the Action Table AA Command The Add Action Item command is use...

Страница 108: ...ON No action is taken PAGE Calls a numeric pager and delivers a message PHIRIS Places a call to IRISSM and reports the event PHONHOME Places a call to the maintenance reporting center PHPPP Initiates a demand dial PPP link PHSYSOP Places a call to the maintenance center and initiates a Sysop session with Admin Catcher REMINIT Performs the remote initialization function RESRELAY Sets the specified ...

Страница 109: ...e ENTER key to display the List Action Items screen To display only part of the Action Table enter a modifier for example LA BSD will display all alarms starting with the letters BSD To display the complete list enter LA with no modifiers LA List Action Items Alarm Routine Parameters Comments 1 NOTIFY A PHONHOME 2 NOTIFY B MGR2000 2 3 NOTIFY C PAGE 4 7 DAILY DOLIST 8 DAILY 1 CLKCHECK 9 DAILY 2 SET...

Страница 110: ... change is not displayed then press the ENTER key to see more action items You are prompted to enter the number corresponding to the action item you wish to change After you type in a number and press the ENTER key the system will display that Action Routine and it s associated parameters The Action Table is updated immediately as changes are made to it 8 6 4 Schedule Action Item SAI Command The S...

Страница 111: ...t If you are simulating a particular Event for testing type the event here as it would have been received to trigger this action For example if you test PHONHOME this field could be used to signify it is a test The system defaults to Sysop Generated Comment Type any comments that you want attached to the Event 8 6 5 Delete Action Item XA Command The Delete Action Item command allows you to remove ...

Страница 112: ...d SITE123 LA List Action Items Alarm Routine Parameters Comments 1 DTA005 SCHEDULE AM PHONHOME DTI YELLOW ALARM 2 DTA007 CANCEL DTA005 YELLOW ALARM CLEARED End of List SITE123 Screen 8 6 Delete Action Item Screen When XA is entered without modifiers the complete list is displayed To specify a search string enter the XA command followed by a space and then one or more characters For example if you ...

Страница 113: ...red with no modifiers A search string can be specified by adding one or more characters after the LE command separated by a space For example if you only want to display HOURLY events type LE H and then press the ENTER key LE List Alarms Events Current Date 010 10 93 Time 09 11 29 1 HOURLY 10 10 93 08 00 01 PHONHOME ASAP 2 HOURLY 10 10 93 09 00 02 PAGE ASAP End of List site123 Screen 8 7 List Alar...

Страница 114: ... Generate Alarm Event Screen Alternatively type GE and then enter the alarm event to be generated at the prompt Note that Enter alarm event limits the number of characters If you want to generate a long event use the method described above Ser 98100221 GE AUTHFAIL Generate Alarm Event Enter alarm event AUTHFAIL 02 26 99 10 23 56 9573 AUX Event AUTHFAIL 02 26 99 10 23 57 8AE4 AUX AUTHFAIL alarm eve...

Страница 115: ...9990010004 Select ENTER for more for all Ctrl A to quit Screen 8 10 Delete Alarm Event Screen The Event Table is updated immediately as changes are made to it To delete an entry in the table enter the number corresponding to that entry at the Select prompt then press the ENTER key NOTE The entire Event Table may be cleared by typing an asterisk instead of a number The system then displays the line...

Страница 116: ...be sent C CLOSED Event indicating that the contact closure input has been changed from open to closed for example C3CLOSED C OPEN Event indicating that the contact closure input has been changed from closed to open for example C3OPEN CLKCHANGE Event indicating that the internal clock of the ASG Guard ASG Guard Plus has changed DISKCRIT Event occurs when the RAMdrive reaches the critical level assi...

Страница 117: ...lowing a period of inactivity POWERUP Event occurs when the system is powered up PPPREQ Event to trigger the dial on demand PPP link POWERLOW Event indicating that the external power supply has changed from OK to low POWEROK Event indicating that the external power supply has changed from low to OK RTSHIGH n Event indicating that the RS 232 signal RTS has changed from Low to High indicates host po...

Страница 118: ...Action and Event Tables 106 Event Description TEMPOK Event occurs when temperature changes from a high or low condition to an OK condition WEEKLY Event occurs once a week each Sunday at midnight ...

Страница 119: ...tes a log entry that describes the event LOGCHECK Checks to see if the Log buffer has reached a specified threshold If Log has exceeded the threshold a LOGFULL event is generated NOACTION Creates Event Log entry PAGE Calls a pager number and delivers a message PHIRIS Delivers an alarm message to IRISSM PHONHOME Places a call to the maintenance reporting center PHPPP Initiates a demand dial PPP lin...

Страница 120: ...Action and Event Tables 108 Page intentionally left blank ...

Страница 121: ...formation For example the start of the overnight period is set by these parameters 9 3 Systems Functions Menu Type S at the system prompt and press the ENTER key to display the System Functions Menu SYSTEM FUNCTIONS CMaster System Parameters Functions DSP Display System Parameters SSP Set System Parameters SHP Set Host Proc Flag SDT Set Date and Time Environmental Control Functions SSA Set Sensor ...

Страница 122: ... flag and the date and time of the ASG Guard ASG Guard Plus Environmental Control Functions The commands in this function group enable you to set and display sensor and contact inputs and alarms Descriptions of Environmental Manager functions are included in Chapter 10 Environmental Manager Device Management Functions The commands in this function group enable you to upgrade the ASG Guard ASG Guar...

Страница 123: ...ms Select Group 1 Screen 9 2 Set System Parameters Screen 9 4 1 1 Site information Type 1 to set Site Information Site information includes site name ASG Guard ASG Guard Plus phone number and the host password When the ASG Guard ASG Guard Plus pages or phones in response to a particular alarm or event it sends its site name and unit phone number along with the error message and other information t...

Страница 124: ...d prompt is displayed Unit Phone Number Enter the phone number of the ASG Guard ASG Guard Plus This number is sent by the PHONHOME Action Routine Host Password for login routine Enter the password for the host system for automatic login The password may have a maximum of 16 alphanumeric characters Number of Expansion Ports Reassigned to Modems ASG Guard Plus only The last four host ports on a host...

Страница 125: ...e that the overnight period starts This defines the end of the working day All alarms non critical assigned to Action Routines scheduled for AM execution collected after the specified time and before the Time for AM Report will be scheduled for delivery at the beginning of the A M period Time for AM Report Enter the time at which the alarms scheduled for AM execution will be sent This defines the ...

Страница 126: ...ne will use Home Phone Number 1 To use Home Phone Number 2 specify 2 in the parameter field Delay Before Transmit sec The length of time in seconds that the modem will wait before transmitting data after a connection has been established This is useful in MNP connections Report Multiple Alarms Initially No appears on the screen Press the SPACE BAR to toggle to Yes Select Yes to have all scheduled ...

Страница 127: ... prompt The following screen appears Site123 DSP Display System Parameters Site Information Site Name USN Unit Ser Number Site123 Unit Phone Number Host Password for login routine 0000 Use Log Message Authentication Codes Yes Number of Expansion Ports Reassigned to Modems 0 Scheduling Parameters Start of Overnight Period Time for AM Report Max Retries Minutes Between Retries After Retries Expired ...

Страница 128: ...rectly to the Site Information parameters The screen example is shown in Section 9 4 1 9 4 3 Set Host Processor Flag SHP Command The set host processing command allows the user four options for processing information relative to action routines Typing SHP at the system prompt displays these options Site123 SHP Set Host Proc Flag Choices Are 1 All Action Routines Enabled 2 Modem Host Action Routine...

Страница 129: ...format As an example if an action item is scheduled to occur in the default format on 07 09 98 and the user changes the format to a four digit year the Action Item date will contain a four digit year The ten options available in the ASG Guard ASG Guard Plus are MM DD YY MM DD YYYY YYYY MM DD YY MM DD DD MM YYYY MM DD YY MM DD YYYY YYYY MM DD YY MM DD DD MM YYYY Scroll through the options with the ...

Страница 130: ...18 System Date Time 12 02 1998 10 10 53 Screen 9 11 Version Information Screen If a host port expansion board is installed it will be listed in the VER command response The VER command result consists of the following components ASG Guard Version Current version of software and firmware loaded in the ASG Guard The r signifies the Real World Interface capable of using contact closures and temperatu...

Страница 131: ...ory of the ASG Guard ASG Guard RAM disk The file is then copied to the non volatile appropriate memory area of the ASG Guard ASG Guard Plus Upgrade ASG Guard Software 1 Secure ASG Guard 2 CCL Interpreter 3 Flash Memory Select Area to Upgrade 1 Screen 9 12 Upgrade ASG Guard Software Screen 9 5 3 Restart the ASG Guard ASG Guard Plus BOOT Command The ASG Guard ASG Guard Plus can be soft booted from a...

Страница 132: ...ither view or save the Customer User Table in a file on an administrative personal computer Appendix C provides the procedures for using the CDUMP command 9 5 7 Put Customer User Table on RAM Disk File CDUMPF Command The CDUMPF command allows the user to save the Customer User Table in a file on the ASG Guard ASG Guard Plus RAM disk Appendix C provides the procedures for using the CDUMPF command 9...

Страница 133: ... Manager Options for the ASG Guard ASG Guard Plus product line Along with the differences listed here there is also a difference in the interface cable between the ASG Guard Plus and ASG Guard The ASG Guard Plus uses an Amphenol connector to access all environmental functions The ASG Guard uses standard RJ45 connections for the 2 temperature probes and the 0 5 volt analog input The solid state rel...

Страница 134: ...ile P Port Session Screen 10 1 System Functions Screen 10 4 1 Set Sensor Alarms SSA Command The Set Sensor Alarms is used to set the alarming values used with the sensor inputs to determine what are valid alarm conditions on the sensor See Section 10 7 for details of the SSA command For example Temperature alarm is set to trip if the temperature falls below 65 degrees or above 85 degrees 10 4 2 Di...

Страница 135: ...ter issuing the SRLY command they quickly close and then immediately re open ASGGUARD1 srly Set Relays Enter relay number 1 2 1 02 08 99 16 54 06 2683 AUX Relay 1 SET Screen 10 2 Set Relays Screen 10 4 6 Reset Relays RRLY Command The command for re setting relays RRLY applies to the ASG Guard The ASG Guard has two solid state relays one latching selection 1 relay and one non latching selection 2 r...

Страница 136: ...be to the sensor input 5 V and ground To do this connect the temperature sensor to pins 7 8 and 2 respectively of the Environmental Manager interface on the ASG Guard Plus rear panel Enable alarms and define the upper and lower threshold limits When a monitored input is outside the limits the ASG Guard Plus issues an alarm Type SSA to set threshold limits For more information see Section 10 5 2 De...

Страница 137: ...0 SLT WH GROUND 6 RE BLUE PLUS 6 V 31 BLUE RE GROUND 7 RE ORN TEMPERATURE SENSOR 32 ORN RE GROUND 8 RE GRN PLUS 5 V 33 GRN RE GROUND 9 RE BRN PBX BATTERY 34 BRN RE PBX BATTERY 10 RE SLT PLUS 5V 35 SLT RE GROUND 11 BLK BLUE NOT USED 36 BLUE BLK NOT USED 12 BLK ORN NOT USED 37 ORN BLK NOT USED 13 RE GRN CONTACT CLOSURE 1 38 GRN RE CONTACT CLOSURE 1 14 RE BRN CONTACT CLOSURE 2 39 BRN RE CONTACT CLOSU...

Страница 138: ... Red OR Orange BK Black GR Green YL Yellow BN Brown VI Violet SL Slate i e gray 10 5 2 The Environmental Interface of the ASG Guard The interface to the Environmental Manager of the ASG Guard is an industry standard 5 08 mm Euroblock connectors for relays or RJ45 connectors temperature 0 5V GP located on the back panel One 6 pin Euro block connector is used for the relay outputs a 10 pin Euroblock...

Страница 139: ...oblock Contact Closures PIN NUMBER Function 1 CONTACT CLOSURE 1 2 GROUND 3 CONTACT CLOSURE 2 4 GROUND 5 CONTACT CLOSURE 3 6 GROUND 7 CONTACT CLOSURE 4 8 GROUND 9 CONTACT CLOSURE 5 10 GROUND Table 10 3 Pin out of the ASG Guard 6 Pin Euroblock Relay Outputs PIN NUMBER Function 1 NC1 2 3 COM1 NO1 4 NC2 5 6 COM2 NO2 ...

Страница 140: ...puts S1 Alarms Enabled No Normal Range n nn n nn V 1 4 S2 Alarms Enabled No Normal Range n nn n nn V 1 4 S3 Alarms Enabled No Normal Range n nn n nn V 1 4 07 09 98 15 15 35 AUX Set Sensor Alarms O K Site123 Screen 10 4 Set Sensor Alarms Screen for ASG Guard Plus For the ASG Guard the screen will look similar to JR 1 SSA Set Sensor Alarms Restore Factory Defaults No Internal Battery Alarms Enabled ...

Страница 141: ...screen Press the SPACE BAR to toggle to Yes Select Yes to enable the alarm Normal Range nn n nn n Enter the upper and lower limits of the normal voltage range An alarm will be issued when the voltage falls outside this range General Purpose 0 5 Volt maximum Sensor Inputs For each general purpose sensor input S1 Alarm Enabled Initially No appears on the screen Press the SPACE BAR to toggle to Yes S...

Страница 142: ... the voltage level falls outside the high and low thresholds defined by the user The voltage range that this input sensor can monitor is from 1 to 100 Volts DC The ASG Guard is 20 60VDC 10 8 2 Temperature The temperature sensor input to the ASG Guard Plus is via an external sensor The sensor is housed in a standard RJ45 connector to facilitate remote measurement The sensor may be located up to 200...

Страница 143: ...ddition to the sensor reading OK HI LO markings show the present recording in relationship to the alarm range Site123 DSI Display Sensor Inputs Press Any Key to Quit Temp 48V Primary Int Int Bat Gen Purpose 0 5V Deg F Input Power Battery Charge S1 S2 S3 LO 0 LO 0 0V ok 17 3V ok 13 8V LO 0ma LO 0 00V LO 0 00V LO 0 00V Screen 10 6 Display Sensor Inputs Screen Note that both the ASG Guard Plus and AS...

Страница 144: ... The ASG Guard Plus updates the display of the status of each closure every 0 5 seconds Site123 DCC Display Contact Inputs Press Any Key to Quit Contact Closures 1 2 3 4 5 6 7 8 open open open open open open open open Screen 10 8 Display Contact Inputs Screen for ASG Guard Plus For the ASG Guard the display has only 5 contact closures JR 1 DCC Display Contact Inputs Press Any Key to Quit Contact C...

Страница 145: ... or from whichever telephone number the user is dialing in from variable callback There is also an encrypted code that can be assigned to the user which requires the use of an ASG Key Once access is gained the user can establish or join an existing session on one of the ASG Guard ASG Guard Plus ports or the user can view a session dialog for an existing session on one of the ASG Guard ASG Guard Pl...

Страница 146: ...thod Authentication methods available include password callback ASG Key and Pager ASG Key requires a handheld token that is the ASG Key The method of authentication is set when the user is added to the ASG Guard ASG Guard Plus user database 11 4 1 Password Callback The Password Callback authentication method allows for three different types of user authentication Passthru Regular Callback Variable...

Страница 147: ... user authentication method should be used only during the evaluation period to allow ease of use in a non secure environment We discourage this use in a live environment Passthru requires only that the user enter the correct ID and password to access the host or PBX through the ASG Guard ASG Guard Plus 11 4 2 Regular Callback To dial in to the ASG Guard ASG Guard Plus using the Password Callback ...

Страница 148: ...r password incorrectly the ASG Guard ASG Guard Plus will give you a second chance to enter the correct password Retype your password at the system prompt and then press the ENTER key You are permitted three attempts at entering your User ID and three attempts at entering your password If the third response is incorrect the connection is dropped If you know you should have access and that you enter...

Страница 149: ...prompt type the number the ASG Guard ASG Guard Plus is to use to call you back and then press the ENTER key The ASG Guard ASG Guard Plus then disconnects The ASG Guard ASG Guard Plus will now call you back at the number you gave it Make certain that your modem is in auto answer mode or that you are prepared to answer the call using modem commands 4 After handshaking has been completed the ASG Guar...

Страница 150: ...us using the ASG Key authentication method follow the procedure outlined below NOTE If your ASG Key has not been initialized see Appendix A for initialization instructions 1 From your terminal or terminal emulator type the proper modem commands followed by the ASG Guard ASG Guard Plus telephone number and then press the ENTER key The ASG Guard ASG Guard Plus responds by requesting that you enter y...

Страница 151: ...ct the ASG Guard ASG Guard Plus will signify that the authentication has been successfully completed and you will either be connected to the ASG Guard ASG Guard Plus or to the host depending on your Access Class If you are connected to the ASG Guard ASG Guard Plus Sysop session you can perform all of the operations to which your Access Class entitles you If you are connected to the host port Host ...

Страница 152: ...G Guard Plus will determine that you are using the Pager method of access 2 At the ASG Guard ASG Guard Plus system prompt type your user ID and then press the ENTER key With a dual modem setup the ASG Guard ASG Guard Plus will dial out to the pager service on the second modem It will deliver a unique 7 digit password to your pager preceded by 999 to distinguish it from a phone number For example 9...

Страница 153: ...nteractively join in a host session with a Lucent host device This access can be either from a remote terminal through a PPP link an Ethernet connection a modem port or from a local terminal connected to an AUX port Up to three users can communicate simultaneously through a join Lucent session to a specific host After you type JSL you will be prompted for the number of the host port At the prompt ...

Страница 154: ...Port 11 5 5 Connect to Host CON Command The Connect to Host command CON allows a sysop or CMaster level user to access a host connected to an ASG Guard ASG Guard Plus Host Port or a modem port internal or external The access can be either from a remote terminal via a modem port from a remote terminal through a PPP link or Ethernet connection or from a local terminal connected to the AUX Port Type ...

Страница 155: ...or checking the status and resetting ports 11 6 1 Port Status PST Command The PST command displays the Port ID and Admin Port Status Type PST at the system prompt and press the ENTER key The status of each network device is listed individually Ser 98100221 PST Port Status Port ID Admin Port Status AUX Sysop User Name AUX_Default Modem 1 Idle Modem 2 Not Available Telnet 1 Host1 User Name MARK Teln...

Страница 156: ...set Port RES Command The RES command is used to reset any of the ports real AUX modem host or virtual Telnet and the Host Action Routine There are special custom routines that interrogate a host device By default the ASG Guard ASG Guard Plus has no Host Action Routines Type RES at the system prompt and press the ENTER key A list of formats will scroll on screen and the system prompt will return Si...

Страница 157: ...User Connectivity 145 The screen will look similar to Site123 RES H7 Reset Port 01 04 96 05 40 27 1223 AUX Reset Port H7 O K 01 04 96 05 40 29 78D0 H Host 7 Idle Site123 Screen 11 11 Reset Port Screen ...

Страница 158: ...User Connectivity 146 Page intentionally left blank ...

Страница 159: ... devices on the network To establish a PPP link or to initiate a Telnet session you must have the appropriate commercial software package installed and setup on the remote PC Connection to a TCP IP network provides for the following services Ping Telnet communication Network access to the ASG Guard ASG Guard Plus for unit administration Network access to the devices connected to the host ports Net...

Страница 160: ...nous RS 232 communication via contact closures or other non network mechanisms The ASG Guard ASG Guard Plus will respond to any of a multitude of alarms such as an error condition on a PBX by performing an appropriate user defined action A typical action might be connecting to a remote computer over a modem link and sending error information from the PBX to that computer SNMP the Simple Network Ma...

Страница 161: ...uard ASG Guard Plus where the information is located Table 12 1 Basic Setup of a MIB Object Identifier Object Data Object Source 1 3 6 4 1 1476 1 1 1 trapId Alarm Severity Placed in the Action Table Parameter Field The value can be from 1 to 10 1 3 6 4 1 1476 1 1 2 trapSiteDesc Site name in System Parameter 1 3 6 4 1 1476 1 1 3 trapSource SNMP Agent 1 3 6 4 1 1476 1 1 4 trapDesc Alarm or error cod...

Страница 162: ...p ID and depends on the trap format 12 4 3 2 SNMP Traps Via PPP To denote that an SNMP trap is to be delivered via a PPP link set the appropriate field in the SNP command When an SNMP trap is to be delivered via a dial up PPP link the ASG Guard ASG Guard Plus generates a PPPREQ event In the Action Table include entries similar to the following Alarm Action Routine Parameter Comments ERR001 SNMPTRA...

Страница 163: ...gment to which the ASG Guard ASG Guard Plus will be connected IP address of the default gateway to be used by the ASG Guard ASG Guard Plus The ASG Guard ASG Guard Plus allows a user to establish a PPP connection to one of its modems This connection allows a Telnet session to either the ASG Guard ASG Guard Plus or another device on the network attached to the ASG Guard ASG Guard Plus In the latter ...

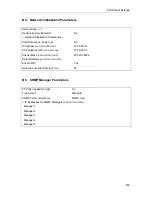
Страница 164: ...ess nnn nnn nnn nnn 192 9 200 2 PPP Address nnn nnn nnn nnn 192 9 200 3 Subnet Mask nnn nnn nnn nnn 255 255 255 0 Default Gateway nnn nnn nnn nnn Enable RIP Yes Network Loss Alarm Delay Time 60 To start the network type STARTNET 07 09 98 15 55 36 A Set Network Params O K Screen 12 1 Set Network Params Screen Field Function Restore Factory Defaults Initially No appears on the screen Press the SPACE...

Страница 165: ...presents its network number and which part represents its node number Obtain an appropriate value from your network administrator Default Gateway nnn nnn nnn nnn The default gateway is the IP address of the router or other equipment on the local network segment that is used to direct traffic to and from the segment Obtain an appropriate value from your network administrator Enable RIP Initially Ye...

Страница 166: ...to reload the values set at the factory Use the SPACE BAR to toggle between Yes and No SNMP Manager Parameters PPP link needed for trap If the ASG Guard ASG Guard Plus is not connected to the same network as its SNMP Manager it can reach the manager over a modem link by using the Point to Point Protocol PPP Initially No appears on the screen Press the SPACE BAR to toggle to Yes Set this option to ...

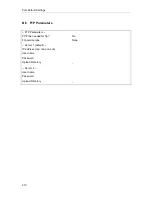
Страница 167: ...123 snp 3 FTP Parameters Restore Factory Defaults No PPP link needed for ftp No Ftp service type Client only Server 1 default IP address nnn nnn nnn nnn User name Password Upload Directory Server 2 IP address nnn nnn nnn nnn User name Password Upload Directory Screen 12 3 FTP Parameters Screen NOTE In setting the user name and password remember that they are case sensitive Field Function Restore F...

Страница 168: ...itive Password Enter the password for the user named above This entry is case sensitive Upload directory Enter the name of the directory that should receive the file Server 2 IP address nnn nnn nnn nnn User name Enter the IP address of the server The files transmitted by FTP are sent to this address automatically when server 2 is specified Enter the name used to logon onto the server This entry is...

Страница 169: ...net Mask nnn nnn nnn nnn 255 255 255 0 Default Gateway nnn nnn nnn nnn Enable RIP Yes Network Loss Alarm Delay Time 60 Ethernet Address hhhhhhhhhhhh 00 E0 89 00 00 00 SNMP Manager Parameters PPP link needed for trap No Trap format Standard SNMP Community Name SNMP_trap IP Addresses for SNMP Managers nnn nnn nnn nnn Manager 1 Manager 2 Manager 3 Manager 4 Manager 5 FTP Parameters PPP link needed fo...

Страница 170: ... will appear Display Network Status The network has not been started If the network has been started on the ASG Guard ASG Guard Plus but no activity is seen the following messages will appear Display Network Status The network has been down since this ASG Guard Plus was started If the network was up and then went down while the ASG Guard ASG Guard Plus was on the network the amount of time the net...

Страница 171: ...ING command is issued to query another device IP address on a network Syntax PING Ipaddr Where Ipaddr is the IP address of the device If successful the reply shows the length of time it took to reach the device If the ping is unsuccessful the message is Device not Reachable 12 10 Telnet Port Parameters 12 10 1 Setting Telnet Port Parameters ST Command If you plan to Telnet to the ASG Guard ASG Gua...

Страница 172: ...he SPACE BAR until the desired choice is displayed Host Session Idle Timer Select the length of idle time no commands are received after which the Sysop session is disconnected Press the SPACE BAR until the desired choice is displayed Host Session Disconnect on Ctrl A Initially No appears on the screen Press the SPACE BAR to toggle to Yes Select Yes to disconnect from the host when the key sequenc...

Страница 173: ...ystem prompt and press the ENTER key Telnet parameter fields will be displayed Site123 DT Display Telnet Port Params Restore Factory Defaults No Terminal Emulation TTY Sysop Idle Timer None Host Session Idle Timer None Host Session Disconnect on Ctrl A Yes Site123 Screen 12 7 Display Telnet Port Params The parameter values apply to all Telnet sessions ...

Страница 174: ... send out broadcast packets to initiate a PPP link If a passive link has been established broadcast packets will NOT be sent out Instead the port will remain in PPP mode until it receives a broadcast packet to initiate the PPP session Enter A for active link P for passive link hostport ID Specifies to the ASG Guard ASG Guard Plus which port is to become the dedicated PPP host port Valid port ID s ...

Страница 175: ...e ASG Guard ASG Guard Plus will broadcast every 30 seconds to the network that this connection exists Routers in the network then know packets destined for the remote site should be sent to the ASG Guard ASG Guard Plus The default gateway for the remote site NOTE If you are using protocols such as Telnet or FTP for devices other than the ASG Guard ASG Guard Plus they must also support RIP When all...

Страница 176: ...ard Plus s IP address and press the OK button The PC is ready to start a PPP connection to the ASG Guard ASG Guard Plus 12 11 2 4 Establishing a PPP Connection 1 From the Dial up Networking group open the Profile entered for the dial up PPP connection to the ASG Guard ASG Guard Plus The User Name and Password Fields are NOT used by the ASG Guard ASG Guard Plus for authentication Consequently the f...

Страница 177: ...Plus for its 10baseT connection The ASG Guard ASG Guard Plus will act as the default gateway for the PPP connection RIP Enabled This should be set to Yes Router Information Protocol RIP allows routers on the network to know how to send packets to destination IP addresses For example if you dial into the ASG Guard ASG Guard Plus from a remote site and establish a PPP connection with RIP enabled the...

Страница 178: ... on the network When using the ASG Guard ASG Guard Plus as a security server make sure that RIP is enabled in the ASG Guard ASG Guard Plus and that both the ASG Guard ASG Guard Plus and the device being accessed are using the same default Gateway To establish this telnet link 1 Establish a dial up connection see Section 12 11 2 2 to the ASG Guard ASG Guard Plus 2 When authentication is completed t...

Страница 179: ...uard ASG Guard Plus Users with Sysop 1 Sysop 2 or CMaster level access can view the log Error Log Contains a history of CCL system errors or exceptions that have occurred Users with Sysop 1 Sysop 2 or CMaster level access can view this log Failure History Contains a list of failed access attempts and the reasons for the failure Users with Sysop 1 Sysop 2 or CMaster level access can view this log L...

Страница 180: ... part of the log history NOTE Be sure to type a space between the command and option in the command line Use a comma to separate options Command Function AH The Access History log is displayed in chronological order from the oldest at the beginning to the most recent record at the end AH The Access History log is displayed in chronological order from the most recent record at the beginning to the ...

Страница 181: ...tes at which the event occurred User ID The User ID of the person who accessed the ASG Guard ASG Guard Plus Duration The total number of minutes seconds the user accessed the ASG Guard ASG Guard Plus Session Type The Session Type lists the Port used to access the ASG Guard ASG Guard Plus and the Access Class of that user Port types are Aux Host and Modem Access Class types are CMaster Sysop2 Sysop...

Страница 182: ...ess History Screen 13 3 2 Log History LH Command Type LH to display the log history and press the ENTER key The LH command lists the oldest record first The Log History file contains a list of activity of the ASG Guard ASG Guard Plus These activities are events that take place within the Guard such as alarms changes to the configuration and User Access The purpose of this log is to assist an admin...

Страница 183: ...y 12 07 1998 15 32 58 8F3C AUX File LOGFILES LH2 TXT Receive Complete 12 07 1998 15 39 52 E892 AUX File LOGFILES LH TXT Receive Complete 12 07 1998 16 01 58 700C AUX User AUX_Default Disconnected 12 07 1998 16 02 18 C6B7 AUX User HENRY Auth Failed Password Invalid 12 07 1998 16 02 24 D757 AUX User AUX_Default Connected to Sysop 12 07 1998 16 02 38 F4E3 AUX User HENRY deleted 12 07 1998 16 03 24 02...

Страница 184: ...ter a value for n and only n lines of the Failure History are displayed starting with the most recent record FH all Lists the entire Failure History without page breaks starting with the oldest record FH all Lists the entire Failure History without page breaks starting with the most recent record FH matchstring Enter a character string for the Port ID or User ID The log entries containing the spec...

Страница 185: ...11 9C09 TOM TELNET User Disconnected 11 25 1998 15 07 4BCC GREGG TELNET Password Invalid 11 25 1998 15 09 EA01 TELNET User Disconnected 11 25 1998 15 09 A523 TELNET User Disconnected 11 25 1998 15 18 27DF TELNET User Disconnected 11 25 1998 15 20 21FD TELNET User Disconnected 11 25 1998 16 21 9A0C TELNET Time Out 12 01 1998 13 07 E16E HENRY TELNET Password Invalid 12 01 1998 13 08 F3F4 HENRY TELNE...

Страница 186: ...th oldest entry DER n Enter a value for n and only n lines of the Display Error Log are displayed starting with the most recent record DER all Lists the entire Display Error Log without page breaks starting with the oldest record DER all Lists the entire Display Error Log without page breaks starting with the most recent record Site123 DER Display Error Log 09 17 98 14 18 23 RESTART 00 P2 20094E53...

Страница 187: ...y press the ENTER key If you want to clear the log history press the SPACE BAR to toggle the field to Yes and then press the ENTER key The system will confirm that the log history has been cleared 13 3 6 Clear Error Log CER Command The Clear Error Log command clears all entries in the CCL Error Log Type CER at the system prompt and press the ENTER key to display the Clear Error Log screen to be di...

Страница 188: ...Log Functions 176 Page intentionally left blank ...

Страница 189: ...ed with that event in the Action Table A set of Action Routines is included with the ASG Guard ASG Guard Plus A description and an example of each Action Routine are included in this chapter Note that customized Action Routines may be written in CCL the communications control language for the ASG Guard ASG Guard Plus 14 3 Internal Events This section describes internal events that can be generated...

Страница 190: ...the Set Sensor Alarms SSA command see Section 10 7 Alarm Event Action Routine Parameters Comments BAT48HIGH SCHEDULE 15 PHONHOME This example activates a call to the maintenance reporting center 15 minutes after the BAT46HIGH condition occurs 14 3 3 BAT48LOW Internal Event The BAT48LOW event occurs when the battery being monitored crosses over from an OK threshold to a low voltage threshold These ...

Страница 191: ...48LOW alarms when BAT48OK event is received 14 3 5 BUFREADY Internal Event This alarm is sent when a buffer file is closed and is ready to be sent Alarm Event Action Routine Parameters Comments BUFREADY PAGE 5551212 1234 File ready 14 3 6 C CLOSED Internal Event This alarm is sent when the contact closure number on the main board has been closed Alarm Event Action Routine Parameters Comments C2CLO...

Страница 192: ...umber to call the maintenance reporting center 14 3 9 CLKCHANGE Internal Event The CLKCHANGE alarm is generated when the internal clock of the ASG Guard ASG Guard Plus has been changed This alarm could be the result of changing the clock for Daylight Saving Time using the Set Date and Time SDT command see Section 10 4 1 Alarm Event Action Routine Parameters Comments CLKCHANGE SNMPTRAP 1 Clock Rese...

Страница 193: ...ST DISKFULL 1 PHONHOME DISKFULL 2 SCHEDULE 30 PAGE In this example the DISKFULL alarm results in a call to the phone number set in the System Parameters SSP menu see Section 9 4 2 If the alarm is not canceled with 30 minutes a page is sent to the default pager number 14 3 13 DTRHIGH DTRLOW DTRHIGH n and DTRLOW n Internal Events The DTRLOW event occurs automatically on the high to low transition of...

Страница 194: ...ameters Comments HOURLY LOGCHECK This example checks if the log buffer is approaching its limit If that is the case the internal event LOGFULL is generated 14 3 15 INTBATLOW Internal Event The status of the internal battery has changed from OK to low Alarm Event Action Routine Parameters Comments INTBATLOW PHONHOME In this example the PHONHOME Action Routine is initiated when the internal battery ...

Страница 195: ...ory CLH command see Section 13 3 14 3 18 MAXRETRY Internal Event This event is generated by PHONHOME PHIRIS PHSYSOP or PAGE It will occur after the value entered for the Max Retries system parameter is surpassed Example Alarm Event Action Routine Parameters Comments MAXRETRY PHONHOME 2 This example initiates a PHONHOME to Home Phone Number 2 as defined in the System Parameter table when the maximu...

Страница 196: ...after a preset length of time during which no network activity is detected When network activity is detected the NETUP alarm is issued The determination of network up and down is based on detected traffic on the Ethernet The time interval for non activity ranges from 1 to 255 seconds and can be selected by the user To do this enter the SNP command and select option 1 see Section 12 3 At the Networ...

Страница 197: ...lation recovery from a power loss or that the unit was moved to a new location Example Alarm Event Action Routine Parameters Comments POWERUP PHONHOME This example causes the ASG Guard ASG Guard Plus to report to the maintenance center that the unit has been reset If desired someone can then investigate the reason for the POWERUP event 14 3 26 PPPREQ Internal Event This event is triggered when a P...

Страница 198: ...is lost on any port Alarm Event Action Routine Parameters Comments RTSLOW 2 PHONHOME This example initiates a PHONHOME if the Ready to Transmit signal RTS is lost only on host port 2 14 3 28 S HIGH S LOW or S OK Internal Event The S HIGH event is generated when the 5V sensor has changed from OK to high based on the parameters set with SSA command see Section 10 7 The S1LOW event is generated when ...

Страница 199: ...MPLOW Internal Events The TEMPLOW event occurs when the temperature being monitored crosses over from an OK threshold to a low temperature threshold These thresholds are set using the Set Sensor Alarms SSA command see Section 10 7 Example Alarm Event Action Routine Parameters Comments TEMPLOW PHONHOME This example activates a call to the maintenance reporting center when the TEMPLOW condition occu...

Страница 200: ... 32 WEEKLY Internal Event This event occurs automatically every week on Sunday evening at midnight Examples Alarm Event Action Routine Parameters Comments WEEKLY DOLIST WEEKLY 2 SCHEDULE 1 08 00 PHONHOME WEEKLY 3 SCHEDULE 5 08 00 PHONHOME This example schedules a check in with the maintenance center on Monday and Friday of each week at 8 00 AM ...

Страница 201: ...Routine This Action Routine cancels a scheduled action corresponding to a particular event containing particular parameters When multiple pending events can be canceled the one first into the queue is canceled Format CANCEL Resource Required None Parameters ASSOCIATED EVENT 1st Match Parameter 2nd Match Parameter Nth Match parameter Associated Event Event mnemonic of the event to be canceled Param...

Страница 202: ...ne advances the ASG Guard ASG Guard Plus time by one hour The CLKBACK Action Routine sets the ASG Guard ASG Guard Plus time back by one hour NOTE The CLKAHEAD and CLKBACK routines also generate the internal event CLKCHANGE These routines are generally executed as a result of CLKCHECK and are not called directly 14 4 4 CLKCHECK Action Routine The CLKCHECK Action Routine checks to see if the current...

Страница 203: ... Comments WEEKLY DOLIST OOPS This example on a weekly basis performs all actions relating to events that begin with the event OOPS Alarm Event Action Routine Parameters Comments DAILY DOLIST This example performs all actions whose events match the instigating event In the example if the Action Table contains entries for DAILY 1 DAILY XX then the actions associated with those events will be perform...

Страница 204: ...ameters Comments DAILY LOGCHECK In this example the log buffer is checked to see if its threshold of 80 has been exceeded Alarm Event Action Routine Parameters Comments DAILY LOGCHECK 50 This example checks if the log buffer has exceeded a threshold of 50 NOTE The event itself DAILY in this example will generate log data thereby tending to fill the log 14 4 8 NOACTION Action Routine The NOACTION A...

Страница 205: ...ing up a user for pager authentication the ASG Guard ASG Guard Plus uses the modem pager template in the modem parameters section Issue a SM command and change the Pager command The correct settings depend on the pager type and the delays from that particular site Some specific examples Straight numeric pager ATDT MSG or ATDT MSG Skytel pager with direct 1800 number access ATDT 1 MSG Skytel digita...

Страница 206: ... PHIRIS Action Routine The PHIRIS Action Routine places a call to the IRISSM alarm collection package and delivers the alarm condition Format PHIRIS Resource Required Modem Parameters phone number 1 to 3 For home phone number 1 2 or 3 from system parameters or Phone Number Phone number to dial optional Examples Alarm Event Action Routine Parameters Comments ERR005 PHIRIS C ERR05 This example place...

Страница 207: ...s a call to a specified number and delivers a ASG Guard ASG Guard Plus alarm message when the call is complete Format PHONHOME Resource Required Modem Parameters phone number 1 to 3 For home phone number 1 2 or 3 from system parameters or Phone Number to call Phone number to call If omitted Home Phone Number 1 is used Examples Alarm Event Action Routine Parameters Comments HOURLY 2 PHONHOME This e...

Страница 208: ...NHOME except at the end of the report the remote terminal is placed in a Sysop session as user MDM_Default Format PHYSOP PHONE NUMBER TO CALL Resource Required Modem Parameters phone number access class 1 to 3 For home phone number 1 2 or 3 from system parameters or Phone Number to call Phone number to call If omitted Home Phone Number 1 is used Access class of Sysop session Defaults to 3 Sysop3 M...

Страница 209: ...parameters If the Site ID and Phone number are not to be updated then the comment field must be left blank REMINIT also schedules a repeat execution five minutes after the first to ensure that a retry is performed if the initialization transfer is aborted before completion Format REMINIT Resource Required Modem Parameters phone number 1 to 3 For home phone number 1 2 or 3 from system parameters or...

Страница 210: ...ched from the normally open contact N O on the relay s specified to the normally closed N C contact N C N O COMMON CONTROL Figure 14 1 Environmental Manager RESRELAY Condition Format RESRELAY Resource Required None Parameters relay number 1 Resets Relay 1 This relay is always reset on power up 2 Resets Relay 2 ALL Resets relays Example Alarm Event Action Routine Parameters Comments TEMPLOW RESRELA...

Страница 211: ...eduled for now If AM is specified omit the Time parameter If Date is omitted action is scheduled for this day Time optional Either a time in the format hh mm or a number of minutes from the current time Event associated with action to be scheduled Name of Action Routine to be scheduled Action Routine Parameters Parameters to be passed to scheduled Action Routine Examples Alarm Event Action Routine...

Страница 212: ... 00 on July 1 1996 Alarm Event Action Routine Parameters Comments CED063 SCHEDULE 1 18 00 DOLIST SPECIAL This example schedules a DOLIST for 6 PM tomorrow 14 4 17 SETHP Action Routine The SETHP Action Routine changes the setting of the Host Processing Flag see the SHP System Functions command Section 10 4 1 Format SETHP PROCESSING FLAG VALUE Resource Required None Parameters Host Processing Flag V...

Страница 213: ...hed from the normally closed contact N C on the relay s specified to the normally open N O contact Format SETRELAY RELAY NUMBER Resource Required None N C N O COMMON CONTROL Figure 14 2 Environmental Manager Relay SETRELAY Condition Parameters 1 Sets Relay 1 This relay is always reset on power up 2 Sets Relay 2 ALL Sets both relays Example Alarm Event Action Routine Parameters Comments BATOK SETRE...

Страница 214: ...rap to remote managers through the Ethernet or PPP link Parameters 1 Sets trap level 1 10 This parameter is the enterprise specific trap ID and depends on the trap format Nortel or Standard Example Alarm Event Action Routine Parameters Comments ERRORA21 SNMPTRAP 3 ...

Страница 215: ...that the ASG system expects To receive the valid Response you must first enter your PIN and then enter the seven digit Challenge into the ASG Key and press the ON button The ASG Key displays the Response that the ASG system expects Provided that you used a valid login ID for the Lucent system entered the Challenge correctly into the ASG Key and entered the corresponding Response correctly into the...

Страница 216: ...ll distributed PIN for example 1840 or 0517 You must not share your ASG Key with anybody else unless approved by your ASG Key Distribution Coordinator that is the person from whom you received your ASG Key Note that if you forget your PIN the ASG Key cannot be used or reprogrammed You must exchange it for a new key Contact your ASG Key Distribution Coordinator A 3 Setting Up the ASG Key You must p...

Страница 217: ...ess the ON button 5 Enter the seven digit Challenge into the ASG Key and press the ON button The ASG Key displays a seven digit Response 6 Enter the seven digit Response into the Lucent system If you entered the PIN Challenge and Response correctly you will gain access to the Lucent system The ASG Key will turn off automatically in 30 seconds If you entered an incorrect or invalid PIN the ASG Key ...

Страница 218: ...5 Press the ON button The ASG Key displays its serial number A 7 Replacing the Battery When the battery in the ASG Key needs to be replaced the ASG Key display will not turn on or the low battery icon will appear in the upper right hand corner of the display The ASG Key requires a single Sony CR2025 3 Volt Lithium coin cell battery To replace the battery 1 Make sure the ASG Key is off 2 Locate the...

Страница 219: ... Length Parity 8 None Terminal Emulation TTY Sysop Idle Timer None Host Session Idle Timer None Host Session Disconnect on Ctrl A Yes Modem Control Strings Use for ENTER for 1 second delay Setup AT F E0 C1 D2 S0 0 S2 38 Setup continued Answer ATA Hang Up AT ATS0 0 H0 Dial Strings Use for Phone No MSG for Pager Message Modem ATDT Pager ATDT MSG ...

Страница 220: ...ession Disconnect on Ctrl A Yes B 3 Host Port Parameters Host Port Number 1 Restore Factory Defaults No Host 1 Host Name HOST1 Baud Rate Setting 9600 Character Length Parity 8 None Alarm Filter None Force CD DSR High Yes Flow Control None Automatic Buffering Enable Automatic Buffering No Compress closed buffer files No Auto Switch Enter 0 to disable When CURRENT File exceeds n KB 50 Every n Hours ...

Страница 221: ...nn nnn nnn 192 9 200 2 PPP Address nnn nnn nnn nnn 192 9 200 3 Subnet Mask nnn nnn nnn nnn 255 255 255 0 Default Gateway nnn nnn nnn nnn Enable RIP Yes Network Loss Alarm Delay Time 60 B 5 SNMP Manager Parameters PPP link needed for trap No Trap format Standard SNMP Community Name SNMP_trap IP Addresses for SNMP Managers nnn nnn nnn nnn Manager 1 Manager 2 Manager 3 Manager 4 Manager 5 ...

Страница 222: ...tings 210 B 6 FTP Parameters FTP Parameters PPP link needed for ftp No Ftp service type None Server 1 default IP address nnn nnn nnn nnn User name Password Upload Directory Server 2 User name Password Upload Directory ...

Страница 223: ... the screen The capabilities to save the configuration data to a file or print to a screen are provided via the DUMP and DUMPF commands and the procedures for using these commands are described in Sections C 4 and C 5 of this Appendix A Customer Key is used to encrypt the Customer User Table when it is stored inside the ASG Guard ASG Guard Plus and when the Customer User Table is exported Section ...

Страница 224: ...le is on the RAM disk follow the procedure in Section C 3 3 to CONFIG the ASG Guard ASG Guard Plus C 2 2 Materials PC connected to the ASG Guard ASG Guard Plus via network Aux or Modem port Communication Package such as Procomm Plus or HyperTerminal C 2 3 CONFIG Procedure With ASCII File Transfer 1 Log onto the ASG Guard or ASG Guard Plus as a CMaster User 2 Type in the command CONFIG and press th...

Страница 225: ...ckage Procomm Plus or CrossTalk C 3 3 CONFIG Procedure 1 Log onto the ASG Guard or ASG Guard Plus as a CMaster User 2 If the configuration file is not stored on the local RAM disk transfer the configuration file from the PC to the RAM disk using the RCV command refer to Section 7 7 for more details on this procedure 3 To configure the ASG Guard ASG Guard Plus type CONFIG filename at the system pro...

Страница 226: ...2 Type in the command DUMP and press the ENTER key At this point the banner Dump Config Details will appear and a list of system tables and system parameters will be displayed To view a subset of the system tables parameters press the Control CTRL key and the letter X at the same time to delete the entire list Type in those sections desired and press the ENTER key 3 The banner Press ENTER when rea...

Страница 227: ...er procedure in the communication program to receive the configuration file from the ASG Guard ASG Guard Plus If required by your communications package initiate the transfer by sending an ENTER 4 When the DUMP is complete terminate the ASCII transfer from the communication program if necessary Press ENTER at the terminal window to get back to the system prompt 5 To verify that the file was saved ...

Страница 228: ...e sections desired and press the ENTER key to save the file to the RAM disk 4 The transfer will take only a few seconds To verify the transfer was successful type VIEW filename at the system prompt DUMPF Dump Config Details to File File name ASG CFG Dump List ATAB Action Table 7 record s DUMPed to file ASG CFG 03 01 99 12 55 25 E9D8 AUX DUMP ATAB 03 01 99 12 55 25 7C30 AUX DUMP Complete Site123 Sc...

Страница 229: ...mportant that this key be changed C 6 2 Materials PC connected to the ASG Guard ASG Guard Plus via network Aux or Modem port Communication Package such as Procomm Plus or Telnet session C 6 3 Procedure for Setting the Customer Encryption Key 1 Type the command SCK at the ASG Guard ASG Guard Plus prompt The ASG Guard ASG Guard Plus requires a 16 digit hexadecimal entry for example ABCDEF0123456789 ...

Страница 230: ... and import CCONFIG to another ASG Guard ASG Guard Plus both units must have the same encryption key C 7 2 CDUMP Procedures C 7 2 1 Overview This section provides a procedure for saving a Customer User Table to a text file on a PC The CDUMP command allows the user to back up the configuration of an ASG Guard ASG Guard Plus with a direct connection via the AUX port over phone lines or via the netwo...

Страница 231: ...KEY 3 To save the User Table to a file on the PC use the ASCII transfer procedure in the communication program to receive the configuration file from the ASG Guard ASG Guard Plus Initiate the transfer by sending an ENTER based on how your communications package operates When the DUMP is complete terminate the ASCII transfer from the communication program if necessary Press ENTER at the terminal wi...

Страница 232: ... VIEW filename at the system prompt Site123 CDUMPF Dump Customer Users to File File Name USERTAB Customer User Table 10 03 02 99 11 26 13 B11B AUX CDUMPF Starting 03 02 99 11 26 13 BD3B AUX CDUMPF Completed by User AUX_Default Site123 Screen C 9 CDUMPF Command for Saving the User Table as a file on the RAM Disk Now it is possible to XMODEM or FTP the information to your PC by using the SEND comman...

Страница 233: ...SCII file transfer C 7 4 2 Materials PC connected to the ASG Guard ASG Guard Plus via network Aux or Modem port Communication Package such as Procomm Plus or Telnet session C 7 4 3 CCONFIG Procedure With ASCII File Transfer 1 Log onto the ASG Guard or ASG Guard Plus as a CMaster User 2 Type in the command CCONFIG and press the ENTER key The message Config Customer Keys will appear 3 Use the commun...

Страница 234: ...e RAM disk C 7 5 2 Materials PC connected to the ASG Guard ASG Guard Plus via Aux or Modem port Communication Package such as Procomm Plus C 7 5 3 Procedure for Configuring the Customer User Table from the RAM Disk 1 Log onto the ASG Guard or ASG Guard Plus as a CMaster User 2 If the Customer User Table is not stored on the local RAM disk download the Customer User Table file to the RAM Disk refer...

Страница 235: ...been selected for Start Network on Powerup If the network module of the ASG Guard ASG Guard Plus has not been started type startnet to start it Connect cable Power cycle the system Unable to access the user database and or perform user maintenance functions Check user s access class Only Master users can access the user database The system must have at least one user with the access level of Maste...

Страница 236: ...Troubleshooting 224 Page intentionally left blank ...

Страница 237: ...o back up files that are stored on the RAM disk It is recommended that before attempting to remove the internal battery from the ASG Guard ASG Guard Plus device the unit key switch should be turned to the OFF position the key removed from keyhole and all power supplies 16V AC 48V DC AC adapter be unplugged The proper safety precautions detailed in this guide must be followed to ensure the safety o...

Страница 238: ...ction of the instruction guide describes the removal of the internal battery from the Access Security Gateway ASG Guard Plus device Figure E 1 Front View of the Access Security Gateway ASG Guard Plus E 4 1 Preparation Once it has been determined that the battery will need to be changed make sure no electrical current is flowing The unit s key switch should be turned to the OFF position the key rem...

Страница 239: ...ews springs and plate can be removed as one piece Figure E 2 Remove Front Plate for ASG Guard Plus 2 The removal of the plate will expose a white tab fastened to the front of the battery Firmly hold down the case and pull the tab up and out to free battery from the case The battery should be pulled out of the casing completely and in a smooth motion If the battery hesitates or becomes stuck the wi...

Страница 240: ...a side to side rocking motion A pair of needle nose pliers may be used to tug gently on the plastic tabs and not the wires Figure E 4 Disconnect Wires from Battery for ASG Guard Plus 4 Connect the red wire to positive terminal and black wire to negative terminal of the replacement battery Battery metal terminals should be flattened and wires should be to the left of battery to avoid hang ups on in...

Страница 241: ...s carefully into internal bracket so they do not snag on the bracket and disconnect tabs from the battery Figure E 6 Insert New Battery for ASG Guard Plus 6 When the battery is completely returned to the case insert the key and turn to ON position to confirm proper connection and re installation of the battery Figure E 7 Confirm Proper Connection and Re Installation of the Battery for ASG Guard Pl...

Страница 242: ...ice Figure E 8 Front View of Access Security Gateway ASG Guard NOTE Please Read All Instructions Thoroughly Before Attempting to Remove the Internal Battery from the Access Security Gateway ASG Guard device E 5 1 Preparation Once it has been determined that the battery will need to be changed make sure no electrical current is flowing The unit s key switch should be turned to the OFF position the ...

Страница 243: ...he top 2 from each side 3 from the bottom and two 3 16 Hex screws on the front panel next to the AUX port 2 Gently slide top portion of housing forward and lift to clear the AUX port Figure E 9 Remove Top Portion of ASG Guard Housing 3 Lay top portion of housing adjacent to base chassis Figure E 10 View of Open ASG Guard ...

Страница 244: ...l disconnect the 3 prong connector key switch Then remove the top housing completely and place on a flat surface Figure E 11 Key Switch and 3 Prong Connector of ASG Guard Description The internal battery is located on the right side of internal hardware The red wire positive and black wire negative are on the left of the battery ...

Страница 245: ...odem wires in front of the battery bracket For access to the bracket screws re position the black modem wires to opposite sides of the bracket Gently lift up the 2 black retaining hooks and pull the white connector to disconnect 2 prong connector next to the battery Figure E 12 2 Prong Connector and Modem Wires for ASG Guard ...

Страница 246: ... tug on the plastic tabs connected to metal terminals NOTE DO NOT remove the zip tie from the battery wires Figure E 13 Detach Wires from the Battery for ASG Guard 3 Unfasten the two 5 16 nuts that are mounted at each end of the battery bracket Remove the bracket from the top of battery and then remove the battery Front bracket nut Rear bracket nut Figure E 14 Front and Rear Bracket Nuts for ASG G...

Страница 247: ...Internal Battery Replacement 235 Battery bracket removed Figure E 15 Remove Battery from ASG Guard Battery removal complete Figure E 16 Battery Removal Complete for ASG Guard ...

Страница 248: ...ttery in base of casing metal terminals should be flattened and wires should be to the left of battery Terminal tab connections New battery properly installed within base Figure E 17 Connect Wires on Battery for ASG Guard 5 Reconnect the white connector to the 2 prong connector located to the left of the battery Figure E 18 Connect 2 Prong Connector for ASG Guard ...

Страница 249: ...nt damage to the Access Security Gateway ASG Guard device 7 To test the battery connection re insert the key and turn the key switch to the ON position Observe whether or not the red PWR FAIL light is ON this light indicates that the internal battery is operable Figure E 20 Test Battery Connection for ASG Guard NOTE If the Access Security Gateway ASG Guard does not Power up no lights appear on pan...

Страница 250: ...s in channel located on the right side of the battery Wrap around in front of the casing and secure with a new zip tie Figure E 21 Replace Battery Bracket and Secure Modem Wires for ASG Guard 9 Replace the outer housing on top of unit and tighten all the outside housings screws on all sides of the unit Do not over torque this may cause the screw threads to strip 10 Reconnect all power supplies 16V...

Страница 251: ...NOT OPEN OR REMOVE THE EXTERNAL HOUSING FROM THE ASG GUARD PLUS DEVICE 2 If the unit will not Power up after checking the connections report the trouble to the Lucent Technical Service Center 800 242 2121 E 6 2 Access Security Gateway ASG Guard device 1 Unfasten all screws on external housing lift cover of unit carefully and check that all connections have been properly made 2 If the unit will not...

Страница 252: ...Internal Battery Replacement 240 Page intentionally left blank ...

Страница 253: ...elete action item CMaster Sysop 2 XE Delete event CMaster Sysop 2 F 2 System Functions Command Description Access Levels DCC Display contact inputs All Sysop levels DSA Display sensor alarms All Sysop levels DSI Display sensor inputs All Sysop levels DSP Display system parameters All Sysop levels RRLY Reset relays CMaster Sysop 2 SDT Set date and time CMaster Sysop 2 SHP Set host processing flag C...

Страница 254: ...s CMaster Sysop 2 DU Display users CMaster Sysop 2 LLU List Lucent users CMaster Sysop 2 LU List users CMaster Sysop 2 SCK Set an encryption key CMaster XU Delete users CMaster F 4 Log Functions Command Description Access Levels AH Access history All Sysop levels CER Clear error log CMaster CLH Clear log history CMaster DER Display error log All Sysop levels FH Display failure history All Sysop le...

Страница 255: ...ive a file CMaster Sysop 2 RD Remove a directory CMaster Sysop 2 REN Rename a file CMaster Sysop 2 SDP Set disk parameters CMaster Sysop 2 SEND Sends a file to another device CMaster Sysop 2 UCOMP Uncompress a file CMaster Sysop 2 VIEW View a file CMaster Sysop 2 F 6 Buffer Functions Command Description Access Levels BST Display host buffer details CMaster Sysop 2 CLBUF Close buffer file CMaster S...

Страница 256: ...op levels F 8 Port Control Functions Command Description Access Levels DA DM DH DT Display Aux Modem Host Telnet port parameters All Sysop levels DNP Display network parameters All Sysop levels DNS Display network status All Sysop levels DPS Display port signals All Sysop levels PING Query remote device CMaster Sysop 2 PPP Start PPP session All Sysop levels PST Port status All Sysop levels RES Res...

Страница 257: ...ormation to a file on the RAM disk CMaster CCONFIG Upload a custom encrypted User Table to the unit CMaster CONFIG Upload a custom configuration file to the unit CMaster DUMP View or save the system configuration to a file on the host PC CMaster DUMPF Save the system configuration to a file on the RAM disk CMaster VER Display system information about the ASG Guard ASG Guard Plus All Sysop levels U...

Страница 258: ...Glossary of Command References 246 Page intentionally left blank ...

Страница 259: ...PPREQ Internal Event 185 RTSHIGH Internal Event 186 RTSLOW Internal Event 186 S HIGH Internal Event 186 S LOW Internal Event 186 S OK Internal Event 186 TEMPHIGH Internal Event 187 TEMPLOW Internal Event 187 TEMPOK Internal Event 187 WEEKLY Internal Event 188 LOGFILES 76 SENTFILES 76 4 48 Volt Battery 130 A AA command 95 Access Classes 8 53 Access History command AH 168 Action Routines 107 AUXCC 1...

Страница 260: ...y 28 set 67 user s guide 203 ASG Key Authentication 30 54 138 Encryption Key Source 30 AU command 25 52 Authentication ASG Key 30 54 138 pager 58 Pager 140 Password Callback 28 57 134 Regular Callback 135 Variable Callback 137 Auto Baud 133 Auto Parity 134 AUX Port configure 33 initiate security 35 parameters 208 AUXCC Action Routine 189 B Battery 130 225 BLA command 69 Block Unblock Lucent Admini...

Страница 261: ...ers command DNP 157 Display Network Status DNS 158 Display Port Signals command DPS 144 Display Sensor Alarms command DSA 122 Display Sensor Inputs command DSI 122 Display Status of Contact Inputs command DCC 132 Display System Parameters command DSP 115 Display Telnet Port Parameters command DT 161 Display User Record command DU 63 DLU command 68 DM command 41 DNP command 157 DNS command 158 DPS ...

Страница 262: ...ct to Host command CON 142 Connect to Lucent Host command CONL 142 Contact Closure Inputs 131 COPY command 86 CSUM EXE Program 88 CU command 64 Customer User Table commands 51 218 D Data buffering overview 7 Date and Time set 117 DCC command 122 132 DCE Device connecting 19 DDP command 75 DEL command 85 86 Delete Action Item command XA 99 Delete Alarm Event command XE 103 Delete User command XU 62...

Страница 263: ...up connection 80 send buffer files via a direct connection 80 I INIT command 40 Initiate PPP Link command PPP 162 Installation 20 Internal Alarms and Events 104 Internal Events 177 AUTHFAIL Internal Event 177 BAT48HIGH Internal Event 178 BAT48LOW Internal Event 178 BAT48OK Internal Event 179 BUFREADY Internal Event 179 C CLOSED Internal Event 179 C OPEN Internal Event 179 CCLERROR Internal Event 1...

Страница 264: ...ddress 153 specify 32 Network Startup 158 Network Status 158 NOACTION Action Routine 192 P PAGE Action Routine 193 Pager Authentication 58 140 Parameters entering 15 selecting 15 Passthru Password Callback Authentication 58 Password Callback Authentication 28 57 134 passthru 58 Passthru 29 58 regular callback 57 Regular Callback 29 variable callback 58 Variable Callback 29 PHIRIS Action Routine 19...

Страница 265: ...1 Set Customer Key command SCK 67 Set Date and Time command SDT 117 Set Host command SH 77 Set Host Processor Flag command SHP 116 Set Modem Port Parameters command SM 43 Set Network Parameters command SNP 152 Set Relays command SRLY 123 Set Sensor Alarms command SSA 122 Set System Parameters command SSP 111 modem action routine parameters 114 scheduling parameters 113 site information 111 Set Tel...

Страница 266: ...9 User Maintenance Functions Menu 50 Users add 25 52 block unblock Lucent users 68 change information 64 delete 62 display Lucent users 68 display record 63 list 60 list Lucent users 68 Utility Programs CSUM EXE 88 overview 88 ZPAD EXE 88 V Variable Callback Authentication 137 Variable Callback Password Callback Authentication 58 VER command 118 VIEW command 87 View Session command VS 142 Voltage ...

Отзывы: