R5905948 /12
Event Master Devices
179
The Link cards allow for linking multiple Event Master units. Depending on the linking configuration, linked
units share inputs, and they expand the number of layers and outputs. For example, beginning with code
release 6.0, eight (8) E2 units can be linked as a system.
Just as in section
Configuration Menu > Network resource area
”
, page 111, the unit that is supposed to be
added is available in the network resource tab. Any second unit can be added, it only needs to have a
separate Unit ID. Change the Unit ID of each system to be different. The default Unit ID is 0 on all E2 chassis
models, 1 on all S3 chassis models, and 2 on the EX chassis. On one of the E2s change the Unit ID to 1 from
the front panel, or by temporarily adding them as separate systems.
A second E2 or S3
–
4K unit adds fully double capacity from one unit. There are very few limitations to the
capacity and operation is all in all the same as it is for one unit.
After linking chassis, a few menus provide the option of changing between which unit controls you
are viewing.
From the Menu bar at the top of all pages, you can select which processor
’
s details you are viewing,
by selecting that processor from the pull down menu.
There is no relationship between Unit ID and Master or Slave selection. Either unit can be Master or
Slave in a linked configuration. The only real significance
—
but totally transparent to users
—
is the
Event Master Toolset communicates only with the Master unit. The Master unit establishes its own
connection and handles all communications with the Slave unit(s).
Certain configuration setups are not allowed. These include spanning input or output configurations
between an E2 and an S3
–
4K. If your setup requires this kind of configuration, then you must link
together two E2 units or two S3
–
4K units.
How to Link Two E2 Units
Each E2 comes equipped with two Link cards, always located in slots 1 and 2. Link cards are identified by a
yellow stripe at the top. Make sure to use the locking mechanism and then push each cable until it locks in
place.
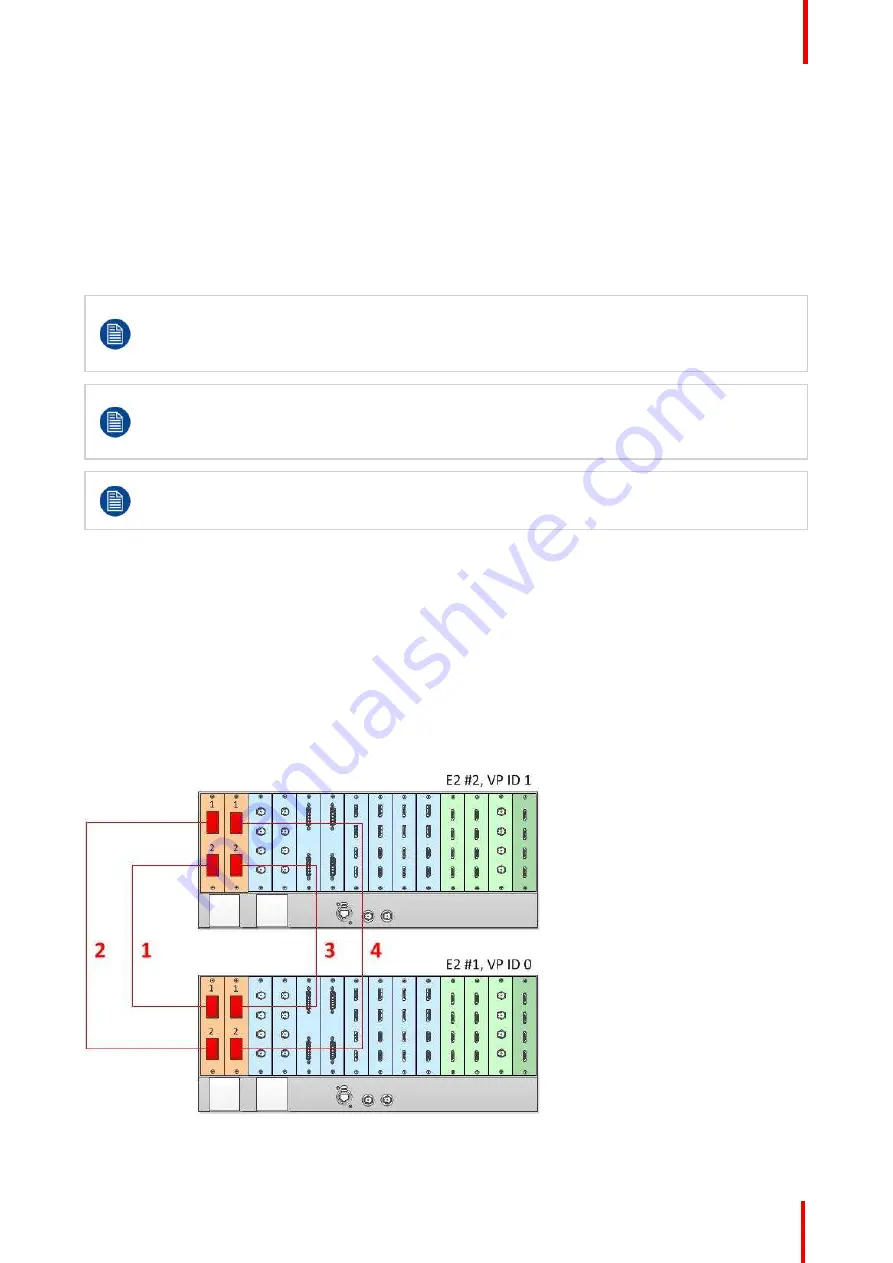
Connect the Link cables provided with each E2 between the Link connectors as follows:
•
VP ID 0, Link Card slot 1, Link 1 >> VP ID 1, Link Card slot 1, Link 2 [1]
•
VP ID 0, Link Card slot 1, Link 2 >> VP ID 1, Link Card slot 1, Link 1 [2]
•
VP ID 0, Link Card slot 2, Link 1 >> VP ID 1, Link Card slot 2, Link 2 [3]
•
VP ID 0, Link Card slot 2, Link 2 >> VP ID 1, Link Card slot 2, Link 1 [4]
See Image 6-45 for an example of the cabling between two E2 units.
Image 6-45: Cabling between two E2 units
Содержание Event Master E2 Series
Страница 1: ...ENABLING BRIGHT OUTCOMES User s Guide Event Master Devices...
Страница 12: ...R5905948 12 Event Master Devices 12...
Страница 24: ...R5905948 12 Event Master Devices 24 Safety...
Страница 52: ...R5905948 12 Event Master Devices 52 General...
Страница 82: ...R5905948 12 Event Master Devices 82 Hardware orientation...
Страница 102: ...R5905948 12 Event Master Devices 102 Front Panel Menu orientation...
Страница 272: ...R5905948 12 Event Master Devices 272 Image 6 137 EM GUI orientation...
Страница 304: ...R5905948 12 Event Master Devices 304 Updating firmware...
Страница 326: ...R5905948 12 Event Master Devices 326 Image 9 28 General operation example...
Страница 382: ...R5905948 12 Event Master Devices 382 Preventive maintenance actions...
Страница 386: ...R5905948 12 Event Master Devices 386 14 2 Process Overview Flow chart Image 14 2 E2 Maintenance...
Страница 444: ...R5905948 12 Event Master Devices 444 E2 Maintenance...
Страница 448: ...R5905948 12 Event Master Devices 448 15 2 Process Overview Flow chart Image 15 2 S3 Maintenance...
Страница 528: ...R5905948 12 Event Master Devices 528 EC 200 EC 210 Maintenance...
Страница 569: ...569 R5905948 12 Event Master Devices Troubleshooting C...
Страница 572: ...R5905948 12 Event Master Devices 572 Troubleshooting...
Страница 583: ...R5905948 12 Event Master Devices 583 Index...


