


Chapter 6 The LAN Configuration Screens
User’s Guide
82
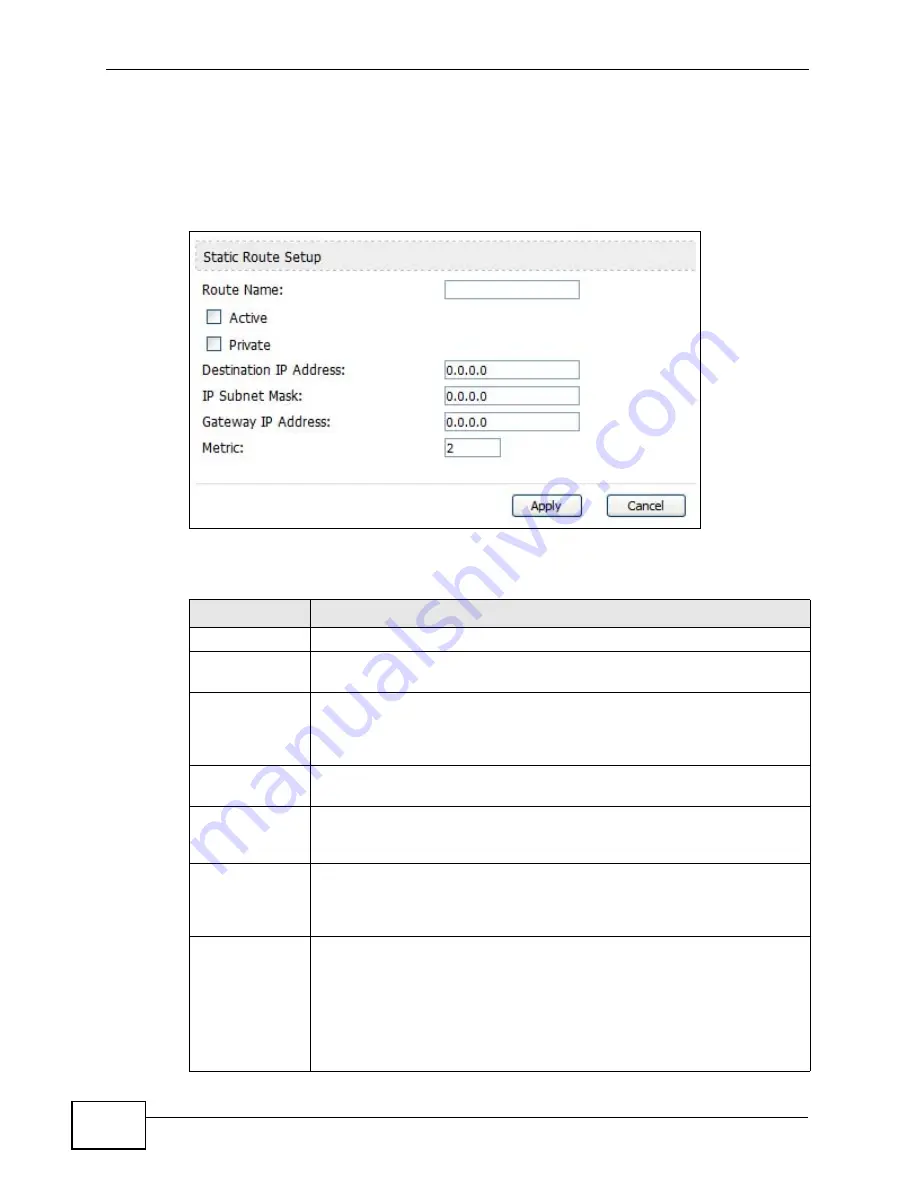
6.5.1 IP Static Route Setup
Click an Edit icon in ADVANCED > LAN Configuration > IP Static Route to
edit a static route in the WiMAX Device.
Figure 28
Advanced> LAN Configuration > IP Static Route Setup
The following table describes the labels in this screen.
Table 24
Management > Static Route > IP Static Route > Edit
LABEL
DESCRIPTION
Route Name
Enter the name of the static route.
Active
Select this if you want the static route to be used. Clear this if you do
not want the static route to be used.
Private
Select this if you do not want the WiMAX Device to tell other routers
about this static route. For example, you might select this if the static
route is in your LAN. Clear this if you want the WiMAX Device to tell
other routers about this static route.
Destination IP
Address
Enter one of the destination IP addresses that this static route affects.
IP Subnet Mask Enter the subnet mask that defines the range of destination IP
addresses that this static route affects. If this static route affects only
one IP address, enter 255.255.255.255.
Gateway IP
Address
Enter the IP address of the gateway to which the WiMAX Device should
send packets for the specified Destination. The gateway is a router or
a switch on the same network segment as the device's LAN or WAN
port. The gateway helps forward packets to their destinations.
Metric
Usually, you should keep the default value. This field is related to RIP.
The metric represents the "cost of transmission". A router determines
the best route for transmission by choosing a path with the lowest
"cost". The smaller the metric, the lower the "cost". RIP uses hop count
as the measurement of cost, where 1 is for a directly-connected
network. The metric must be 1-15; if you use a value higher than 15,
the routers assume the link is down.
Summary of Contents for MAX-306
Page 2: ......
Page 8: ...Safety Warnings User s Guide 8...
Page 10: ...Contents Overview User s Guide 10...
Page 30: ...30...
Page 36: ...Chapter 1 Getting Started User s Guide 36...
Page 46: ...Chapter 2 Introducing the Web Configurator User s Guide 46...
Page 64: ...Chapter 4 VoIP Connection Wizard User s Guide 64...
Page 65: ...65 PART II Basic Screens The Main Screen 40 The Setup Screens 67...
Page 66: ...66...
Page 74: ...74...
Page 88: ...Chapter 6 The LAN Configuration Screens User s Guide 88...
Page 112: ...Chapter 8 The Wi Fi Configuration Screens User s Guide 112...
Page 134: ...Chapter 10 The NAT Configuration Screens User s Guide 134...
Page 146: ...146...
Page 164: ...Chapter 12 The Service Configuration Screens User s Guide 164...
Page 180: ...Chapter 14 The Phone Book Screens User s Guide 180...
Page 182: ...182...
Page 202: ...Chapter 15 The Certificates Screens User s Guide 202...
Page 212: ...Chapter 16 The Firewall Screens User s Guide 212...
Page 226: ...Chapter 18 The Remote Management Screens User s Guide 226...
Page 242: ...Chapter 19 The Logs Screens User s Guide 242...
Page 252: ...Chapter 20 The UPnP Screen User s Guide 252...
Page 265: ...265 PART VI Troubleshooting and Specifications Troubleshooting 267 Product Specifications 275...
Page 266: ...266...
Page 274: ...Chapter 22 Troubleshooting User s Guide 274...
Page 278: ...278...
Page 310: ...Appendix B Setting Up Your Computer s IP Address User s Guide 310...
Page 336: ...Appendix D Pop up Windows JavaScripts and Java Permissions User s Guide 336...
Page 380: ...Appendix F Importing Certificates User s Guide 380...
Page 382: ...Appendix G SIP Passthrough User s Guide 382...
Page 398: ...Appendix J Customer Support User s Guide 398...
Page 405: ...Index User s Guide 405...