background image


Z41 Pro / Lite / COM 

http://www.zennio.com

                                                                     Tecnical Support: 

http://support.zennio.com


144 

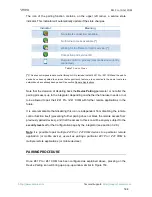
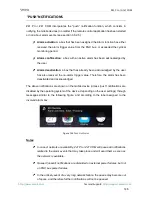
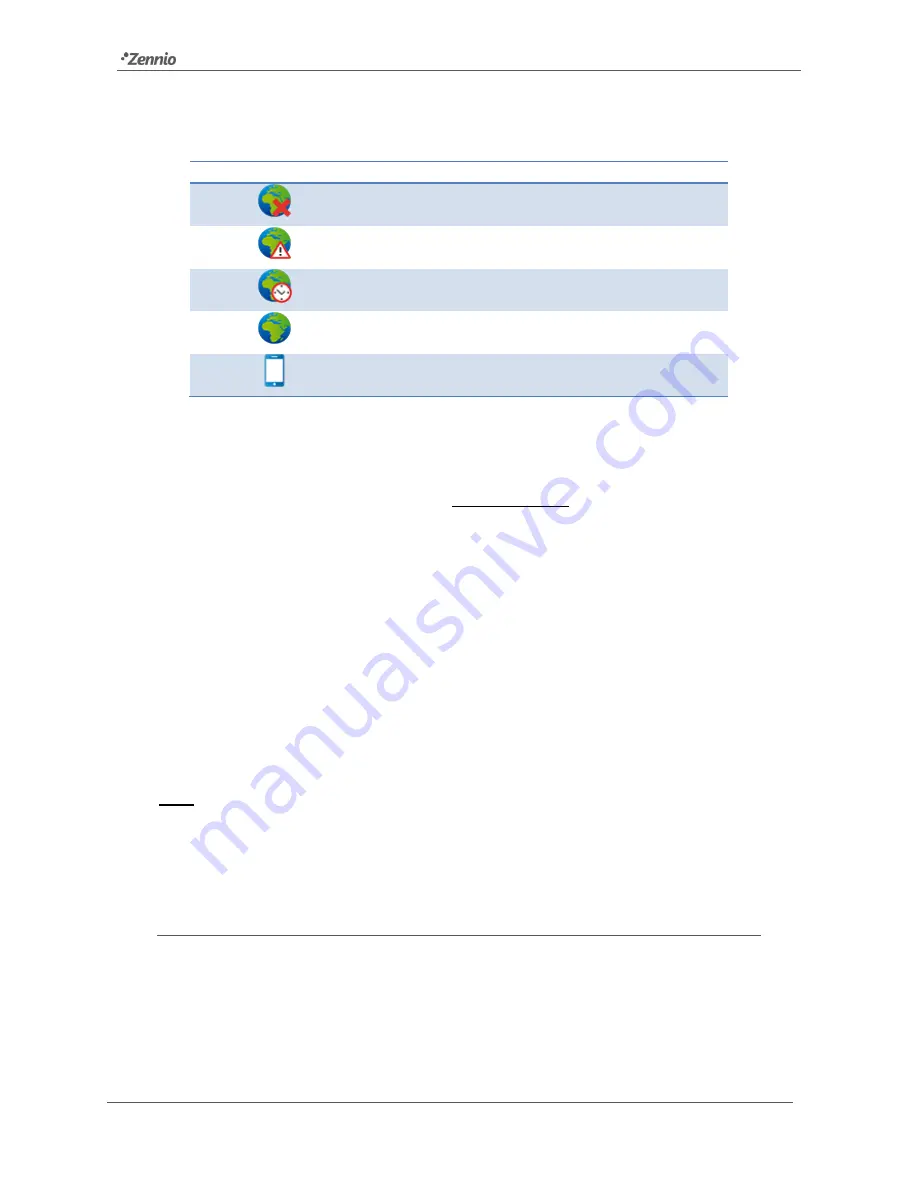
The  icon  of  the  pairing  function  contains,  on  the  upper  left  corner,  a  service  state 

indicator. This indicator will automatically update if the state changes. 

Indicator 

Meaning 


No network connection available. 


No Internet access available. 

(*)


Waiting for the Remote Control service. 

(*)


Connection and service OK. 


Remote control in process (remote device currently 
connected). 

Table 7 

Service States


(*)


This does not impede remote control through LAN, provided that both Z41 Pro / Z41 COM and the mobile 

device  have  been  updated  to  versions  that  support  such  feature,  are  connected  to  the  same  local  area 

network and have already been paired. See section Remote Applications.


Note that the decision of disabling back the

 Device Pairing

 parameter or not after the 

pairing process is up to the integrator, depending on whether the final user needs or not 

to  be  allowed  to  pair  their  Z41  Pro  /  Z41  COM  with further remote  applications  in  the 

future.  

It  is  also  remarkable that  disabling this  icon  is  independent from  disabling  the remote 

control function itself (preventing further pairing does not block the remote access from 

previously paired devices), and that the access to this icon will be anyway subject to the 

security


level

 set for the Configuration page by the integrator (see section 3.2.8). 

Note

it is possible to pair multiple Z41 Pro / Z41 COM devices to a particular remote 

application  (or  mobile  device),  as  well  as  pairing  a  particular  Z41  Pro  /  Z41  COM  to 

multiple remote applications (or mobile devices)

PAIRING PROCEDURE 

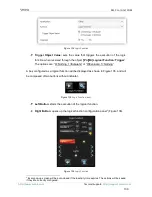
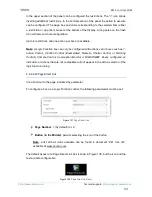
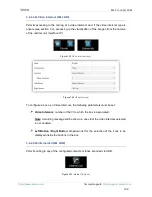
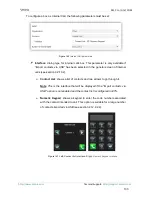
Once  Z41  Pro  /  Z41  COM  has  been  configured  as  explained  above,  pressing  on  the 

Device Pairing icon will bring up a pop-up window similar to Figure 153. 

Summary of Contents for Z41 Pro

Page 1: ...apacitive Colour Touch Panel ZVI Z41LIT ZVI Z41PRO ZVI Z41COM Application Program Version Z41 Pro Z41 Lite 3 1 Application Program Version Z41 COM 1 1 User Manual Version 3 1 _c www zennio com USER MA...

Page 2: ...uration Page 16 2 3 1 Device 20 2 3 2 Program Configuration Z41 Pro and Z41 Lite 21 2 3 3 Profile 22 2 3 4 VoIP Calls Z41 COM 24 2 4 Screen Orientation 26 2 5 Screensaver 27 2 5 1 Screensaver image ch...

Page 3: ...hernet Z41 Pro and Z41 COM 62 3 2 12 Firmware Update 63 3 2 13 VoIP Calls Z41 COM 64 3 2 14 NTP Z41 Pro and Z41 COM 68 3 3 Outdoor Unit n Z41 COM 70 3 4 Internal Call Z41 COM 73 3 5 Menu 74 3 5 1 Conf...

Page 4: ...tatus After Programming and Bus Failure 142 ANNEX I Remote Control via IP Z41 Pro and Z41 COM 143 Configuring Z41 Pro Z41 Pro Z41 COM 143 Pairing Procedure 144 Push Notifications 146 Remote Applicatio...

Page 5: ...program Synchronize Time Date via NTP Z41 Pro Z41 COM Video Intercom Z41 COM 3 1 _a Changes in the application program Translations Backlight brightness level Screensaver Welcome back object Welcome...

Page 6: ...port http support zennio com 6 Four byte indicators Error log Light intensity regulation on RGB RGBW controls Fan speed control New outline of the Configuration page 1 1 _a Changes in the application...

Page 7: ...e following table Functionality Z41 Lite Z41 Pro Z41 COM Analogue digital inputs Ethernet Interface Firmware update via Ethernet Synchronize Time Date via NTP Remote control Video Intercom Internal Ca...

Page 8: ...Logic functions Direct links to other pages Screensaver with custom image Multi Language 2 independent thermostats Built in temperature sensor 2 customisable analogue digital inputs Only in Z41 Pro a...

Page 9: ...alue switch hold release short press long press o Unsigned integer 1 2 bytes o Signed integer 1 2 bytes o Scaling percentage o Floating point 2 bytes o Scene run save 2 button Controls o Binary icon t...

Page 10: ...s adjustment among others Notes Z41 Pro Lite COM supports Latin Arab Chinese Korean Japanese Greek Cyrillic and Hebrew characters for the on screen customisable labels However only certain combination...

Page 11: ...s use of a button battery located at the corresponding slot 4 to help maintain the time and date updated in case of a failure of the external power supply Note immediately after connecting the externa...

Page 12: ...ues ERROR The Sync box shows as a percentage the progress of the internal synchronisation of the device during the start up Once it reaches 100 the Status page will disappear and the Menu page will co...

Page 13: ...of them is focused on interfacing with the KNX bus and on running the application program itself while the second one is dedicated to running the firmware that implements the operating system and the...

Page 14: ...nless the application program is reverted to the version that corresponds to the current firmware version In other words the device does not apply any further parameter changes in case of a version mi...

Page 15: ...tive alarms see epigraph 3 6 2 5 7 in section 3 6 2 5 within the page while a lock reflects that the access to the page is password protected see section 3 2 8 which also applies to the Configuration...

Page 16: ...igurable control parameters for the general purpose pages and their behaviour will be described in detail in section 3 2 3 CONFIGURATION PAGE The Configuration page lets the user know or adjust certai...

Page 17: ...ortant so that the data of the call log entries of the video intercom are reliable This is particularly important when there are several Z41 COM synchronized in the installation It is recommended that...

Page 18: ...tatus of each of them which may be ON the alarm is still active or has not been acknowledged by the user OK the user has acknowledged the alarm event but the corresponding object is still in the alarm...

Page 19: ...vity Z41 Pro COM labelled as Internet Inconsistent firmware application program versions labelled as Version Mismatch See section 1 3 1 Loss of remote control service connectivity Z41 Remote Z41 Pro C...

Page 20: ...g function which needs to be run prior to be controlling the device from a remote IP application See ANNEX I Remote Control via IP for more details about controlling Z41 remotely VoIP Calls Configurat...

Page 21: ...data loss Parameters Reset and Z41 Reboot the above two combined Note alarm logs consumption logs or any other logs are not reset to zero in any case Nevertheless the ETS Reset Device option does res...

Page 22: ...ice The IP address can be static only in Z41 COM or dynamic assigned for a DHCP server MAC Address only in Z41 Pro Z41 COM indicator showing the MAC address of the device Figure 11 Configuration Progr...

Page 23: ...esses or as a feedback on action executions One more possibility is to make these beeps silent alarm beeps will still sound Volume Z41 COM in Z41 COM instead of melody the lower left box will control...

Page 24: ...n receiving a call from an outdoor unit There are seven different ringtones Browsing through them the selected one will play once Internal Call Ringtone Desired tune reproduced when receiving a call f...

Page 25: ...ill be active indefinitely When enabling the mode the value 1 is sent through the object VoIP Do Not Disturb Mode and when the timing expires it is sent the value 0 It is also possible to stop the cou...

Page 26: ...ation In the case of a horizontal arrangement page titles can be configured as two separate text lines instead of as only one Figure 16 Page title Therefore the current page label at the bottom right...

Page 27: ...nto an USB memory device and connect it to the USB connector of Z41 The image must fulfil the following requirements It has to be a JPEG image file extension jpg with 240 x 320 pixels resolution for v...

Page 28: ...BACKLIGHT It is possible to configure brightness user defined levels for the display of Z41 Pro Lite COM Two operation modes are available the normal mode and the night mode The second one is optional...

Page 29: ...log shown to the user when trying to access a protected page Figure 17 Password Insertion Dialog for password protected pages In case of setting up two levels the first one is assumed to be enclosed b...

Page 30: ...ed or automatically ordered Static grid Distribution all the eight boxes of the page will be shown remaining empty those not having been assigned a function Figure 18 Static Distribution Automatic Dis...

Page 31: ...ced in ETS must be indicated by means of a parameter and will be the one shown by default main language Translations should be uploaded to the device through an external USB memory The desired languag...

Page 32: ...ons are finished plug in the USB to the Z41 and the translations will be imported automatically Notes The duration of actions to import export translations via USB can become 1 min During this time th...

Page 33: ...s for a total of up to 12 doors controllable by one Z41 COM GetFace IP is responsible for controlling the doors locks On the other hand one GetFace IP can make a call to a maximum of 8 Z41 COM at a ti...

Page 34: ...umber of the entry and the date and hour of the call reception as well as whether the call has been attended or not In case of the image cannot be captured a default image will be shown see Figure 21...

Page 35: ...other Z41 COM receives through the mentioned object a call has been accepted or rejected from another device a message will be displayed for a short time see Figure 23 These messages can be changed by...

Page 36: ...Figure 25 It comprises the camera images visualization the buttons for accept or reject the call the buttons to open the doors the button to silence the call and the exit button Figure 25 Video Interc...

Page 37: ...ith username and password as parameterised Besides the synchronisation object is sent to the bus to notify others Z41 COM linked to the same GetFace IP The call will continue but is saved in the log a...

Page 38: ...available plus level 0 or mute The selected value is saved to apply in future calls Mute Microphone toggles between mute and enable the microphone Exit equivalent to reject call button 2 12 2 INTERNAL...

Page 39: ...contact to make the call This option is best suited for a high number of contacts Figure 28 Internal Call Numeric keypad 2 12 2 2 CONTACTS There are two ways to configure the Z41 COM contact list via...

Page 40: ...ile format The fields that must be modified for each contact are code numeric code associated with the contact This field is used to call the contact using the numeric keypad Note if two contacts have...

Page 41: ...ile name must be exactly contacts json There should be no other contacts json file in the USB memory not even in another folder 2 12 2 3 INCOMING CALL The interface of the Z41 during an incoming call...

Page 42: ...esponse Mute the playback of the ringtone is muted Note There is no maximum incoming call time so the display will remain in this state until one of the above events mentioned is performed 2 12 2 4 OU...

Page 43: ...en the Z41 COM will begin Figure 33 Ongoing Internal Call The functions available in this dialog are Reject Call ends the communication and closes the ongoing call dialog Speakers Volume up to 5 level...

Page 44: ...ontain special characters symbols accents coded with more than one byte It is advisable to verify that these texts fit properly on the screen with independence of whether they reach the maximum text l...

Page 45: ...to the KNX bus whenever it is necessary e g when the user touches a button that has been configured to send scene commands see section 3 6 2 2 General Internal Temperature 2 byte object through which...

Page 46: ...receiving a value through the bus 0 2 for selecting the melody and 3 for muting Profile Theme 1 byte object for changing the theme when receiving a value through the bus 0 7 During the parameter confi...

Page 47: ...to activate and configure each of the general purpose pages of the device see section 2 2 Configuration Page which itself will contain the following tabs Configuration from which it will be possible t...

Page 48: ...interface 3 2 1 GENERAL The General screen contains the following parameters Figure 36 General Main Configuration Power Supply Voltage lets the integrator specify the particular voltage of the externa...

Page 49: ...that sends temperature values Screensaver enables or disables the Screensaver tab in the tree on the left See section 3 2 4 for details Welcome back object enables or disables the Welcome back tab in...

Page 50: ...time lags it is advisable to only have one master clock within the installation Having multiple devices overwriting each other their time and date registers periodically may end up inducing delays Th...

Page 51: ...t evident that the main language is always enabled Select language list of the available languages Language X enables or disables the additional language X Select language list of available languages...

Page 52: ...Normal Mode enabled by default Backlight Level display brightness percentage 0 100 Backlight Attenuation lets defining whether the backlight should behave during inactivity according to section 2 8 Tu...

Page 53: ...the mode by writing to a binary object General Ilumination It is possible to select which value should trigger which mode 0 Normal Mode 1 Night Mode or 0 Night Mode 1 Normal Mode Control object Scene...

Page 54: ...Display sets whether to decrease the display brightness when showing the screensaver Time Date sets whether to show the current time or not Temperature sets whether to show the current temperature or...

Page 55: ...ck function Additional Condition sets if sending the welcome back object should also depend on an external condition The option by default is No Additional Condition The following are available too Do...

Page 56: ...ding of a scene run request through General Scene send when the welcome back function is triggered and the condition if any evaluates to true The desired scene number 1 through 64 should to be entered...

Page 57: ...n assigned the option Received from text object With a parameterisation as the one shown in Figure 42 if Mr Marshall is received through the General Welcome Greeting Line 2 object the display will sho...

Page 58: ...acters will represent one weekday The default value is MTWTFSS which stands for the day names in English Label for X sets the label that will represent the twelve months of the year They default value...

Page 59: ...ter Time appears to set the time period from 10 to 655350 seconds Password parameter made of four additional textboxes each of which should contain one of the four consecutive digits 0 9 that will com...

Page 60: ...Label for Password 1 message shown when the user is required to type in the password for level 1 By default Password 1 Label for Password 2 message shown when the user is required to type in the passw...

Page 61: ...h the following options 0 Unlocked 1 Locked default value and 0 Locked 1 Unlocked Depending on the selection sending one value or another 0 or 1 to object General Touch lock will lock unlock the touch...

Page 62: ...Internal temperature object see section 3 1 enabled by default The permitted values are 0 to 100 tens of a second The value 0 set by default deactivates this sending to the bus Send with a Temperatur...

Page 63: ...Static only available in Z41 COM This IP address is used to communicate with the Z41 Pro COM remote control from the mobile application as well as to update its firmware see section 1 3 1 over a local...

Page 64: ...ALLS Z41 COM In this tab is possible to set the network configuration for voice calls as well as enabling the Video Intercoms and Internal Calls Figure 51 VoIP Calls Main Configuration Z41 COM VoIP Co...

Page 65: ...ables the Internal Calls tab where the calls to other Z41 COM can be configured See section 3 2 13 2 for details Note When enabling and configuring a Video Intercom and or an Internal Call the Z41 COM...

Page 66: ...yte object to change the ringtone volume 0 100 Video Intercom Ringtone 1 byte object to change the ringtone of a call made from an external unit Seven values available 0 Ringtone 1 1 Ringtone 2 6 Ring...

Page 67: ...power failure is required to update the parameter My ID after downloading Page Title Incoming Call Outgoing Call Ongoing Call titles of the different internal calls dialogs Default Ringtone allows se...

Page 68: ...ject to change the ringtone of internal call Seven values available 0 Ringtone 1 1 Ringtone 2 6 Ringtone 7 3 2 14 NTP Z41 PRO AND Z41 COM After enabling Synchronize Time Data via NTP from General scre...

Page 69: ...synchronization 0 pool ntp org is the default server which belongs to NTP Pool Project s servers Note it is recommended to use the specific server of the continental zone where the installation is Fo...

Page 70: ...e or Community The private type allows accessing at any time to the visualization of images from the camera of the outdoor unit The community type does not The Outdoor Unit Is in a Different Network r...

Page 71: ...n enabled the following parameters appear Secure Opening allows setting a username and password required to send through the HTTP command to open de door in order to increase the security must match w...

Page 72: ...5 seconds after which the automatic door opening command will be sent For further information about the configuration of Z41 COM and external units GetFace IP please refer to the Manual for Video Inte...

Page 73: ...tifier If the contacts are imported via USB this field corresponds to the sipID Important It must match the My ID parameter configured in the Internal call tab of the Z41 COM to which the contact refe...

Page 74: ...ntains only one screen Configuration 3 5 1 CONFIGURATION Figure 57 Configuration Menu Vertical If the screen orientation is set horizontally see section 3 2 1 the title field is divided into two maxim...

Page 75: ...distributed option Yes depending on the number of boxes configured or be displayed as a static 2x4 grid option No See section 2 10 Default Page dropdown list that sets the page Menu or any of the gen...

Page 76: ...es in this section will show the parameters of a certain page for instance page 1 or a certain box for instance box 1 The parameters for other pages or boxes are totally analogous 3 6 1 CONFIGURATION...

Page 77: ...sword when trying to access it Two levels No the page will not be protected by password All users can access it Level 1 the page will implement security level 1 To access it users will be required to...

Page 78: ...ected sets whether the control will be password protected or not does not apply to indicator type boxes Depending on the security levels configured one or two see section 3 2 8 this list will contain...

Page 79: ...function must be selected through the Function parameter The available functions and the related parameters are 3 6 2 1 1 Binary Indicator Icon The box will behave as a binary state indicator Each of...

Page 80: ...or 1 through the aforementioned object the box will show one text or another Figure 64 Binary Indicator Text 3 6 2 1 3 Enumerated Indicator Icon The box will behave analogously to the case of the Bina...

Page 81: ...lue no icon will be shown 3 6 2 1 4 Enumerated Indicator Text The box will behave analogously to the case of the Binary indicator Text however it will be possible to distinguish up to 6 states configu...

Page 82: ...int indicator 2 byte floating point 671088 64 670760 96 Pn Bi 2 byte float indicator 4 byte signed integer 2147483648 2147483647 Pn Bi 4 byte Signed Int Indicator 4 byte floating point 3 403E 38 3 40...

Page 83: ...an be afterwards offered a visual representation that reflects the chronological evolution of such value with several levels of detail depending on the parameterisation Figure 68 Plot Zoom Levels Boxe...

Page 84: ...minimum values Finally the bin icon lower right corner of the screen lets the user by performing a long press the contents will be deleted from the log file thus setting the values of the monitor to z...

Page 85: ...e Pn Bi Binary control object which turns visible as soon as this function is assigned to the box Figure 74 Binary control On the other hand Action permits setting what value will be sent to the bus t...

Page 86: ...trols Figure 75 1 byte constant unsigned int If the box is assigned any of the remaining constant control options the central button in the box will react to user presses by sending a certain numerica...

Page 87: ...e number of the scene 1 64 to be sent Moreover Action which shows the options Run and Run and save sets whether the device will only send scene execution orders after a short press or if it will be po...

Page 88: ...secutively on the buttons of a control that regulates e g increases decreases the value of a certain variable only the final value selected by the user will be sent to the bus to prevent an unnecessar...

Page 89: ...y Control object while the status object Pn Bi Binary Indicator will determine the text that will be shown in the box The parameters available are Action sets the value to be sent on button touches Th...

Page 90: ...rough the control object when the user after pressing the buttons sets the control box to state j Icon j indicative icon that will be displayed in the box when the status object which gets automatical...

Page 91: ...tus object which gets automatically updated whenever a control order is sent although it may also receive values from the bus acquires the numerical value defined in the above parameter 3 6 2 3 5 Nume...

Page 92: ...crease Right Decrease Range Control object Status object 1 byte unsigned int 0 255 Pn Bi 1 byte unsigned int control Pn Bi 1 byte unsigned int indicator 1 byte signed int 128 127 Pn Bi 1 byte signed i...

Page 93: ...es will be required It is 10 by default except for the case of the 2 byte floating point control where it is 1 Note if the increments configured are too small certain button touches may not cause a pe...

Page 94: ...l contain an indicator that will permanently show as a percentage the value of the status object The only specific parameter for this function is Action sets which of the two buttons will send the mov...

Page 95: ...ps up and 1 for steps down are sent through Pn Bi Stop Shutter after a short press on the corresponding button If the shutter was already in movement these orders are interpreted by the actuator as a...

Page 96: ...ton takes place the object Pn Bi Light Dimming will send the light increment order corresponding to the parameterised dimming step while a stop order value 8 will be sent through the same object as so...

Page 97: ...climate control The available options for Function and for the dependent parameters are as follows 3 6 2 4 1 Setpoint Control This function permits controlling the temperature setpoint of an external...

Page 98: ...nt to the thermostat being progressively higher or lower as the user touches the control buttons It is possible to set different increments for short press short increment and long press long incremen...

Page 99: ...t 10 C Maximum offset 10 C The objects are linked to those from an external thermostat which can be supposed to have a base temperature setpoint of 25 C After the parameter download 1 The first touch...

Page 100: ...een sent the value 1 5 to the bus it will happen that on the forth press the value sent will be 0 5 and not 2 Figure 90 Relative Float Setpoint Control Object Linking Note the parameterised setpoint t...

Page 101: ...ool mode the device will send the value 0 through the control object while on the activation of the Heat mode the value 1 will be sent Moreover the box will automatically commute between one icon and...

Page 102: ...be sent to the bus a certain value see Table 5 after which the box will display the icon that corresponds to the new mode Additionally if the status object receives from the bus a value that represen...

Page 103: ...as a percentage the value of the current fan level which will be represented with a variable icon on the box Action permits setting the increase or decrease actions to one button or another Options a...

Page 104: ...the following parameters are also shown Dedicated Object for Auto Mode sets how the Auto mode should be activated In the absence of a dedicated object the Auto fan mode will be activated by switching...

Page 105: ...e button In this case the fan levels reachable through short presses are speed 0 is optional 0 Minimum Medium Maximum Here the Auto mode is only activated by long press Allow speed 0 sets whether the...

Page 106: ...sponds to the mode that the user selects by touching the buttons see Table 6 while the status object which can receive values from the bus although it gets self updated as well on button presses will...

Page 107: ...ns in the box Note a list with all icons available can be found in document Z41 Icon list available at www zennio com 3 6 2 5 OTHER This category involves the following functions which can be selected...

Page 108: ...ends Left Button and Right Button permit selecting the icon that will be displayed inside the buttons in the box Regarding the RGB control boxes themselves a central label will permanently show as a...

Page 109: ...ed colours is shown at the bottom of the palette These colours refer to those recently used within that particular box 3 6 2 5 2 RGBW The RGBW control is entirely analogous to the above RGB control al...

Page 110: ...ly to RGB control boxes Figure 104 RGBW Box Nevertheless when the colour palette of an RGBW box is accessed a fourth increase decrease regulator is shown together with the three regulators shown in th...

Page 111: ...e box indicator shows the instant power or flow When the user touches any of these boxes a pop up window similar to the Figure 108 will be shown Figure 108 Energy Monitor Pop Up Window Evolution of th...

Page 112: ...n the pop up window and if so the energy measurement units kWh or Wh Figure 109 Energy consumption monitor If Water Gas two specific parameters will show up to set the water gas flow units litres per...

Page 113: ...ing elements must be highlighted Evolution of the Power Flow object shows as a graph the chronological evolution of the value of the power or flow object according to the measurement type The horizont...

Page 114: ...certain time either every day or only once or at the end of a countdown Figure 112 Daily Timer Box Hence when the user presses on the box a window containing the necessary controls for setting up a ti...

Page 115: ...Scenes Send object in case of scene values In both cases the Pn Bi Daily Timer Enabling binary object will be available making it possible to disable by sending the value 0 or to enable value 1 the ex...

Page 116: ...certain days on a weekly basis The difference between the daily and the weekly timers is that the latter does not permit the countdown based sending although it does permit that a time based sending...

Page 117: ...g value through the Pn Bi Weekly Timer Control object in the case of sending a binary value or through the General Scenes Send object in the case of sending a scene number In both cases the Pn Bi Week...

Page 118: ...itions even if the clock does not specifically pass through the specified time In other words supposing one timed sending of the value ON at 10 00h am and one timed sending of the value OFF at 8 00h p...

Page 119: ...18 Chrono thermostat box The switch button on the left activates deactivates the chrono thermostat that is resumes or stops the execution of the timed actions that may have been configured the configu...

Page 120: ...ble to send a switch off order to the thermostat In such case the user must successively press on the above control until one of the range limits is reached after which the word OFF will show on the s...

Page 121: ...e alarm is still active and unconfirmed Additionally the icon of the page that contains the box will also show an exclamation Figure 121 Alarm Box The intermitting exclamation means that the alarm is...

Page 122: ...alue Periodic Monitoring activates Yes or deactivates No default option periodic monitoring of the alarm trigger object Cycle Time x 1min in case of having selected Yes under the above parameter sets...

Page 123: ...value 0 for example due to failures or sabotage The user should proceed in the same manner as in the above example to manage the alarm notification 3 6 2 5 8 Holiday Calendar Figure 123 Holiday Calend...

Page 124: ...will be sent Figure 124 Send Scene Send 1 byte Object checkbox to enable or disable the sending of a 1 byte object 0 to 255 on date changes When enabled two more parameters will show Value Workday nu...

Page 125: ...ult Figure 127 Holiday Calendar Note this configuration is year dependent Therefore the holiday selection only applies to the year shown on the calendar although it is possible to navigate to the subs...

Page 126: ...e project topology On the contrary if set to Scene Object the trigger value will be expected through the General Scenes Receive object Value 0 Stop 1 Start or 0 Start 1 Stop in the case of the one bit...

Page 127: ...ired delay of the action while the icon allows inserting additional actions The page box and value corresponding to each of the actions in the list can be set through the upper section of the panel Up...

Page 128: ...ugh the object Pn Bi Scheduler Enabling The options are 0 Disable 1 Enable or 0 Enable 1 Disable A box configured as a Scheduler will have the same appearance as a Chrono Thermostat as shown in Figure...

Page 129: ...actions The and arrows allow stepping through the time controlled actions while a long press on the garbage icon allows removing the action Up to 30 time controlled actions are available per scheduler...

Page 130: ...Evaluate or 0 Evaluate 1 Nothing A box configured as a logical function will be displayed as shown in Figure 135 and will be composed of two buttons without indicator Figure 135 Logic Function box Lef...

Page 131: ...as 1 button Control 2 button Control Enumerated Numeric Shutter Control or Dimming Control Climate Control Comsuption Monitor or RGB RGBW Boxes configured as indicators or actions that are not compati...

Page 132: ...Video Intercom box Figure 140 Video Intercom To configure a box as a Video Intercom the following parameters must be set Video Intercom number of the VI to which the box is associated Note A warning m...

Page 133: ...l screen of internal calls see section 3 2 13 2 Contact List shows a list of contacts and two arrows to go through it Note This is the interface that will be displayed if the Import contacts via USB o...

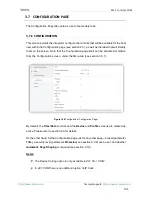
Page 134: ...page itself can be activated or hidden from the Configuration screen under the Menu tab see section 3 5 1 Figure 144 Configuration Configuration Page By default the Time Date controls and the Device a...

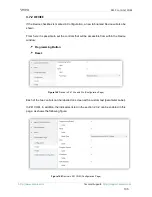
Page 135: ...o set the controls that will be accessible from within the Device window Programming Button Reset Figure 145 Device in Z41 Lite and Pro Configuration Page Each of the two controls can be labelled on s...

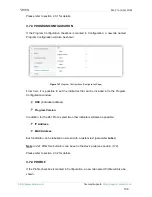
Page 136: ...possible to set the indicators that will be included intro the Program Configuration window KNX individual address Program Version In addition for the Z41 Pro to select two other indicators will also...

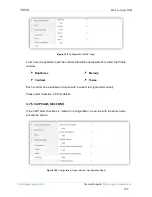
Page 137: ...accessible from within the Profile window Brightness Contrast Melody Theme Each control can be labelled on screen with a custom text parameter Label Please refer to section 2 3 3 for details 3 7 5 Vo...

Page 138: ...that will be accessible from within the VoIP Calls configuration window Video Intercom Ringtone Internal Call Ringtone Ringtone Volume Do Not Disturb Mode Enabling Do Not Disturb Mode Timing IP Addre...

Page 139: ...tabs both similar to each other for the parameterisation of these functions independently Under each of the tabs a set of screens Configuration Setpoint etc is provided to define the type of the therm...

Page 140: ...ctor e g ZN1IO DETEC and ZN1IO DETEC N will not work properly with Z41 Pro Lite When Inputs has been activated in the General screen see section 3 2 1 the following drop down lists will be available f...

Page 141: ...ennio website www zennio com Notes The ZN1IO DETEC P motion detector is compatible with a variety of Zennio devices However depending on the device it is actually being connected to the functionality...

Page 142: ...ost indicators in consumption monitor boxes see section 3 6 2 5 On the other hand after a software update the configuration of the following controls is maintained while they remain in the same box an...

Page 143: ...ea network LAN CONFIGURING Z41 PRO Z41 PRO Z41 COM In order to make the Z41 Pro Z41 COM control function available for remote applications it is necessary that the integrator specifically enables it i...

Page 144: ...bling back the Device Pairing parameter or not after the pairing process is up to the integrator depending on whether the final user needs or not to be allowed to pair their Z41 Pro Z41 COM with furth...

Page 145: ...on the screen The user will be required to enter this key word on the remote application in order to set the link with Z41 Pro Z41 COM The key word will be active for 2 minutes after that time it exp...

Page 146: ...as also received the no alarm trigger value Therefore the alarm has been deactivated and acknowledged The above notifications are shown on the mobile device unless push notifications are disabled by t...

Page 147: ...tware failures of any kind REMOTE APPLICATIONS For instructions on configuring and using the available remote applications please refer to the Z41 Remote specific document available at the Zennio home...

Page 148: ...Byte I C W 0 5 General Select Language 0 Main 1 Lang 2 4 Lang 5 8 2 Bytes I C W DPT_LanguageCodeAlpha2_ASCII General Select Language Language selection through ISO 639 1 two letters code 9 1 Bit I C W...

Page 149: ...8 32767 2 Bytes I C T W U 9 xxx 671088 64 670760 96 Px Bx 2 Byte Float Indicator 671088 64 670760 96 1 Byte I C T W U DPT_Scaling 0 100 Px Bx Shutter Position 0 Top 100 Bottom 1 Byte I C T W U DPT_Sca...

Page 150: ...1 Px Bx Binary Control 1 Bit Control 1 Byte O C T R DPT_Value_1_Ucount 0 255 Px Bx 1 Byte Unsigned Int Control 0 255 1 Byte O C T R DPT_Value_1_Count 128 127 Px Bx 1 Byte Signed Int Control 128 127 1...

Page 151: ...Scaling 25 50 75 100 1 Byte O C T R DPT_Scaling 0 100 Px Bx Fan Control Scaling 33 67 100 1 Byte O C T R DPT_Scaling 0 100 Px Bx Fan Control Scaling 50 100 1 Byte O C T R DPT_Scaling 0 100 Px Bx Fan C...

Page 152: ...DPT_Scaling 0 100 Px Bx Blue Channel 0 100 2 Bytes I C T W U 670760 00 670760 00 Px Bx Consumption Monitor Cost Local Currency 1 Bit O C T R DPT_Switch 0 1 Px Bx Chrono thermostat On Off 0 Off 1 On 1...

Page 153: ...727 735 743 751 759 767 775 783 791 4 Bytes I C T W U DPT_Value_Volume 3 403E 38 3 403E 38 Px Bx Consumption Monitor Volume m 4 Bytes I C T W U DPT_ActiveEnergy 3 403E 38 3 403E 38 Px Bx Consumption M...

Page 154: ...73 481 489 497 505 513 521 529 537 545 553 561 569 577 585 593 601 609 617 625 633 641 649 657 665 673 681 689 697 705 713 721 729 737 745 753 761 769 777 785 793 1 Bit O C T R DPT_Switch 0 1 Px Bx Co...

Page 155: ...Move Up Down Shutter Switching 0 1 Up Down 1 Bit C T DPT_Step 0 1 Ix Short Press Stop Step Up Shutter Sending of 0 Stop Step Up 1 Bit C T DPT_Step 0 1 Ix Short Press Stop Step Down Shutter Sending of...

Page 156: ...PT_Scaling 0 100 Ix Short Press Shutter Status Input 0 Top 100 Bottom 1 Byte I C W DPT_Scaling 0 100 Ix Short Press Dimming Status Input 0 100 798 804 1 Bit C T DPT_Switch 0 1 Ix Long Press 0 Sending...

Page 157: ...255 Ix Long Press Constant Value Integer 0 255 1 Bit C T DPT_Switch 0 1 Ix Double Press 0 Sending of 0 1 Bit C T DPT_Switch 0 1 Ix Double Press 1 Sending of 1 1 Bit I C T W DPT_Switch 0 1 Ix Double P...

Page 158: ...ate Scaling 0 100 824 829 834 853 858 863 1 Byte O C T R DPT_HVACMode 1 Comfort 2 Standby 3 Economy 4 Building Protection Ix Cx Detection State HVAC Auto Comfort Standby Economy Building Protection 82...

Page 159: ...Tx Setpoint Status Current Setpoint 891 921 2 Bytes O C T R DPT_Value_Temp 273 00 670760 00 Tx Basic Setpoint Status Current Basic Setpoint 892 922 2 Bytes O C T R DPT_Value_Tempd 670760 00 670760 00...

Page 160: ...7 1 Byte I C W 0 5 General Select Language 0 Main 1 Lang 2 4 Lang 5 8 2 Bytes I C W DPT_LanguageCodeAlpha 2_ASCII General Select Language Language Selection Through ISO 639_1 Two Letters Code 9 1 Bit...

Page 161: ...3 651 659 667 675 683 691 699 707 715 723 731 739 747 755 763 771 779 787 1 Bit I C T W U DPT_Switch 0 1 Px Bx Binary Indicator 1 Bit Indicator 1 Byte I C T W U DPT_Value_1_Ucount 0 255 Px Bx Enumerat...

Page 162: ...483647 Px Bx 4 Byte Signed Int Indicator 2147483648 2147483647 1 Byte I C T W U DPT_Scaling 0 100 Px Bx Fan Indicator 0 100 1 Byte I C T W U DPT_Value_1_Ucount 0 255 Px Bx Fan Indicator Enumerated Val...

Page 163: ...ode Control 0 Cool 1 Heat 1 Byte O C T R DPT_HVACContrMode 0 Auto 1 Heat 3 Cool 9 Fan 14 Dry Px Bx Mode Control Heat Cool Auto Fan and Dry 1 Byte O C T R DPT_HVACMode 1 Comfort 2 Standby 3 Economy 4 B...

Page 164: ...4 1 Byte O C T R DPT_Value_1_Ucount 0 255 Px Bx Fan Control Enumerated Auto 1 2 3 1 Byte O C T R DPT_Value_1_Ucount 0 255 Px Bx Fan Control Enumerated Auto 1 2 1 Byte O C T R DPT_Value_1_Ucount 0 255...

Page 165: ...y 1 Bit O C T R DPT_Switch 0 1 Px Bx Chrono thermostat On Off 0 Off 1 On 1 Byte I O C T R W U DPT_Scaling 0 100 Px Bx White Channel 0 100 1 Byte O C T R DPT_Value_1_Ucount 0 255 Px Bx Holiday 1 Byte 0...

Page 166: ...56 664 672 680 688 696 704 712 720 728 736 744 752 760 768 776 784 792 2 Bytes I C T W U 9 xxx 671088 64 670760 96 Px Bx Consumption Monitor CO kg CO 33 41 49 57 65 73 81 89 97 105 113 121 129 137 145...

Page 167: ...ll Ringtone 0 Ringtone 1 1 Ringtone 2 6 Ringtone 7 820 1 Byte I C W DPT_SceneControl 0 63 128 191 Thermostat Scene Input Scene Value 821 851 2 Bytes I C W DPT_Value_Temp 273 00 670760 00 Tx Temperatur...

Page 168: ...fault 1 Bit I C W DPT_Reset 0 1 Tx Offset Reset Reset offset 839 869 1 Bit I C W DPT_Heat_Cool 0 1 Tx Mode 0 Cool 1 Heat 840 870 1 Bit O C T R DPT_Heat_Cool 0 1 Tx Mode Status 0 Cool 1 Heat 841 871 1...

Page 169: ...n and send us your inquiries about Zennio devices http support zennio com Zennio Avance y Tecnolog a S L C R o Jarama 132 Nave P 8 11 45007 Toledo Spain Tel 34 925 232 002 www zennio com info zennio c...

Reviews: