Front Panel
Replacement Procedures
Force EZ-C Series Service Manual
8-9
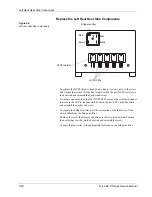
If you are replacing only the front panel housing, remove the knobs, Display
board (with REM lever assembly), Footswitch receptacle, and power switch from
the old assembly and install them on the new front panel housing. Follow the
instructions in
Remove and Reinstall the Front Panel Components
.
or
If you are replacing the entire front panel assembly, go to
Install the Front Panel
Assembly
.
Remove and Reinstall the Front Panel Components
1.
Remove the knobs and Display board.
a.
Using pliers, pry the clips off each knob shaft and pull the knobs out. Save
the knobs for reinstallation. Discard the clips.
b.
Remove the eight screws that secure the Display board to the front panel.
Save the screws and ground clips for reinstallation
c.
Partially separate the Display board from the front panel and disconnect
the footswitch cable from the Display board. Do not remove the REM
lever and spring from the Display board.
2.
Remove the Footswitch receptacle and install it on the new front panel.
a.
Note the location of the ground wire. Then, remove the four screws that
secure the Footswitch receptacle (and ground wire) to the front panel.
b.
Note the orientation of the Footswitch receptacle. Slide it out the front of
the panel.
c.
On the new front panel, position the receptacle over the opening, orienting
the receptacle and ground wire as they were in the old front panel. Press to
fit the receptacle into the opening.
d.
Install the screw that secures the ground wire (and Footswitch receptacle)
to the front panel. Install the remaining three screws that secure the
Footswitch receptacle to the front panel.
3.
Remove the power switch and install it on the new front panel.
a.
Inside the front panel, use the pliers to press the four tabs that secure the
power switch and push the switch (and connected cable) out of the
opening.
b.
From outside the new front panel, route the power switch cable through
the power switch opening.
c.
Position the power switch with the on ( | ) switch above the off ( O) switch.
Press to snap the switch into place.


