8
Valco Melton
IS0161
Handgun Switch Kit Installation and Operation
Input Setup
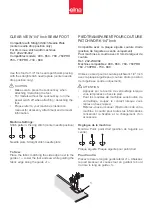
1.
On the Power Board (151xx614), set “Switch 1” UP to the FILL
position. See Figure above.
2.
For Variable Speed Units (with a VFD) only: Locate the Motor
Control Board on the back side of the keypad and make sure
SW1 is in the FIX position. See figure below.
For Fixed Speed
Units, skip step 2 and
proceed to step 3.
3.
Setup is complete.
Testing
1.
Connect the hose/handgun to the D10 Unit.
2.
Connect the 4-pin circular connector from the Handgun Switch
Cable installed, to the mating connector from the hose.
3.
Turn ON the unit and wait for all zones to reach temperature and
for the System Ready light to come on.
4.
Enable the Pump by pressing the Manual Pump On/Off on the
Keypad.
5.
Pull the handgun trigger to activate the pump. Testing is
successful when the pump is enabled during the time the trigger
is held.
To tell if the pump is
enabled when the
trigger is held, listen
for the sound of the
pump activating. Also,
if there is glue in the
system, the handgun
will dispense glue.
Summary of Contents for D4
Page 1: ...D4 Hot Melt Unit Manual Number MM147 Revision Date 6 2018 ...
Page 4: ......
Page 10: ...Table of Contents MM147 D4 Hot Melt Unit 10 Module Status LED 170 Link Activity LED 170 ...
Page 20: ...Section 2 Safety and Use MM147 D4 Hot Melt Unit 20 ...
Page 22: ...Section 3 Basic Features MM147 D4 Hot Melt Unit 22 ...
Page 35: ...MM147 D4 Hot Melt Unit Section 5 Setup 35 Section 5 Setup Control Panel ...
Page 42: ...Section 5 Setup MM147 D4 Hot Melt Unit 42 Set Language Continued Next Page ...
Page 43: ...MM147 D4 Hot Melt Unit Section 5 Setup 43 Set Language Continued ...
Page 44: ...Section 5 Setup MM147 D4 Hot Melt Unit 44 Set Temperature Units ...
Page 47: ...MM147 D4 Hot Melt Unit Section 5 Setup 47 Hose Valve Temperature Continued ...
Page 54: ...Section 5 Setup MM147 D4 Hot Melt Unit 54 Beacon Alarm Setup Continued ...
Page 55: ...MM147 D4 Hot Melt Unit Section 5 Setup 55 Beacon 2 ...
Page 70: ...Section 5 Setup MM147 D4 Hot Melt Unit 70 Sequential Start Valve ...
Page 100: ...Section 6 Operation MM147 D4 Hot Melt Unit 100 ...
Page 106: ...Section 7 Maintenance MM147 D4 Hot Melt Unit 106 ...
Page 110: ...Section 9 Specifications MM147 D4 Hot Melt Unit 110 Dimensions ...
Page 112: ...Section 10 Part Number List MM147 D4 Hot Melt Unit 112 D4 Unit ...
Page 113: ...MM147 D4 Hot Melt Unit Section 10 Part Number List 113 D4 Unit Continued ...
Page 120: ...Section 10 Part Number List MM147 D4 Hot Melt Unit 120 D4 Base Unit 776xx392 ...
Page 142: ...Section 11 Warranty MM147 D4 Hot Melt Unit 142 ...
Page 144: ...Section 12 Service MM147 D4 Hot Melt Unit 144 ...
Page 146: ...Appendix A Password Levels MM147 D4 Hot Melt Unit 146 Setting Level 0 as Default Continued ...
Page 148: ...Appendix B Power Requirements MM147 D4 Hot Melt Unit 148 ...
Page 150: ...Appendix C Instruction Sheets for Option Kits MM147 D4 Hot Melt Unit 150 ...
Page 208: ...5 Valco Melton IS0343 Anybus Installation Installation Continued ...
Page 245: ...Appendix E Communication Protocols Modus MM147 D4 Hot Melt Unit 162 ...