


152
9
9
9
9.
.
.
.1
1
1
1.
.
.
.3
3
3
3
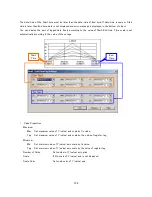
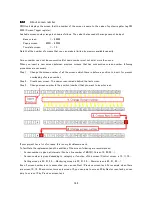
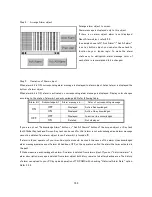
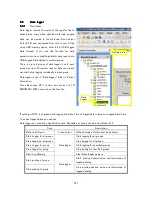
USB Data Log Upload task (From USB memory to PMIU unit)
This is a kind of extra task. You can upload logged data in background task (unit does not stops) without TR
PGMS, and can select Data/Time of the logged data to upload. About detail, refer
6.2.4.
Insert USB memory device to USB Host port at first, then execute the task. If task settings (Start/End
Date/Time, file name) are set correctly, task is done and the logged data is saved in USB memory device as
CSV file (Tab spread type).
9
9
9
9.
.
.
.1
1
1
1.
.
.
.4
4
4
4
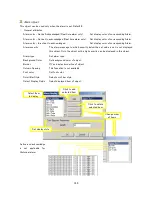
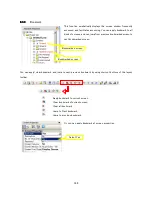
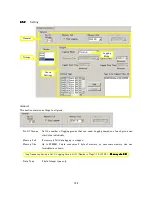
USB Download (From USB memory to PMIU unit)
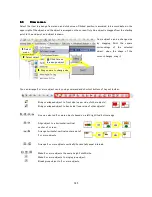
Step 1.
You should prepare the project file to upload. Open the project for upload, and save as the name
“TRP0500A” to USB memory. If the name is different, the operation is not done.
Step 2.
Insert the USB memory to USB HOST port of PMIU unit, then turn ON S0037 (USB host menu
trigger).
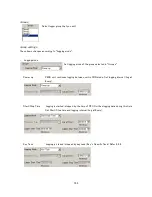
Step 3.
Select “Yes” in “Confirm Operation” window. If you select “No”, or when you left the unit for several
seconds, unit reboots automatically and switches to HALT mode.
Step 4.
Select “Download” in “Confirm Operation” window. Note that when you left the unit for several
seconds, unit reboots automatically and switches to HALT mode.
Step 5.
Upload options is displayed. Select item to download to PMIU unit. If you select “Exit”, the unit
reboots automatically and switches to HALT mode.
Here are 4 items for upload, Application, Firm ware, Fonts, Ladder. Select the item.
Step 6.
Select item to download, then operation is started automatically. Note that this operation overwrites
the project file in PMIU unit.
Step 7.
When the download operation is finished, unit displays confirmation window, and back to download
options menu. If you download 2 or more items, select item and repeat operation.
Step 8.
If you have finished downloading necessary items to PMIU unit, select “Exit” from download options
menu to quite USB Host mode. PMIU unit reboots automatically and switches to HALT mode.
Summary of Contents for TR PMIU
Page 11: ...1 Chapter Chapter Chapter Chapter 1 1 1 1 Introduction Introduction Introduction Introduction ...
Page 15: ...5 Chapter 2 Chapter 2 Chapter 2 Chapter 2 Hardware Hardware Hardware Hardware ...
Page 23: ...13 Input Wiring for TR PDIO0808 P Output ...
Page 24: ...14 Wiring for TR PDIO0808 N Input Output ...
Page 26: ...16 Input Input Wiring for TR PDIX1600 ...
Page 28: ...18 Output Wiring for TRSDOX0016N ...
Page 39: ...29 Chapter Chapter Chapter Chapter 3 3 3 3 TR PGMS TR PGMS TR PGMS TR PGMS ...
Page 83: ...73 Chapter 5 Chapter 5 Chapter 5 Chapter 5 Tag Tag Tag Tag ...
Page 98: ...88 Chapter Chapter Chapter Chapter 6 6 6 6 Task Task Task Task ...
Page 124: ...114 Chapter 8 Chapter 8 Chapter 8 Chapter 8 Screen Screen Screen Screen ...
Page 167: ...157 Note for the numbers of alarm message ...
Page 176: ...166 Appendix Appendix Appendix Appendix ...
Page 181: ...171 ...
Page 182: ...172 ...