
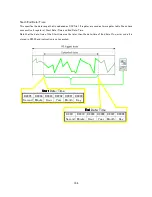


111
Automatic allocation
If you prepare all Expansion I/O units which are actually used, you can use Automatic I/O allocation function.
Note that existing I/O allocation setting of project will overwrite.
Step 1.
Connect all Expansion I/O units to PMIU unit, and supply power to all unit.
Step 2.
Connect PMIU unit to your PC by USB. ONLINE mode is not needed.
Step 3.
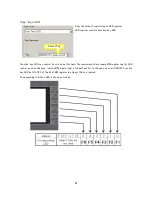
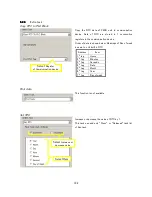
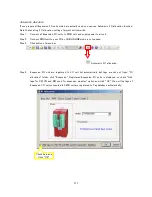
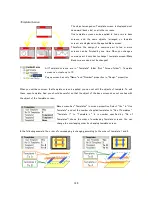
Click button of menu bar.
Automatic I/O allocation
Step 4.
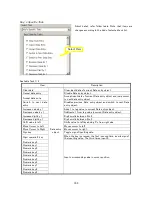
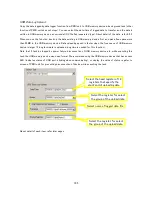
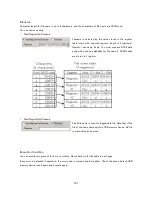
Expansion I/O unit are registered to I/O unit list automatically, but tags are not yet. Open “IO
allocation” folder, click “Expansion”. Registered Expansion I/O units is displayed, so check “Add
tags for XW, YW and MW used for expansion modules” option and click “OK”, then all the tags of
Expansion I/O unit connected to PMIU unit are registered to Tag database automatically.
Check here and
Click “OK”
Summary of Contents for TR PMIU
Page 11: ...1 Chapter Chapter Chapter Chapter 1 1 1 1 Introduction Introduction Introduction Introduction ...
Page 15: ...5 Chapter 2 Chapter 2 Chapter 2 Chapter 2 Hardware Hardware Hardware Hardware ...
Page 23: ...13 Input Wiring for TR PDIO0808 P Output ...
Page 24: ...14 Wiring for TR PDIO0808 N Input Output ...
Page 26: ...16 Input Input Wiring for TR PDIX1600 ...
Page 28: ...18 Output Wiring for TRSDOX0016N ...
Page 39: ...29 Chapter Chapter Chapter Chapter 3 3 3 3 TR PGMS TR PGMS TR PGMS TR PGMS ...
Page 83: ...73 Chapter 5 Chapter 5 Chapter 5 Chapter 5 Tag Tag Tag Tag ...
Page 98: ...88 Chapter Chapter Chapter Chapter 6 6 6 6 Task Task Task Task ...
Page 124: ...114 Chapter 8 Chapter 8 Chapter 8 Chapter 8 Screen Screen Screen Screen ...
Page 167: ...157 Note for the numbers of alarm message ...
Page 176: ...166 Appendix Appendix Appendix Appendix ...
Page 181: ...171 ...
Page 182: ...172 ...