Storing Documents 31
10
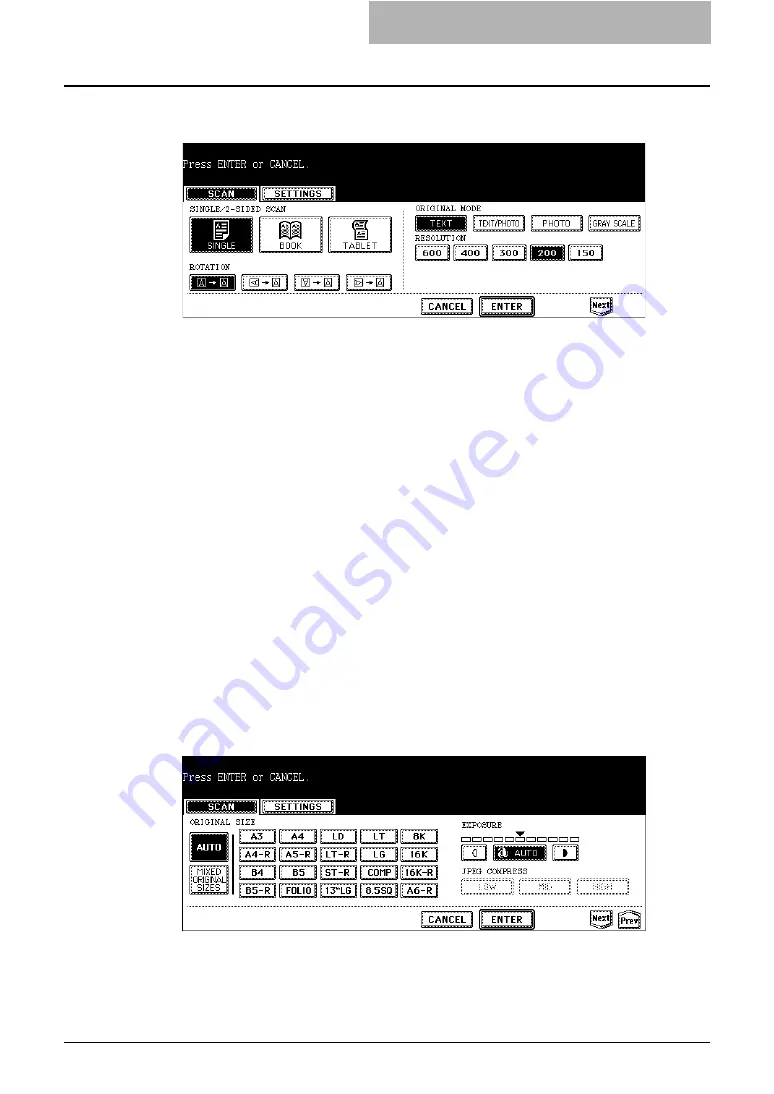
Specify the following items as you require, and press the [Next]
button.
y
SINGLE/2-SIDED SCAN
[SINGLE]
— Press this when scanning only the front page of originals.
[BOOK]
— Press this when scanning both side of originals in the same direction.
[TABLET]
— Press this when scanning front page in the general direction, and scanning
back page rotated 180 degree.
y
ROTATION
[0 degree]
— Press this not to rotate the scanned image.
[90 degree right]
— Press this to rotate the scanned image 90 degree on the right.
[180 degree]
— Press this to rotate the scanned image 180 degree.
[90 degree left]
— Press this to rotate the scanned image 90 degrees on the left.
y
ORIGINAL MODE
[TEXT]
— Press this when scanning the originals that contain texts.
[TEXT/PHOTO]
— Press this when scanning originals that contain texts and photos.
[PHOTO]
— Press this when scanning originals that contain photos printed on
photographic paper.
[GRAY SCALE]
— Press this when scanning originals as gray scale pictures.
y
RESOLUTION
[600]
— Press this when scanning originals in 600 dpi.
[400]
— Press this when scanning originals in 400 dpi.
[300]
— Press this when scanning originals in 300 dpi.
[200]
— Press this when scanning originals in 200 dpi.
[150]
— Press this when scanning originals in 150 dpi.
11
Specify the following items as you require, and press the [Next]
button.
y
ORIGINAL SIZE
Select the button of the original size, or select the [AUTO] button to automatically detects
the original size.
When placing the different size originals on the Automatic Document Feeder, select the
[MIXED ORIGINAL SIZE] button.
Summary of Contents for e-STUDIO 850 Series
Page 1: ...MULTIFUNCTIONAL DIGITAL SYSTEMS e Filing Guide ...
Page 2: ......
Page 10: ...8 Preface ...
Page 14: ...12 TABLE OF CONTENTS ...
Page 24: ...1 Overview 22 Features and Functions ...
Page 106: ...2 Getting Started 104 Getting Started with e Filing Web Utility ...
Page 138: ...3 How to Edit Documents 136 Moving and Merging Documents ...
Page 215: ...Safeguarding Data 213 3 Click OK y The selected user boxes are deleted from the e Filing ...
Page 234: ...5 System Administration 232 Using e Filing Backup Restore Utility ...
Page 260: ...6 Menu Functions Web utility 258 Layout Menu Functions ...
Page 268: ...7 Troubleshooting 266 TWAIN and File Downloader Errors ...
Page 272: ...270 INDEX ...


