6B-8 Steering / Handlebar:
• Install the cotter pin (8).
CAUTION
!
The removed cotter pin (8) must be replaced
with a new one.
• Install EPS body assembly. Refer to “EPS Body
Assembly Removal and Installation (LT-A750XP/ZK9)
in Section 6C (Page 6C-50)”.
• Install the EPS control unit. Refer to “EPS Control Unit
Removal and Installation (LT-A750XP/ZK9) in Section
6C (Page 6C-48)”.
• Install the handlebars. Refer to “Handlebars Removal
and Installation in related manual”.
• Install the front fender. Refer to “Front Side Exterior
Parts Removal and Installation in Section 9D in
related manual”.
• Install the front wheels. Refer to “Front / Rear Wheel
Removal and Installation in Section 2D in related
manual”.
• After installing these parts, adjust the toe. Refer to
“Toe Adjustment (LT-A750XP/ZK9) in Section 0B
(Page 0B-2)”.
Tie-rod / Tie-rod End Removal and Installation
(LT-A750XP/ZK9)
B931G46206013
WARNING
!
When using the tie-rod end remover, keep
clear of the tie-rod end because it may come
loose with some force and could strike you.
Removal
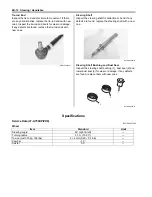
1) Remove the tie-rod end with the special tool. Refer
to “Front Wheel Hub / Steering Knuckle Removal
and Installation in Section 2B in related manual”.
Special tool
(A): 09942–72410 (Tie-rod end remover)
2) Remove the cotter pin, tie-rod end nut and washer.
3) Remove the steering arm plate (1) with a special
tool.
Special tool
(A): 09942–72410 (Tie rod end remover)
8
I931G3620020-01
(A)
I931G3620021-01
I931G3620022-01
1
(A)
I931H1620030-01
Summary of Contents for 2009 LT-A750XK9
Page 2: ......
Page 4: ......
Page 5: ...SUPPLEMENTS L LT A750XK9 09 MODEL 10 LT A750XPK9 09 MODEL 11 ...
Page 29: ...0A 15 General Information 99565 01010 013 CD ROM Ver 13 ...
Page 57: ...0B 28 Maintenance and Lubrication 09915 40610 Oil filter wrench Page 0B 12 Page 0B 12 ...
Page 68: ...0C 11 Service Data ...
Page 310: ...1K 5 Exhaust System ...
Page 482: ...4D 6 Parking Brake ...
Page 528: ...6B 13 Steering Handlebar ...
Page 581: ......


