Exterior Parts: 9D-11
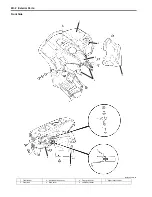
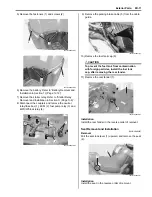
5) Remove the fasteners (1) and screws (2).
6) Remove the battery. Refer to “Battery Removal and
Installation in Section 1J (Page 1J-12)”.
7) Remove the starter relay. Refer to “Starter Relay
Removal and Installation in Section 1I (Page 1I-6)”.
8) Disconnect the couplers and remove the neutral
relay/fuse box (1), ECM (2), fuel pump relay (3) and
4WD/diff-lock relay (4).
9) Remove the parking brake cable (5) from the cable
guide.
10) Remove the fuel tank cap (6).
CAUTION
!
To prevent the fuel tank from contamination
with foreign particles, install the fuel tank
cap, after removing the rear fender.
11) Remove the rear fender (7).
Installation
Install the rear fender in the reverse order of removal.
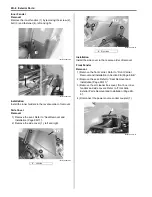
Seat Removal and Installation
B831G29406007
Removal
Pull the seat lock lever (1) upward, and remove the seat
(2).
Installation
Install the seat in the reverse order of removal.
1
2
I831G1940028-01
1
2
I831G1940029-01
1
3
2
4
I831G1940030-01
5
I831G1940031-01
6
7
I831G1940032-01
1
2
I831G1940033-01
Summary of Contents for 2009 LT-A750XK9
Page 2: ......
Page 4: ......
Page 5: ...SUPPLEMENTS L LT A750XK9 09 MODEL 10 LT A750XPK9 09 MODEL 11 ...
Page 29: ...0A 15 General Information 99565 01010 013 CD ROM Ver 13 ...
Page 57: ...0B 28 Maintenance and Lubrication 09915 40610 Oil filter wrench Page 0B 12 Page 0B 12 ...
Page 68: ...0C 11 Service Data ...
Page 310: ...1K 5 Exhaust System ...
Page 482: ...4D 6 Parking Brake ...
Page 528: ...6B 13 Steering Handlebar ...
Page 581: ......


