


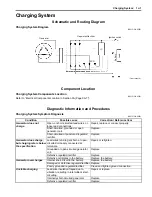


Charging System: 1J-3
Repair Instructions
Battery Current Leakage Inspection
B831G21A06001
Inspect the battery current leakage in the following
procedures:
1) Turn the ignition switch OFF.
2) Remove the seat. Refer to “Seat Removal and
Installation in Section 9D (Page 9D-11)”.
3) Disconnect the (–) battery lead wire.
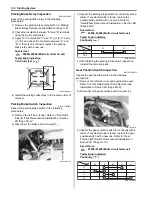
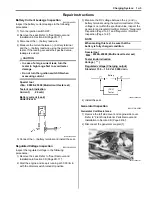
4) Measure the current between (–) battery terminal
and the (–) battery lead wire using the multi-circuit
tester. If the reading exceeds the specified value,
leakage is evident.
CAUTION
!
• In case of a large current leak, turn the
tester to high range first to avoid tester
damage.
• Do not turn the ignition switch ON when
measuring current.
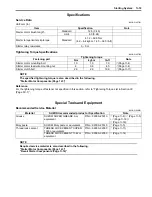
Special tool
: 09900–25008 (Multi-circuit tester set)
Tester knob indication
Current (
, 20 mA)
Battery current (Leak)
Under 2.6 mA
5) Connect the (–) battery terminal and install the seat.
Regulated Voltage Inspection
B831G21A06002
Inspect the regulated voltage in the following
procedures:
1) Remove the seat. Refer to “Seat Removal and
Installation in Section 9D (Page 9D-11)”.
2) Start the engine and keep it running at 5 000 r/min
with the dimmer switch turned HI position.
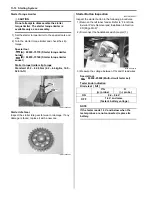
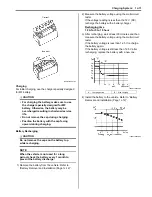
3) Measure the DC voltage between the (+) and (–)
battery terminals using the multi-circuit tester. If the
voltage is not within the specified value, inspect the
generator and regulator/rectifier. Refer to “Generator
Inspection (Page 1J-3)” and “Regulator / Rectifier
Inspection (Page 1J-8)”.
NOTE
When making this test, be sure that the
battery is fully charged condition.
Special tool
: 09900–25008 (Multi-circuit tester set)
Tester knob indication
Voltage (
)
Regulated voltage (Charging output)
Standard: 13.5 – 15.0 V at 5 000 r/min
4) Install the seat.
Generator Inspection
B831G21A06003
Generator Coil Resistance
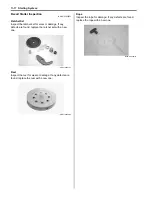
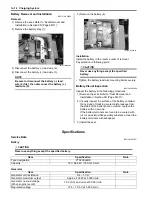
1) Remove the left side cover and engine side cover.
Refer to “Front Side Exterior Parts Removal and
Installation in Section 9D (Page 9D-6)”.
2) Disconnect the generator coupler (1).
I649G11A0002-02
(DCV)
Tester
Battery
I649G11A0003-02
1
I831G11A0001-01
Summary of Contents for 2009 LT-A750XK9
Page 2: ......
Page 4: ......
Page 5: ...SUPPLEMENTS L LT A750XK9 09 MODEL 10 LT A750XPK9 09 MODEL 11 ...
Page 29: ...0A 15 General Information 99565 01010 013 CD ROM Ver 13 ...
Page 57: ...0B 28 Maintenance and Lubrication 09915 40610 Oil filter wrench Page 0B 12 Page 0B 12 ...
Page 68: ...0C 11 Service Data ...
Page 310: ...1K 5 Exhaust System ...
Page 482: ...4D 6 Parking Brake ...
Page 528: ...6B 13 Steering Handlebar ...
Page 581: ......


