1D-39 Engine Mechanical:
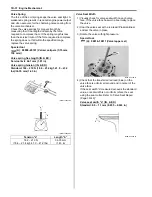
5) Cool down the new valve guides in a freezer for
about one hour and heat the cylinder head to 100 –
150
°
C (212 – 302
°
F) with a hot plate.
CAUTION
!
Do not use a burner to heat the valve guide
hole to prevent cylinder head distortion.
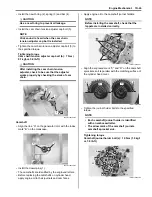
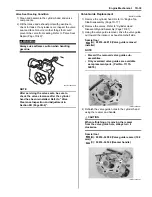
6) Apply engine oil to each valve guide and valve guide
hole.
7) Drive the guide into the guide hole using the valve
guide installer.
CAUTION
!
Failure to oil the valve guide hole before
driving the new guide into place may result in
a damaged guide or head.
Special tool
(A): 09916–44910 (Valve guide remover/
installer)
(D): 09916–57360 (Attachment)
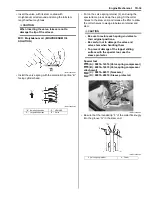
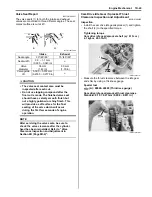
8) After installing the valve guides, refinish their guiding
bores using the reamer. Be sure to clean and oil the
guides after reaming.
Special tool
(C): 09916–34542 (Reamer handle)
(E): 09916–34550 (Valve guide reamer (5.5
mm))
NOTE
• Be sure to cool down the cylinder head to
ambient air temperature.
• Insert the reamer from the combustion
chamber and always turn the reamer
handle clockwise.
9) Reassemble the cylinder head. Refer to “Cylinder
Head Disassembly and Assembly (Page 1D-31)”.
10) Install the cylinder head assembly. Refer to “Engine
Top Side Assembly (Page 1D-21)”.
1. Cylinder head
“a”: IN.: 14.5 mm (0.57 in)
EX.: 12.5 mm (0.49 in)
“ a ”
(A)
(D)
1
I718H1140127-01
(A)
(D)
I831G1140168-01
(C)
(E)
I831G1140169-01
Summary of Contents for 2009 LT-A750XK9
Page 2: ......
Page 4: ......
Page 5: ...SUPPLEMENTS L LT A750XK9 09 MODEL 10 LT A750XPK9 09 MODEL 11 ...
Page 29: ...0A 15 General Information 99565 01010 013 CD ROM Ver 13 ...
Page 57: ...0B 28 Maintenance and Lubrication 09915 40610 Oil filter wrench Page 0B 12 Page 0B 12 ...
Page 68: ...0C 11 Service Data ...
Page 310: ...1K 5 Exhaust System ...
Page 482: ...4D 6 Parking Brake ...
Page 528: ...6B 13 Steering Handlebar ...
Page 581: ......


