Engine Mechanical: 1D-60
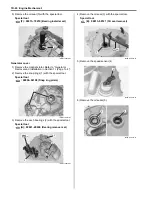
Conrod Deflection
Wear On the big end of the conrod can be estimated by
checking the movement of the small end of the rod. This
method can also check the extent of ware on the parts of
the conrod’s big end.
Special tool
(A): 09900–20701 (Magnetic stand)
(B): 09900–20607 (Dial gauge (1/100 mm, 10
mm))
(C): 09900–21304 (V-block (100 mm))
Conrod deflection
Service Limit: 3.0 mm (0.12 in)
Conrod Big End Side Clearance
1) Check the conrod big end side clearance with the
thickness gauge.
Special tool
(A): 09900–20803 (Thickness gauge)
Conrod big end side clearance
Service limit: 1.0 mm (0.04 in)
2) If the clearance exceeds the limit, replace the
crankshaft assembly and conrod with a new one.
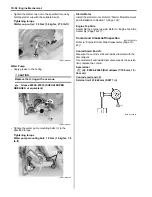
Crankshaft Runout
• Measure the crankshaft runout with V-blocks and dial
gauge.
NOTE
• Place the crankshaft onto the V-blocks so
that it becomes horizontally.
• Measure the runout from the tips of the
crankshaft.
Crankshaft runout
Service limit: 0.08 mm (0.003 in)
Special tool
(A): 09900–20607 (Dial gauge (1/100 mm, 10
mm))
: 09900–20701 (Magnetic stand)
: 09900–21304 (V-block (100 mm))
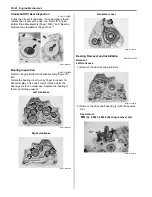
Width Between Crankshaft Webs
B831G21406036
Measure the width between crankshaft webs “a”.
Width between crankshaft webs “a”
Standard: 72.9 – 73.1 mm (2.87 – 2.88 in)
(A)
(B)
(C)
I831G1140293-01
(A)
I831G1140294-01
(A)
(A)
I705H1140241-01
“a”
I705H1140149-04
Summary of Contents for 2009 LT-A750XK9
Page 2: ......
Page 4: ......
Page 5: ...SUPPLEMENTS L LT A750XK9 09 MODEL 10 LT A750XPK9 09 MODEL 11 ...
Page 29: ...0A 15 General Information 99565 01010 013 CD ROM Ver 13 ...
Page 57: ...0B 28 Maintenance and Lubrication 09915 40610 Oil filter wrench Page 0B 12 Page 0B 12 ...
Page 68: ...0C 11 Service Data ...
Page 310: ...1K 5 Exhaust System ...
Page 482: ...4D 6 Parking Brake ...
Page 528: ...6B 13 Steering Handlebar ...
Page 581: ......

