3D-8 Propeller Shafts:
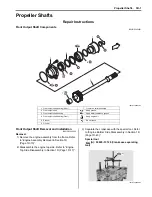
• Install the rear output shaft (1).
NOTE
Be sure to fit the C-ring (2) and bearing
knock-pin “A” on the bearing to the groove of
the crankcase.
• After installed rear output shaft, inspect the backlash
and tooth contact. Refer to “Rear Output Shaft Drive
Bevel Gear Shim Inspection and Adjustment
(Page 3D-11)”.
Rear Output Shaft Disassembly and Assembly
B831G23406007
Refer to “Rear Output Shaft Removal and Installation
(Page 3D-6)”.
Disassembly
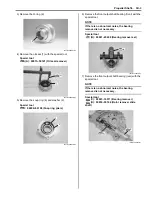
1) Using a chisel, unlock the nut. Remove the rear
output shaft nut.
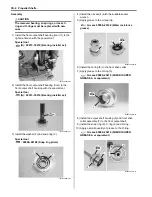
2) Remove the washer (1), rear output shaft driven
gear (2), bearing (3) and rear output shaft driven
bevel gear (4).
3) Remove the rear output shaft yoke (5) and oil seal
(6).
Refer to “Rear Propeller Shaft Removal and
Installation (Page 3D-17)”.
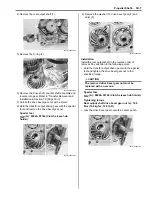
4) Remove the bearing (7) and shim (8).
1
“A”
2
I831G1340028-03
I831G1340031-05
1
3
4
2
I831G1340032-06
5
6
I831G1340029-03
7
8
I831G1340030-03
Summary of Contents for 2009 LT-A750XK9
Page 2: ......
Page 4: ......
Page 5: ...SUPPLEMENTS L LT A750XK9 09 MODEL 10 LT A750XPK9 09 MODEL 11 ...
Page 29: ...0A 15 General Information 99565 01010 013 CD ROM Ver 13 ...
Page 57: ...0B 28 Maintenance and Lubrication 09915 40610 Oil filter wrench Page 0B 12 Page 0B 12 ...
Page 68: ...0C 11 Service Data ...
Page 310: ...1K 5 Exhaust System ...
Page 482: ...4D 6 Parking Brake ...
Page 528: ...6B 13 Steering Handlebar ...
Page 581: ......


