


b)
Get rid of flammable or explosive objects such as propane-butane
lighters or matches before welding.
c)
Use face protection (helmet or shield) and eye protection with a filter
with a degree of darkness matched to the welder's vision and welding
current. The safety standards suggest a tint of No. 9 (minimum No. 8)
for any amperage below 300 amperes. Lower shielding tints may be
used if the arc covers the workpiece.
d)
Always use approved safety glasses with side shields under the helmet
or other shielding.
e)
Use a work area shield to protect others from glare or spatter.
f)
Always wear earplugs or other hearing protection to protect against
excessive noise and to prevent splatter from entering the ears.
g)
Bystanders should be warned before looking at an electric arc.
3.4.
PROTECTION AGAINST SHOCK
Electric shock can be fatal.
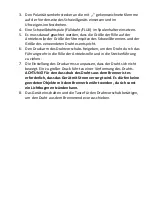
a)
Plug the power cord into the nearest outlet and arrange it in a
practical and safe manner. Avoid spreading the cable carelessly
around the room on an unstudied surface, which may result in electric
shock or fire.
b)
Contact with electrically charged parts may cause electric shock or
severe burns.
c)
The electric arc and the working area are electrically charged when
current flows.
d)
The input circuit and the internal current circuit of the unit are also
energized when the power is turned on.
e)
Do not touch electrically energized parts.
f)
Wear dry, lint-free, insulated gloves and protective clothing.
g)
Use insulating mats or other insulating coverings on the floor that are
large enough to prevent body contact with the object or floor.
h)
Do not touch the electric arc.
i)
Turn off electrical power before handling, cleaning, or replacing an
electrode.
j)
Ensure that the grounding cable is properly connected and that the
plug is properly connected to a grounded outlet. Improper grounding
of the unit may result in a risk to life or health.
k)
Regularly inspect current cables for damage or lack of insulation. A
damaged cable should be replaced. Careless repair of insulation may
result in death or personal injury.
Summary of Contents for Power2 S-MAG 180
Page 13: ...Hinteransicht ...
Page 14: ...Innenansicht 1 Anzeige Strom Spannung 2 Drehregler für Schweißspannung ...
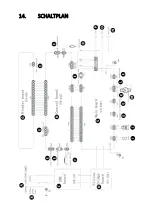
Page 29: ...14 SCHALTPLAN ...
Page 31: ...15 Explosionszeichnung Nr Beschreibung 1 Türriegel 2 Linke Abdeckung der Maschine Teil 1 ...
Page 47: ...5 2 MODEL S MAG 350D Front view Rear view ...
Page 48: ......
Page 49: ...Welding wire feeder ...
Page 50: ......
Page 83: ...5 OPIS URZĄDZENIA 5 1 MODELE S MAG 180 S MAG 200 Widok z przodu Widok z tyłu ...
Page 84: ...Widok wnętrza 1 Wyświetlacz natężenia napięcia 2 Pokrętło regulacji napięcia spawania ...
Page 89: ...Widok z tyłu ...
Page 90: ......
Page 91: ...Podajnik drutu spawalniczego ...
Page 92: ......
Page 125: ...Pohled zezadu ...
Page 126: ...Pohled dovnitř 1 Displej intenzity napětí 2 Ovladač pro nastavení svařovacího napětí ...
Page 139: ...14 ELEKTRICKÉ SCHÉMA ...
Page 141: ...15 Výkres sestavy Č Popis 1 Uzávěr dveří 2 Levý kryt zařízení 1 část ...
Page 152: ...5 DESCRIPTION DE L APPAREIL Vue de face Vue arrière ...
Page 166: ...14 SCHÉMA ÉLECTRIQUE ...
Page 168: ...15 Dessin d assemblage N Description 1 Fermeture de la porte ...
Page 179: ...5 DESCRIZIONE DEL DISPOSITIVO Vista frontale Vista posteriore ...
Page 193: ...14 SCHEMA ELETTRICO ...
Page 195: ...15 Esploso N Descrizione 1 Fermo della porta ...
Page 207: ...Vista interior 1 Indicador de intensidad voltaje 2 Regulador de la tensión de soldadura ...
Page 221: ...14 ESQUEMA ELÉCTRICO ...
Page 223: ...15 Dibujo de conjunto N Descripción 1 Pestillo de puerta 2 Cubierta izquierda de la máquina ...
Page 234: ...Hátsó nézet ...
Page 235: ...Belső nézet 1 Áram feszültség kijelzés 2 A hegesztő feszültségszabályozó gombja ...
Page 250: ...14 ELEKTROMOS DIAGRAM ...
Page 252: ...15 Szerelési rajz Nr Paraméter 1 Ajtózár 2 Bal oldali gépfedél 1 rész ...
Page 263: ...Udsigt bagfra ...
Page 264: ...Indvendig udsigt 1 Strøm spændingsdisplay 2 Knap til justering af svejsespænding ...
Page 277: ...14 ELEKRISK DIAGRAM ...
Page 279: ...15 Samlingstegning Nr Parameter 1 Dørlås 2 Venstre maskindæksel del 1 ...