3.
SAFETY OF USE
CAUTION!
Read all safety warnings and all instructions. Failure to
follow the warnings and instructions may result in electric shock, fire and/or
severe personal injury or death.
3.1.
GENERAL REMARKS
a)
Take care of your own safety and the safety of bystanders by carefully
reading and following the instructions in the unit manual.
b)
Only qualified personnel should be allowed to start up, use, service and
repair the unit.
c)
Do not misuse the unit.
3.2.
PREPARING THE WORK AREA FOR WELDING
WELDING CAN CAUSE A FIRE OR EXPLOSION.
a)
Observe occupational safety and health regulations for welding and
equip the work area with a suitable fire extinguisher.
b)
Welding in areas where flammable materials can be ignited is
prohibited.
c)
Do not weld in an atmosphere containing an explosive mixture of
flammable gases, vapours, mists or dusts with air.
d)
All flammable materials must be removed within a 12 m radius of the
welding area, or if this is not possible, the flammable materials must
be covered with a non-combustible cover.
e)
Take precautions against sparks and glowing metal particles.
f)
Be aware that sparks or hot metal splatter may pass through gaps or
openings in protective covers, shields or screens.
g)
Do not weld tanks or drums that contain or have contained flammable
substances. Do not weld in their vicinity either.
h)
Do not weld pressurized tanks, pressure piping or pressure
accumulators.
i)
Always ensure sufficient ventilation.
j)
Assume a stable position before welding.
3.3.
PERSONAL PROTECTIVE EQUIPMENT
Arc radiation can damage the eyes or skin of the body.
a)
When welding, wear clean, oil-free protective clothing made of non-
flammable and non-conductive material (leather, thick cotton),
leather gloves, high boots and a protective hood.
Summary of Contents for Power2 S-MAG 180
Page 13: ...Hinteransicht ...
Page 14: ...Innenansicht 1 Anzeige Strom Spannung 2 Drehregler für Schweißspannung ...
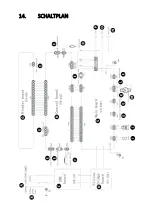
Page 29: ...14 SCHALTPLAN ...
Page 31: ...15 Explosionszeichnung Nr Beschreibung 1 Türriegel 2 Linke Abdeckung der Maschine Teil 1 ...
Page 47: ...5 2 MODEL S MAG 350D Front view Rear view ...
Page 48: ......
Page 49: ...Welding wire feeder ...
Page 50: ......
Page 83: ...5 OPIS URZĄDZENIA 5 1 MODELE S MAG 180 S MAG 200 Widok z przodu Widok z tyłu ...
Page 84: ...Widok wnętrza 1 Wyświetlacz natężenia napięcia 2 Pokrętło regulacji napięcia spawania ...
Page 89: ...Widok z tyłu ...
Page 90: ......
Page 91: ...Podajnik drutu spawalniczego ...
Page 92: ......
Page 125: ...Pohled zezadu ...
Page 126: ...Pohled dovnitř 1 Displej intenzity napětí 2 Ovladač pro nastavení svařovacího napětí ...
Page 139: ...14 ELEKTRICKÉ SCHÉMA ...
Page 141: ...15 Výkres sestavy Č Popis 1 Uzávěr dveří 2 Levý kryt zařízení 1 část ...
Page 152: ...5 DESCRIPTION DE L APPAREIL Vue de face Vue arrière ...
Page 166: ...14 SCHÉMA ÉLECTRIQUE ...
Page 168: ...15 Dessin d assemblage N Description 1 Fermeture de la porte ...
Page 179: ...5 DESCRIZIONE DEL DISPOSITIVO Vista frontale Vista posteriore ...
Page 193: ...14 SCHEMA ELETTRICO ...
Page 195: ...15 Esploso N Descrizione 1 Fermo della porta ...
Page 207: ...Vista interior 1 Indicador de intensidad voltaje 2 Regulador de la tensión de soldadura ...
Page 221: ...14 ESQUEMA ELÉCTRICO ...
Page 223: ...15 Dibujo de conjunto N Descripción 1 Pestillo de puerta 2 Cubierta izquierda de la máquina ...
Page 234: ...Hátsó nézet ...
Page 235: ...Belső nézet 1 Áram feszültség kijelzés 2 A hegesztő feszültségszabályozó gombja ...
Page 250: ...14 ELEKTROMOS DIAGRAM ...
Page 252: ...15 Szerelési rajz Nr Paraméter 1 Ajtózár 2 Bal oldali gépfedél 1 rész ...
Page 263: ...Udsigt bagfra ...
Page 264: ...Indvendig udsigt 1 Strøm spændingsdisplay 2 Knap til justering af svejsespænding ...
Page 277: ...14 ELEKRISK DIAGRAM ...
Page 279: ...15 Samlingstegning Nr Parameter 1 Dørlås 2 Venstre maskindæksel del 1 ...


