Using AP Quick Start to Initialize the Access Point
Installation and Configuration Guide, (CQW-AP108AG)
31
To connect to the AP using the web browser interface requires an IP connection to the AP network
and a computer with a browser capable of Secure Sockets Layer (SSL) connections. Follow these
steps:
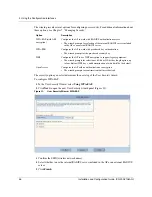
1
Launch the web browser.
a
If your network has a DHCP server, enter the DHCP-assigned address of the AP in the
address bar.
b
If your network does not use a DHCP server, assign the static address 192.168.1.1/24 to your
computer, and then enter
https://192.168.1.254
in the browser address bar.
2
Depending on the browser security settings, a security alert may open with a prompt on
whether to accept the PLANEX security certificate. Click
Yes
to accept the certificate and to
open the login panel.
3
In the login panel, enter or confirm the administrative user name, enter the password, select a
language, and click
OK
to open the web interface. The factory default for administrator access
is user name:
admin
. If the AP has not been initialized, the user name field is grayed out. The
factory default password is shipped with the AP on a paper insert. Use the password from the
insert to log in.
4
The system response at this point depends upon whether the AP has already been initialized.
a
If the AP has been initialized, the Home feature panel opens. See “The Home Panel” on
page 37.
b
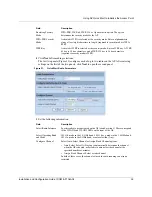
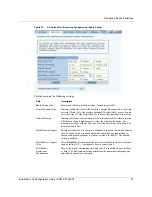
If the AP has not been initialized, the QuickStart Welcome panel opens. Use the QuickStart
panels, described in the next section, to quickly configure the AP.
Using AP Quick Start to Initialize the Access Point
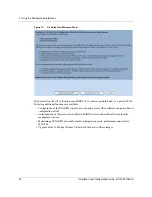
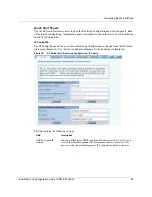
When accessing the web interface for the first time or after resetting the AP to factory defaults, the
Welcome panel of the AP Quick Start Wizard opens (Figure 18). From this panel, initialize the AP
in either of two roles:
•
Normal Access Point
•
Portal Access Point (NM Portal)
NOTE:
Each AP has DHCP enabled by default. If you are installing the AP on a
network that already has a DHCP server, enter the DHCP-assigned address of the AP to
access the web interface.
Summary of Contents for CQW-AP108AG
Page 2: ......
Page 13: ...Preface xiii Installation and Configuration Guide CQW AP108AG ...
Page 67: ...3 Using the Configuration Interfaces 54 Installation and Configuration Guide CQW AP108AG ...
Page 113: ...4 Configuring Radio Settings 100 Installation and Configuration Guide CQW AP108AG ...
Page 141: ...5 Configuring Networking Settings 128 Installation and Configuration Guide CQW AP108AG ...
Page 149: ...6 Configuring a Wireless Backhaul 136 Installation and Configuration Guide CQW AP108AG ...
Page 167: ...7 Managing Security 154 Installation and Configuration Guide CQW AP108AG ...
Page 177: ...8 Configuring Guest Access 164 Installation and Configuration Guide CQW AP108AG ...
Page 223: ...9 Managing the Network 210 Installation and Configuration Guide CQW AP108AG ...
Page 241: ...10 Maintaining the Access Point 228 Installation and Configuration Guide CQW AP108AG ...
Page 245: ...A Using the Command Line Interface 232 Installation and Configuration Guide CQW AP108AG ...
Page 247: ...B Regulatory and License Information 234 Installation and Configuration Guide CQW AP108AG ...
Page 289: ...C Alarms 276 Installation and Configuration Guide CQW AP108AG ...


