


ANEXO 1. SOFTWARE ESA S630
A38
- Enter the radius of the rolling (60.0) in the field “R”, touching with a finger on the field.
- Press
[Ok].
- Enter the length of the rolling pitch you want to obtain in the field “P”, touching with a finger on the field.
- Press
[Ok],
the next length will be drawn in automatic mode; the length that the data refer to will be
highlighted.
- Enter the length corresponding to the last length to be drawn (30.0) in the field “I” , touching with a finger
on the field.
- Press
[Ok],
the drawing has now been completed.
How to execute a Dutch Folding (hemming)
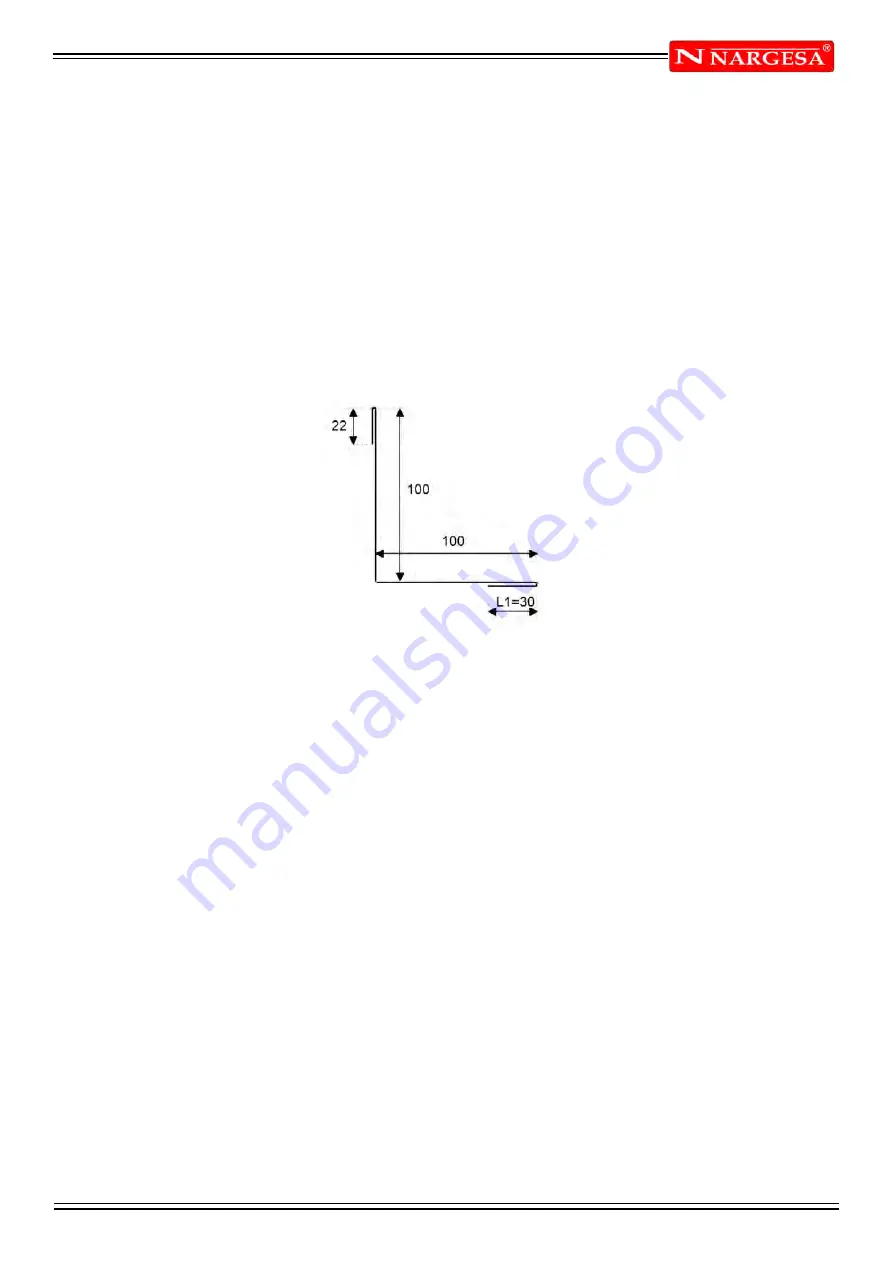
Let's suppose we have to draw the piece illustrated in the figure 32:
Figure 32 Example of Dutch Folding bend to be drawn
The cursor is located in the field “I” of the window for the polar setting of the drawing data.
- Enter the length of side L1 to be hemmed (30.0) in the field “l” , touching with a finger on the field.
- Press
[Ok].
- Press
[Dutch Folding].
- Enter the intermediate Dutch folding angle (e.g.: 45.0°) in the
“
alpha
”
field, touching with a finger on the
field.
- Press
[Ok],
the next length will be drawn in automatic mode; the length the data refer to will be highlighted.
- Enter the length of the side (100.0) in the field “I”, touching with a finger on the field.
- Press
[Ok],
the cursor will move onto the field
“
alfa
”
for setting the angle compared to the following length.
- Enter the value of the angle (-90.0°), touching with a finger on the field.
- Press
[Ok],
Enter the length of the side (100.0) in the field “I”, touching with a finger on the field .
- Press
[Ok].
- Press
[Dutch Folding].
- Enter the intermediate Dutch folding angle (e.g.: 45.0°) in the
alpha
field, touching with a finger on the field.
- Press
[Ok],
the next length will be drawn in automatic mode; the length the data refer to will be highlighted.
- Enter the length of the last side (22.0) in the field “I”, touching with a finger on the field. The drawing has
now been completed.
Summary of Contents for MP3003 CNC
Page 2: ...Thank you for choosing our machines www nargesa com...
Page 18: ...Annex 1 Software ESA S630...
Page 19: ......
Page 68: ...Annex 2 Technical data...
Page 69: ......
Page 71: ...ANEX 2 TECHNICAL DATA MP3003CNC B3 1 List of parts...
Page 72: ...ANEX 2 TECHNICAL DATA MP3003CNC B4...
Page 73: ...ANEX 2 TECHNICAL DATA MP3003CNC B5...
Page 74: ...ANEX 2 TECHNICAL DATA MP3003CNC B6...
Page 75: ...ANEX 2 TECHNICAL DATA MP3003CNC B7...
Page 76: ...ANEX 2 TECHNICAL DATA MP3003CNC B8...
Page 77: ...ANEX 2 TECHNICAL DATA MP3003CNC B9...
Page 78: ...ANEX 2 TECHNICAL DATA MP3003CNC B10...
Page 79: ...ANEX 2 TECHNICAL DATA MP3003CNC B11...
Page 80: ...ANEX 2 TECHNICAL DATA MP3003CNC B12 2 Hydraulic group...
Page 81: ...ANEX 2 TECHNICAL DATA MP3003CNC B13...
Page 82: ...ANEX 2 TECHNICAL DATA MP3003CNC B14...
Page 83: ...ANEX 2 TECHNICAL DATA MP3003CNC B15 3 Upper cylinder...
Page 84: ...ANEX 2 TECHNICAL DATA MP3003CNC B16...
Page 85: ...ANEX 2 TECHNICAL DATA MP3003CNC B17 4 Main cylinder...
Page 86: ...ANEX 2 TECHNICAL DATA MP3003CNC B18...
Page 87: ...ANEX 2 TECHNICAL DATA MP3003CNC B19 5 Electric box...
Page 88: ...ANEX 2 TECHNICAL DATA MP3003CNC B20 6 Control panel box...
Page 89: ...ANEX 2 TECHNICAL DATA MP3003CNC B21 7 Electric maps...
Page 90: ...ANEX 2 TECHNICAL DATA MP3003CNC B22...
Page 91: ...ANEX 2 TECHNICAL DATA MP3003CNC B23...
Page 92: ...ANEX 2 TECHNICAL DATA MP3003CNC B24...
Page 93: ...ANEX 2 TECHNICAL DATA MP3003CNC B25...
Page 94: ...ANEX 2 TECHNICAL DATA MP3003CNC B26...
Page 95: ...ANEX 2 TECHNICAL DATA MP3003CNC B27...
Page 96: ......
Page 98: ...Annex 3 Laser devices...
Page 99: ......
Page 109: ...ANNEX 3 LASER DEVICE C11 15 List of parts right laser...
Page 110: ...ANNEX 3 LASER DEVICE C12...
Page 111: ...ANNEX 3 LASER DEVICE C13...