[
VII
Control ]
- 68 -
HWE10060
GB
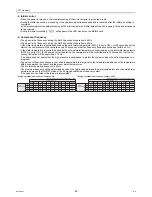
(2) Scheduled operation
Up to three sets of start/end times can be assigned for each day.
To operate the units according to the schedule, set the item code 5 to "1", and set the time for item codes 1 and 6
through 9.
Note
The operation schedule function will operate only when SWS1 is set to "REMOTE."
Setting procedures
Step 0
Set the ON/OFF
switch (SWS1) to
OFF.
Set SWS1 to OFF from the remote controller or with the local switch.
Settings cannot be changed unless the ON/OFF setting is set to OFF.
Step 1
Set the dip switches
SW2 and SW3.
Set the dip switches on the circuit board as follows before making the settings for the items
described in this section.
Step 2
Select the desired
item with the push
switch SWP3.
Item codes 1, 5 through 9, 18, and 19 relate to scheduled operation setting.
Set the item code to 1, and set the time for each of the relevant items.
Press the push switch SWP3 to select an item code.
Use the push switches SWP1 and SWP2 to change the value of the selected item.
The value will keep blinking while it is being changed.
Step 3
Press the push
switches SWP1 (↑)
or SWP2 (↓) to
increase or
decrease the value.
Step 4
Press the push
switch SWP3 to
save the change.
Press SWP3 once within one minute of changing the setting with SWP1 or SWP2 to save the
setting.
Once the new setting is saved, the display will stop blinking and stay lit. The display will, then,
return to the item code display mode.
If SWP3 is not pressed within one minute, the change will not be saved and the display will
return to the item code display mode.
SW2
SW3
-10
5
6
7
8
9
10
OFF
OFF
OFF
OFF
OFF
ON
OFF
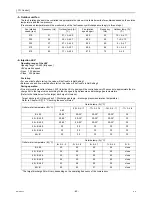
Settings table
Settable item
Item
code
Initial
value
Unit
Limits and increments
Increments
Lower limit
Upper limit
9
5
3
2
0
0
0
0
e
t
u
n
i
m
1
e
t
u
n
i
m
:
r
u
o
H
0
0
0
0
1
e
m
i
t
t
n
e
r
r
u
C
Enable or disable scheduled
operation (ON/OFF)
5
0
Enable: 1
Disable: 0
1
0
1
Operation start time 1
6
0000
Hour: minute
1 minute
0000
2359
Operation end time 1
7
0000
Hour: minute
1 minute
0000
2359
Operation start time 2
8
0000
Hour: minute
1 minute
0000
2359
Operation end time 2
9
0000
Hour: minute
1 minute
0000
2359
Operation start time 3
18
0000
Hour: minute
1 minute
0000
2359
Operation end time 3
19
0000
Hour: minute
1 minute
0000
2359
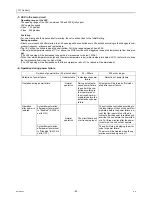
Note
A mode (preset temperatures) can be selected for each operation time period. See the next page
for how to make the settings.
Note
If Code 5 is set to "1," lock the remote controller's schedule function.
Summary of Contents for CAHV-P500YA-HPB
Page 1: ...Service Handbook Service Handbook CAHV P500YA HPB Model 2011 HOT WATER HEAT PUMP ...
Page 7: ...CONTENTS HWE10060 GB ...
Page 9: ... 2 HWE10060 GB ...
Page 19: ... 12 HWE10060 GB ...
Page 37: ... 30 HWE10060 GB ...
Page 46: ... 39 HWE10060 GB IV Remote Controller 1 Using the Remote Controller 41 2 Function Settings 46 ...
Page 47: ... 40 HWE10060 GB ...
Page 55: ... IV Remote Controller 48 HWE10060 GB ...
Page 56: ... 49 HWE10060 GB V Electrical Wiring Diagram 1 Electrical Wiring Diagram 51 ...
Page 57: ... 50 HWE10060 GB ...
Page 61: ... V Electrical Wiring Diagram 54 HWE10060 GB ...
Page 63: ... 56 HWE10060 GB ...
Page 67: ... VI Refrigerant Circuit 60 HWE10060 GB ...
Page 69: ... 62 HWE10060 GB ...
Page 101: ... VII Control 94 HWE10060 GB ...
Page 103: ... 96 HWE10060 GB ...
Page 109: ... VIII Test Run Mode 102 HWE10060 GB ...
Page 111: ... 104 HWE10060 GB ...
Page 155: ... IX Troubleshooting 148 HWE10060 GB ...
Page 156: ... 149 HWE10060 GB X Attachments 1 R407C saturation temperature table 151 ...
Page 157: ... 150 HWE10060 GB ...
Page 159: ... X Attachments 152 HWE10060 GB ...


