[
IV
Remote Controller ]
- 44 -
HWE10060
GB
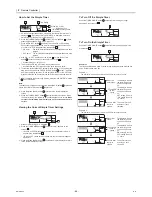
How to Set the Simple Timer
1. On the normal operation screen, make sure that the simple timer icon is
displayed (
). If anything other than “SIMPLE” is displayed, select the
simple timer by referring to 4.[4]-3(3) (page 47).
2. Press the TIMER MENU button
, so that “Set Up” appears (
). (Each
press toggles between “Set Up” and “Monitor”.)
3. Press the ON/OFF button
to display the current ON or OFF setting.
Each press toggles between the time remaining until the unit turns on or
off. (“ON” or “OFF” will appear in the area labeled
.)
• ON timer
The unit will start operation when the specified hours have
elapsed.
• OFF timer
The unit will stop operation when the specified hours have
elapsed.
4. With “ON” or “OFF” displayed on the screen (
), press the Set Time
button
to set the hours until the unit turns on or off (
).
• Available Range: 1 to 72 hours
5. To set both the ON and OFF times, repeat Steps 3 and 4.
* Note that ON and OFF times cannot be set to the same value.
6. To clear the current ON or OFF setting: Display the ON or OFF setting (see
step 3) and then press the CHECK (CLEAR) button
so that “-” appears
where the remaining time was. To use only the ON-timer or the OFF-timer,
make sure that the time setting for the timer that will not be used is set to
“-”.
7. After completing steps 3 through 6 above, press the CIR.WATER
button
to save the value.
Note:
The changes will not be saved unless the Mode (BACK) button
is pressed
before the CIR.WATER
button
is pressed.
8. Press the Mode (BACK) button
to return to the Normal Operation
screen.
9. Press the TIMER ON/OFF button
to start the timer countdown. When
the timer is running, the remaining time should appear on the screen.
Make
sure that the remaining time is displayed on the screen and that it is
correct.
Viewing the Current Simple Timer Settings
1. Make sure that “SIMPLE” is displayed (
).
2. Press the TIMER MENU button
, so that “Monitor” appears on the
screen (
).
• If the ON or OFF simple timer is running, the current timer value will
appear in the area labeled
.
• If ON and OFF values have both been set, the two values will appear
alternately.
3. Press the Mode (BACK) button
to close the monitor display and return
to the Normal Operation screen.
To Turn Off the Simple Timer
Press the TIMER ON/OFF button
so that the timer setting no longer
appears on the screen (at
).
To Turn On the Simple Timer
Press the TIMER ON/OFF button
so that the timer setting appears in the
area labeled
.
Examples
The two examples below show how the screen will appear when both the ON-
and Off- timers have been set.
Example 1:
The ON-timer is set to 3 hours, and the OFF-timer is set to 7 hours.
Example 2:
The ON-timer is set to 5 hours, and the OFF-timer is set to 2 hours.
ON
Hr
AFTER
SIMPLE
2
4
3
1
Action (On or Off)
*
“– –” will appear if no
temperature settings have
been made.
Time Setting
1
2
3
3
4
N
O
R
E
M
I
T
OFF
Hr
AFTER
SIMPLE
1
6
5
Timer Setting
1
5
6
7
˚C
˚C
SIMPLE
7
7
˚C
˚C
ON
Hr
AFTER
SIMPLE
7
ON
Hr
AFTER
SIMPLE
˚C
˚C
OFF
Hr
AFTER
SIMPLE
SIMPLE
When the
timer starts
7 hours after
the timer
started
2 hours after
the timer
started
The display will show
the remaining hours
until the unit will turn
on.
OFF setting (7 hours)
- ON setting (3 hours)
= 4 hours.
The unit will turn off
and stay off until
restarted.
The display will show
the remaining hours
until the unit will turn
off.
˚C
˚C
OFF
Hr
AFTER
SIMPLE
ON
Hr
AFTER
SIMPLE
˚C
˚C
SIMPLE
When timer
starts
5 hours after
the timer
started
2 hours after
the timer
started
The display will show
the remaining hours
until the unit will turn
on.
ON-setting (5 hours) -
OFF-setting (2 hours)
= 3 hours.
The unit will turn on
and stay on until
turned off.
The display will show
the ramaining hours
until the unit will turn
off.
12
1
11
4
10
2
4
2
9
12
2
9
9
Summary of Contents for CAHV-P500YA-HPB
Page 1: ...Service Handbook Service Handbook CAHV P500YA HPB Model 2011 HOT WATER HEAT PUMP ...
Page 7: ...CONTENTS HWE10060 GB ...
Page 9: ... 2 HWE10060 GB ...
Page 19: ... 12 HWE10060 GB ...
Page 37: ... 30 HWE10060 GB ...
Page 46: ... 39 HWE10060 GB IV Remote Controller 1 Using the Remote Controller 41 2 Function Settings 46 ...
Page 47: ... 40 HWE10060 GB ...
Page 55: ... IV Remote Controller 48 HWE10060 GB ...
Page 56: ... 49 HWE10060 GB V Electrical Wiring Diagram 1 Electrical Wiring Diagram 51 ...
Page 57: ... 50 HWE10060 GB ...
Page 61: ... V Electrical Wiring Diagram 54 HWE10060 GB ...
Page 63: ... 56 HWE10060 GB ...
Page 67: ... VI Refrigerant Circuit 60 HWE10060 GB ...
Page 69: ... 62 HWE10060 GB ...
Page 101: ... VII Control 94 HWE10060 GB ...
Page 103: ... 96 HWE10060 GB ...
Page 109: ... VIII Test Run Mode 102 HWE10060 GB ...
Page 111: ... 104 HWE10060 GB ...
Page 155: ... IX Troubleshooting 148 HWE10060 GB ...
Page 156: ... 149 HWE10060 GB X Attachments 1 R407C saturation temperature table 151 ...
Page 157: ... 150 HWE10060 GB ...
Page 159: ... X Attachments 152 HWE10060 GB ...


